Distribution List in Outlook: Create and Manage Easily
Mastering distribution lists in Outlook can transform how you manage internal and external communication. Learn how to build, use, and optimize these lists to save time, reduce errors, and streamline your email outreach.
Creating distribution lists in Outlook provides a powerful solution for streamlining mass email communication, whether you’re coordinating with team members, departments, or external partners. Instead of manually adding multiple recipients to each email, a distribution list allows you to group contacts under a single name, saving valuable time and reducing the risk of overlooking important stakeholders.
Outlook offers robust and user-friendly tools for creating, managing, and utilizing these lists. Whether you need to reach your immediate team or maintain regular communication with clients, Outlook’s distribution list features accommodate both internal and external contacts with equal efficiency. The platform’s intuitive interface makes it accessible even for those without advanced technical skills.
This article will guide you through the process of quickly creating and effectively managing distribution lists in Outlook. We’ll help you navigate potential pitfalls and understand the limitations of this feature, ensuring you can maximize its benefits while avoiding common mistakes.
What Is a Distribution List in Outlook and Why Do You Need It
In this section, we’ll explore what a distribution list is within Microsoft Outlook, how it differs from a contact group, and examine the various practical applications that make distribution lists an essential tool for efficient communication in both business and personal contexts.
Understanding distribution lists
A distribution list (also called a distribution group) in Outlook is a collection of email addresses grouped under a single name. Instead of manually adding multiple recipients each time you send an email to the same group, you can simply address your message to the distribution list name. This streamlines communication and ensures consistency when emailing regular groups of people. For example, instead of individually selecting 15 team members for your weekly update, you can send your message to a “Marketing Team” distribution list with one click.
Distribution lists vs. Contact groups: Key Differences
While they serve similar purposes, distribution lists and contact groups have important distinctions:
Contact Group:
- Created locally by individual users in Outlook (desktop only)
- Exists only in your personal mailbox unless shared
- Only you can view, use, and edit it
- Changes are not visible to others
- Best for personal or small team use (e.g., “Family” or “Friends”)
Distribution List (Microsoft 365 Group or Mail-Enabled Security Group):
- Created and managed centrally by your organization’s IT admin in Microsoft 365 or Exchange
- Available to all users within the organization
- Can include permissions, moderation, and delivery management
- Updates are global and reflect for all users automatically
- Ideal for teams, departments, or organization-wide communications
📝 Note: In Microsoft 365, many “distribution lists” have been replaced or upgraded to Microsoft 365 Groups, which offer additional collaboration tools like shared calendars, SharePoint sites, and Teams integration.
👉 We’ll go over differences between contact groups and distribution lists in more detail in a later section.
Practical applications of distribution lists
Distribution lists have numerous applications across various scenarios:
Internal teams and departments:
- “Marketing@company.com” for all marketing team communications
- “Finance@company.com” for financial department updates
- “HR@company.com” for human resources announcements
Project Teams:
- “ProjectAlpha@company.com” for specific project communications
- “ProductLaunch2025@company.com” for coordinating product releases
- “WebsiteRedesign@company.com” for website development updates
Client Communications:
- “PremiumClients@company.com” for VIP customer newsletters
- “RetailPartners@company.com” for retail network updates
- “Subscribers@company.com” for regular product updates
Training and Events:
- “LeadershipTraining@company.com” for executive development programs
- “TechWorkshop@company.com” for IT training participants
- “AnnualConference@company.com” for event planning and coordination
Management Communication:
- “ExecutiveTeam@company.com” for leadership discussions
- “RegionalManagers@company.com” for territory management
- “DepartmentHeads@company.com” for cross-functional alignment
Temporary Work Groups:
- “OfficeRelocation@company.com” for move coordination
- “InventoryAudit@company.com” for seasonal inventory checks
- “BudgetPlanning2026@company.com” for annual budget processes
Support and Service:
- “TechSupport@company.com” for IT assistance
- “CustomerService@company.com” for customer inquiries
- “Maintenance@company.com” for facility issues
Company-Wide Communications:
- “AllEmployees@company.com” for organization-wide announcements
- “NewHires@company.com” for onboarding communications
- “CompanyUpdates@company.com” for general news and information
Organizations can significantly improve communication efficiency, ensure message consistency, and maintain appropriate information flow throughout the company and with external stakeholders when they implement distribution lists for these various purposes.
Distribution Lists vs. Contact Groups in Outlook: Understanding the Differences
When managing group communications in Outlook, the terminology can be confusing. This section clarifies the distinctions between Contact Groups, Distribution Lists, and Microsoft 365 Groups, explaining their different purposes and helping you choose the right option for your needs.
- Contact Groups (Personal Groups in Outlook Desktop)
A Contact Group in Outlook Desktop is a personal group of email addresses grouped under one name for simplified communication. When you send an email to a contact group, it goes to all listed members. Contact Groups are stored in your mailbox and visible only to you. They are ideal for small, personal use cases like “Family” or “Project Alpha.”
- Distribution Lists (Exchange Distribution Groups)
A Distribution List, also known as an Exchange Distribution Group, is a centrally managed group created by your IT department in Microsoft 365 or Exchange. These are ideal for sending broadcast messages to large groups, such as departments or company-wide lists. They appear as a single recipient in the Global Address List (GAL) and can be configured with advanced controls like sender permissions and moderation.
Key characteristics:
- Managed centrally by admins
- Appear in the GAL
- Primarily email-only (no shared resources)
- Suitable for large or formal group messaging
- Microsoft 365 Groups (Collaborative Workspaces)
A Microsoft 365 Group is a modern solution for team collaboration. When you create a Microsoft 365 Group, members gain access to a shared mailbox, calendar, document library, planner, and more. These groups are ideal for teams that need to collaborate regularly.
Shared resources include:
- A shared inbox
- A shared calendar
- A SharePoint document library
- A shared OneNote notebook
- Guest access for external collaborators
- Integration with Microsoft Teams and Planner
Here are the key differences between all types of groups:
| Feature | Contact Group | Distribution List | Microsoft 365 Group |
| Created by | Individual user | Admin | User (or Admin) |
| Visibility | Personal | Org-wide | Org-wide |
| Collaboration tools | No | No | Yes |
| Appears in GAL | No | Yes | Yes |
| Best for | Small, personal lists | Broadcast emails | Team collaboration |
Here’s how to choose the right option for your needs:
- Use a Contact Group when: You want a personal, simple group for sending emails to a small set of people.
- Use a Distribution List when: You need to send messages to a large group with no collaboration features.
- Use a Microsoft 365 Group when: Your team needs shared tools like calendars, file libraries, and a shared inbox.
As of April 2025, there haven’t been significant updates to the functionality of distribution lists in Outlook, suggesting they remain a straightforward tool for email distribution without new features. The more substantial developments in recent years have focused on enhancing Microsoft 365 Groups with additional collaboration capabilities.
How to Create a Distribution List in Outlook?
This section provides step-by-step instructions for creating email groups in different versions of Outlook. Whether you’re using the desktop application on Windows or Mac, or accessing Outlook through your web browser, we’ll guide you through the process of setting up your first email group (also called a contact group or contact list, depending on the version).
In the desktop version of Outlook (Outlook desktop & Mac)
Creating a distribution list in the desktop version of Outlook is straightforward, though the exact steps vary slightly between Windows and Mac platforms. Follow these instructions to set up your distribution list quickly and efficiently.
For Windows users:
- Open Outlook and click on the People icon at the bottom of the navigation pane (or press Ctrl+3).
- In the Home tab of the ribbon, click on New Contact Group (in some versions, it may be labeled as “New Distribution List”).
- A new window will open. Enter a descriptive name for your distribution list in the Name field (e.g., “Marketing Team” or “Project Alpha”).
- Click on the Add Members button, then select one of the following options:
- From Outlook Contacts – to add people already in your address book
- From Address Book – to select from your organization’s address book
- New Email Contact – to add someone not in your contacts
- If selecting from contacts or address book, a dialog box will open. Select the contacts you want to include by clicking on names (hold Ctrl to select multiple names at once).
- Click Members -> button, then click OK when you’ve selected all desired contacts.
- Repeat steps 4-6 until you’ve added all members to your distribution list.
- When finished, click Save & Close in the ribbon.
For Mac users:
- Open Outlook and click on the People icon in the navigation bar at the bottom of the screen.
- Click the Home tab in the ribbon, then click New Contact List.
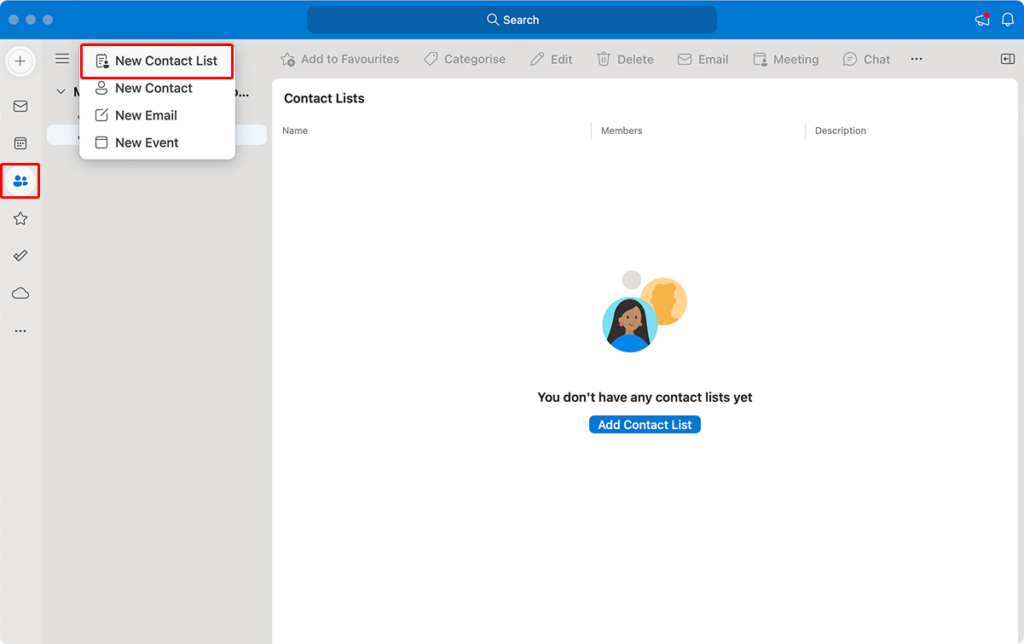
- In the new window that appears, enter a name for your distribution list in the Group Name field.
- To add members, click the Add Members button, then choose:
- From Address Book: to select existing contacts
- New Email Contact: to add someone new
- If selecting from address book, find and select contacts (hold Command key to select multiple contacts).
- Click Add to include them in your group.
- Repeat until all members are added, then click Save & Close.
In Outlook Web
Creating a distribution list in the web version of Outlook is equally straightforward, though the interface differs from the desktop applications. Here’s how to create a distribution list when accessing Outlook through your web browser.
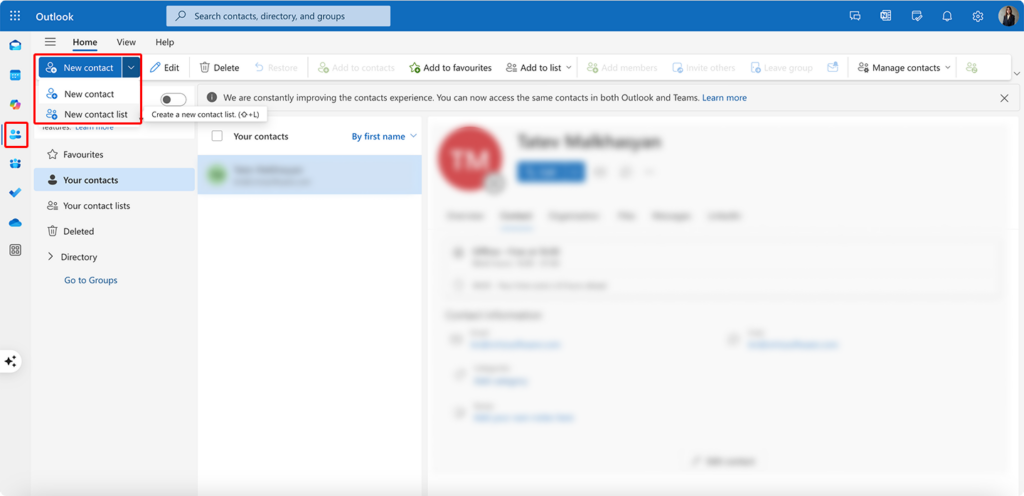
- Sign in to your Outlook account at outlook.office.com.
- On the left-side panel select People.
- In the People view, click New contact list in the toolbar (if you don’t see this option, click on New first, then select Contact list).
- A new panel will open. Enter a descriptive name for your distribution list in the List name field.
- In the Add members section, start typing a contact’s name or email address. Outlook will show matching contacts from your address book.
- Select the appropriate contact from the dropdown suggestions.
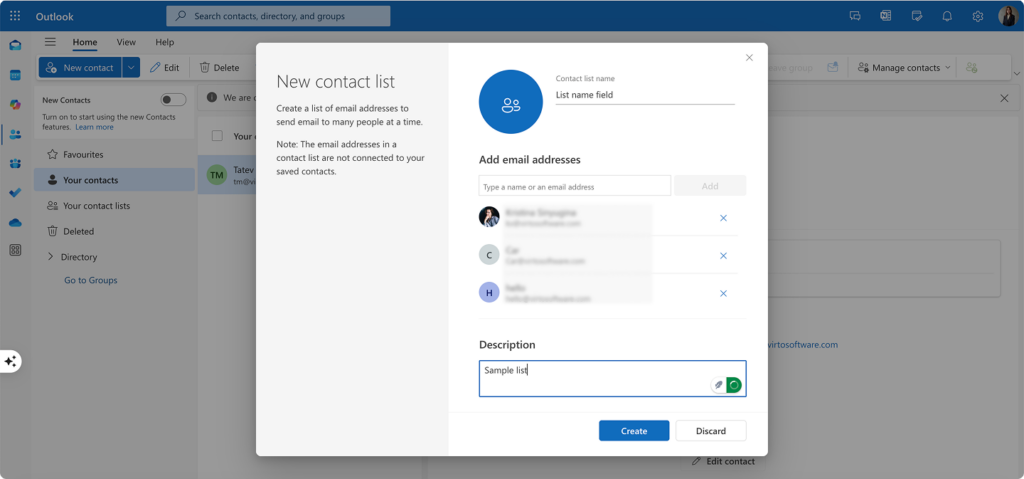
- Continue adding members by typing additional names or email addresses.
- To remove someone from the list, hover over their name and click the X that appears.
- When you’ve added all members, click Create or Save at the bottom of the panel.
- Your new distribution list will now appear in your contacts and can be used when addressing emails.
With your distribution list now created, you can easily send emails to the entire group by simply typing the list name in the “To” field when composing a new message. In the next section, we’ll explore how to manage and modify your distribution lists effectively.
Setting Up and Managing Group Email Lists in Outlook and Microsoft 365
Once you’ve created your email group—whether it’s a personal Contact Group, a Microsoft 365 Group, or an Exchange Distribution List—ongoing management is essential to ensure the group remains accurate, up-to-date, and useful. This section outlines how to add or remove members, assign group ownership where applicable, delete groups when they’re no longer needed, and apply best practices to maintain list integrity and effectiveness.
Adding and removing members
Keeping your group membership current is key to avoiding communication gaps and ensuring the right people receive relevant information.
✅ For Contact Groups in Outlook Desktop (Personal):
- Go to the People or section in Outlook.
- Open the group by double-clicking it.
- Use Add Members or Remove Member to update the list.
- Click Save & Close when done.
🔒 Only the user who created the group can view or edit it.
✅ For Contact Lists in Outlook on the Web:
- Sign in to Outlook on the web.
- Click People in the app launcher.
- Under Your contact lists, select the list to edit.
- Click Edit (pencil icon).
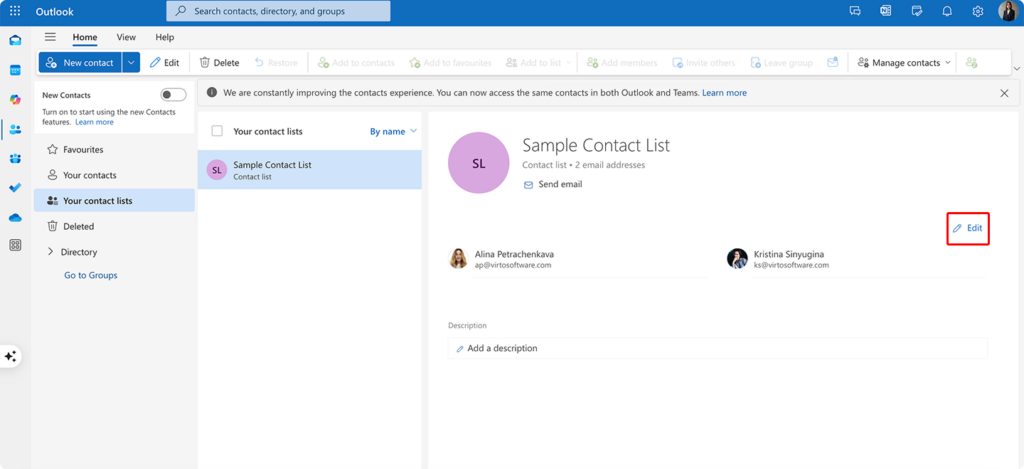
- Add members by typing names or email addresses.
- Remove members by clicking the X next to their name.
- Click Save to apply changes.
✅ For Microsoft 365 Groups or Exchange Distribution Lists (Admin-managed):
- Sign in to the Microsoft 365 Admin Center: admin.microsoft.com
- Go to Groups > Active groups.
- Select the group you want to manage.
- Click the Members tab, then choose View all and manage members.
- Use options to Add or Remove individuals as needed.
🔐 Editing Microsoft 365 Groups or Exchange DLs typically requires admin rights or owner permissions.
Assigning group owners (Microsoft 365 Groups or Exchange Distribution Lists)
Assigning group owners helps distribute management responsibilities and avoids IT bottlenecks. Owners can maintain group membership, configure settings, and—if moderation is enabled—approve messages.
🔧 Owners can:
- Add or remove members
- Control who can send to the group
- Moderate message delivery
- Manage group privacy and properties
🛠️ To assign owners (Admins only):
- Open the Microsoft 365 Admin Center.
- Go to Groups > Active groups.
- Select the group > click on the Owners tab.
- Click Manage owners > then Add owners.
- Search and select users to assign ownership.
- Click Save to confirm.
✅ It’s best to assign at least two owners for continuity in case one is unavailable.
Deleting groups or lists
When a group is no longer needed—such as after a project ends or a team is restructured—it’s important to delete it to keep your directory clean and avoid confusion.
🗑️ For Contact Groups (Personal):
- Open the group in Outlook Desktop.
- Right-click and select Delete, or press Delete on your keyboard.
🗑️ For Microsoft 365 Groups:
- Admins or owners (if allowed) can delete the group:
- In the Microsoft 365 Admin Center, or
- In Outlook on the Web > open the group > Settings > Delete group
🗑️ For Exchange Distribution Lists:
- Only administrators can delete:
- Go to Admin Center > Groups > Active Groups
- Select the group > click Delete (trash icon)
- Confirm the deletion when prompted
⚠️ Deletion is permanent. Before deleting, notify members, check for any automated workflows that depend on the group, and archive member details if needed.
Best practices for group management
To keep your group email lists well-organized, secure, and effective, it’s important to implement thoughtful governance and maintenance practices. Below are recommended best practices to help you manage Contact Groups, Microsoft 365 Groups, and Exchange Distribution Lists efficiently:
- Audit quarterly
Review each group at least once per quarter to ensure accuracy and relevance. Remove users who are no longer part of the team or project, and add new members who need access. Regular audits prevent miscommunication, reduce unnecessary email traffic, and ensure compliance with data privacy policies.
- Use clear naming conventions
Establish consistent naming patterns that reflect the group’s purpose and make it easy to identify in the address book. Examples include:
DEPT-Marketing-Global
PROJ-WebsiteRedesign-2025
EVENT-AnnualSummit
This improves searchability, supports automation, and helps users avoid sending emails to the wrong group.
- Write clear descriptions
Each group should have a meaningful description that explains:
- The group’s purpose
- Who should be a member
- Appropriate use cases (e.g., announcements only, open discussion, etc.)
Clear descriptions help new members and other users identify the right group for their communication needs.
- Assign multiple owners
Every group should have at least two owners to ensure continuity in management. If one owner is unavailable or leaves the organization, the other can still update membership, approve messages (if moderation is enabled), or make necessary changes. This prevents administrative bottlenecks and ensures the group remains functional.
- Enable moderation for large or sensitive groups
For organization-wide or high-impact groups (e.g., AllEmployees, ExecutiveTeam), enable message moderation. This allows designated reviewers (usually group owners or admins) to approve or reject messages before they’re delivered. Moderation helps prevent accidental “reply-all” storms and ensures only appropriate content is broadcast to large audiences.
- Mark temporary groups
For short-term initiatives or projects, include an expiration date or tag in the group name or description. Example:
PROJ-Migration2025-Q2
TEMP-HiringCommittee-April2025
This signals that the group is time-bound and reminds admins to review or delete it when no longer needed.
- Create offboarding workflows
As part of your employee or contractor offboarding process, ensure that departing users are removed from all relevant groups. This:
- Prevents ongoing access to sensitive communications
- Reduces clutter in group membership
- Ensures accurate communication targeting
Automating this process through identity governance tools (if available) is recommended.
- Use prefixes and categories
Group similar lists together using consistent prefixes or categories. For example:
DEPT– for departmentsPROJ– for projectsTEAM– for working groupsTEMP– for temporary or seasonal lists
This makes it easier to manage and search groups, especially in organizations with hundreds of lists.
- Avoid auto-forwarding sensitive data
Be cautious when setting up automatic forwarding rules to external addresses or personal inboxes. This can pose data privacy and compliance risks. Ensure that:
- Auto-forwarding follows internal policies
- Sensitive information is protected
- External forwarding is disabled unless explicitly permitted by IT
By applying these best practices consistently, organizations can maintain high-quality, secure, and efficient group communication systems that scale as the business grows.
Creating a Distribution List with External Members
Whether you’re coordinating with clients, vendors, freelancers, or partners, it’s often necessary to include external email addresses in your group communications. This section explains how to incorporate external contacts into personal Contact Groups in Outlook and Microsoft 365 Groups with guest access.
Adding external email addresses to a Contact Group (Outlook Desktop)
Outlook Desktop allows you to include external members (people outside your organization) in Contact Groups—personal email groups stored in your mailbox.
✅ To add external contacts:
- Open Outlook Desktop and go to the People section (or press Ctrl + 3).
- Create a new Contact Group using New Contact Group, or double-click an existing one.
- In the Contact Group window, click Add Members > New E-mail Contact.
- In the pop-up window:
- Enter the person’s display name.
- Enter their email address (e.g., Gmail, Yahoo, or client domain).
- (Optional) Choose a contact folder to save this address.
- Click OK to add the external contact to the group.
- Repeat steps 3–5 for each external member.
- Click Save & Close to update the group.
✅ Tip: You don’t need to create full Outlook contacts for each external user. You can simply add their email addresses directly into the group.
If the external contact already exists in your address book, you can choose Add Members > From Outlook Contacts and select them from the list.
Adding external members (Guests) to Microsoft 365 Groups
Microsoft 365 Groups offer richer collaboration tools and allow guest access for external users—if your organization’s policies permit it.
✅ From Outlook on the Web (for group owners):
- Go to Outlook on the web.
- Click the Groups icon in the left navigation panel.
- Select the group you want to add external members to.
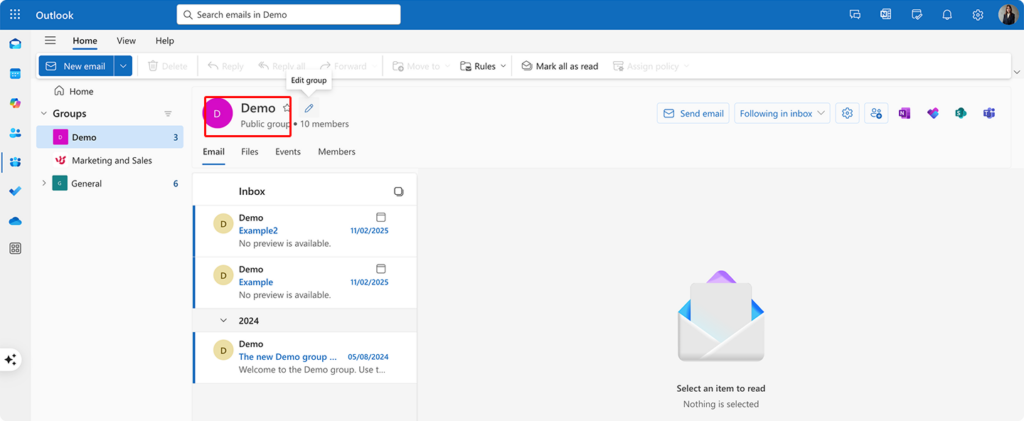
- Click the More options (three dots) > Settings > Members. Alternatively, locate and click the group name at the top of the interface to access its settings.
- Click Add members.
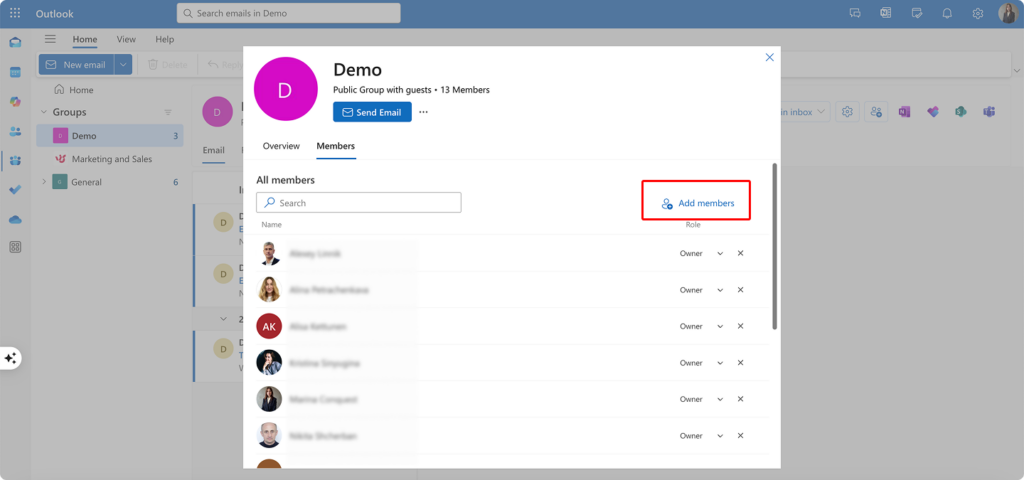
- Type the full email address of the external user.
- When prompted, select Add as guest.
- (Optional) Add a personal message.
- Click Add to send an invitation.
📧 The external user will receive an invitation email and must accept it to gain access to the group’s resources.
Guests will have a label like (Guest) next to their name in the member list.
✅ From the Microsoft 365 Admin Center (for admins):
- Sign in to the Microsoft 365 Admin Center.
- Go to Groups > Active groups.
- Select the Microsoft 365 Group you want to manage.
- Go to the Members tab > click View all and manage members.
- Click Add members > type the full email of the external user.
- Choose Add as guest when prompted.
- Click Save to send the invitation.
Admin: Enable or restrict guest access to groups
To allow or restrict guest access across all Microsoft 365 Groups:
- Go to Admin Center > Settings > Org settings.
- Click Services > Microsoft 365 Groups.
- Under Guest access, configure:
- ✅ Allow group owners to add guests
- ✅ Allow guests to access group content
- Click Save changes.
Guest access limitations
External members added to Microsoft 365 Groups (guests) have limited access compared to internal users:
- They cannot browse your organization’s address book.
- They only see content shared in the group(s) they’re invited to.
- They cannot create or manage groups.
- Access to certain features (like Planner) may vary based on tenant settings.
These restrictions help maintain data security while still enabling collaboration with people outside your organization.
🛡️ Always verify with your IT department whether guest access is permitted in your Microsoft 365 tenant before adding external users.
How to Create a Shared Distribution List in Outlook
When multiple team members need to communicate with the same group of people or represent a department or function rather than themselves as individuals, a shared distribution list provides the perfect solution. This section explores how to set up and use shared distribution lists in Outlook and Microsoft 365, allowing teams to collaborate on communications efficiently.
What is a shared distribution list?
In the Microsoft 365 ecosystem, a shared distribution list typically refers to a centrally managed, mail-enabled group—formally known as a Distribution Group—that allows multiple users to send and receive messages using a single group email address (e.g., support@company.com). These lists are managed by IT administrators through the Microsoft 365 Admin Center or Exchange Admin Center, and they appear in the Global Address List (GAL), making them accessible to everyone in the organization.
Unlike personal contact groups (which are private to the user who created them), shared distribution lists are organization-wide, centrally governed, and can be configured with delegated owners for easier maintenance.
Key characteristics of shared distribution lists include:
- Centralized communication: Messages sent to the list are automatically distributed to all members’ individual inboxes.
- Shared identity: Teams can send and receive emails using a shared address, helping present a unified brand or functional identity.
- Organizational visibility: The list is published in the address book and searchable by all users.
- Flexible management: Multiple owners can be assigned to manage membership, permissions, and settings without relying solely on IT admins.
- Security controls: Permissions can be configured for who can send to or manage the list, including message moderation and external sender restrictions.
Distribution Lists vs. Microsoft 365 Groups
Although we’ve highlighted the differences between lists and different types of groups above, here’s another comparison of how they differ from one another:
| Feature | Distribution Group (Classic) | Microsoft 365 Group |
| Primary Purpose | Email distribution | Team collaboration + email |
| Shared Mailbox | ❌ No | ✅ Yes |
| Calendar | ❌ No | ✅ Yes |
| File Storage (SharePoint) | ❌ No | ✅ Yes |
| Planner, Teams Integration | ❌ No | ✅ Yes |
| Send As / Send on Behalf | ✅ Supports configuration | ✅ Supported |
| External Access (Guests) | ❌ Limited (via mail forwarding only) | ✅ Full guest collaboration support |
| Best For | Simple group email communication | Teams that need shared tools and collaboration |
Here’s when to choose each:
Use a Distribution Group when
- You only need to send messages to a list of recipients.
- You want a simple communication channel without collaboration tools.
- You need precise control over send permissions and message approval.
Use a Microsoft 365 Group when
- Your team collaborates on emails, files, calendars, and tasks.
- You want to integrate with tools like Teams, Planner, or SharePoint.
- You need a persistent shared workspace beyond just email.
🔐 Important note on terminology: While many users refer to these as “shared distribution lists,” Microsoft officially calls them Distribution Groups or Mail-Enabled Security Groups (depending on usage). The term “shared” is often used informally to emphasize that multiple users can send from or manage the group collaboratively.
How to create a shared distribution list in Microsoft 365:
Creating a shared distribution list—technically referred to as a Distribution Group—requires administrator privileges and is done through the Microsoft 365 Admin Center. These groups allow centralized email communication under a single address (e.g., support@company.com) and are visible in your organization’s Global Address List (GAL).
Here’s how to create one step by step:
- Access the admin center
- Go to admin.microsoft.com and sign in using an administrator account.
- Navigate to groups
- In the left-hand navigation, go to Teams & groups > Active teams & groups.
- Add a new group
- Click Add a group.
- When prompted, select Distribution as the group type, then click Next.
- Enter basic group details
- Name: Give the group a descriptive name (e.g., Customer Support Team).
- Email address: Choose the email prefix for the list (e.g., support).
- Description: Briefly describe the group’s purpose (helps with search and governance).
- Click Next.
- Assign owners
- Add one or more group owners who will manage membership and settings.
- It’s best practice to assign at least two owners for continuity.
- Click Next.
- Add members
- Select the users (internal only) who will receive emails sent to this distribution list.
- You can add individuals or existing groups.
- Click Next.
- Review and create
- Double-check all settings.
- Click Create group to finish.
- (Optional but Recommended): Configure advanced settings—After the group is created, return to its settings to fine-tune access and behavior:
- Settings to consider:
- Allow external senders: Enable this if people outside your organization need to email the list.
- Message approval: Enable moderation for large or sensitive lists.
- Hide from address lists: Useful for backend automation groups or security-focused lists.
- Configure “Send As” permissions: If users need to send emails as the group name (not just on behalf of it), you must grant Send As permission.
- Using PowerShell:
Add-RecipientPermission "Support Team" -AccessRights SendAs -Trustee "John Doe"- Or via Exchange Admin Center: Go to Recipients > Groups > [Your Group] > Delegation, and add users under Send As.
⏳ Note: Newly created groups may take up to 30–60 minutes to appear in Outlook due to directory synchronization.
Accessing and using the shared distribution list
Once created, the distribution list can be used in various ways:
✅ Sending emails to the group:
- Open Outlook (desktop or web).
- In the To field, type the name of the distribution list.
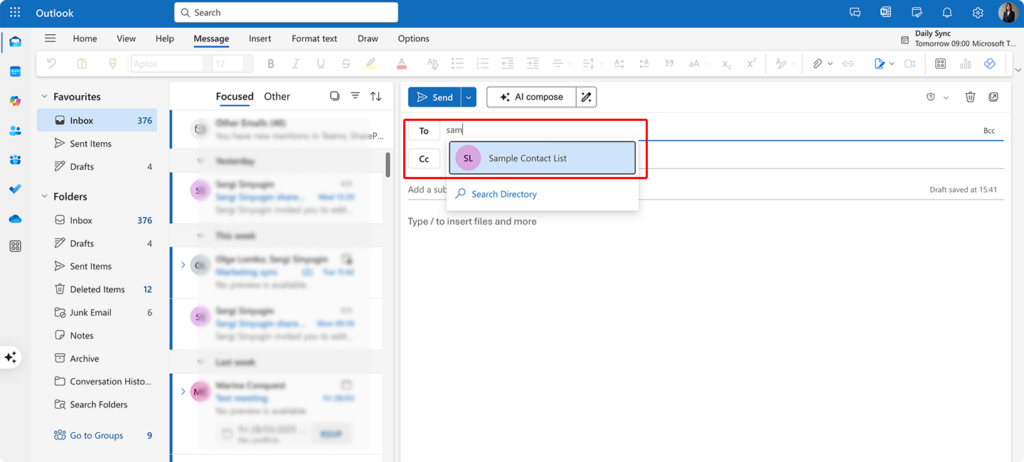
- Select the list from the suggestions.
- Compose and send your message. All members will receive the email in their inbox.
✅ Sending emails as the group:
If a user has been granted Send As permissions:
- Open a new email in Outlook.
- Click the From dropdown.
- Choose the group address (or select Other Email Address and manually enter it).
- Compose and send the message.
📬 The recipient will see the message from the group address, not your personal account.
✅ Managing the group (for owners or admins)
- Microsoft 365 Admin Center:
- Go to Groups > Active Groups.
- Select the distribution list.
- Use the tabs to manage members, settings, and permissions.
- Exchange Admin Center (Advanced):
- Go to Recipients > Groups.
- Select the group to manage delegation, delivery management, and moderation rules.
⚠️ Note: Distribution Groups do not have a shared inbox—they simply forward emails to members’ inboxes. If you need a shared mailbox, consider creating a Shared Mailbox or a Microsoft 365 Group instead.
Examples of using a shared distribution list
Shared distribution lists can be adapted to fit a wide range of business needs—whether you’re streamlining customer support, coordinating projects, or managing regional communications. Below are some common use cases that illustrate how organizations can effectively leverage distribution lists to enhance team collaboration and ensure consistent messaging.
| Use Case | Example Address | Benefits |
| Customer Support | support@company.com | Ensures continuous coverage and unified communication with customers |
| Project Teams | projectalpha@company.com | Centralizes updates and communications for project stakeholders |
| Departments | marketing@company.com | Provides a consistent departmental identity for internal/external emails |
| Event Planning | conference2025@company.com | Keeps event communications organized and accessible to all organizers |
| Regional Teams | europe-sales@company.com | Enables localized support and communication while maintaining brand voice |
✅ Pro Tip: Combine shared distribution lists with mail rules, templates, and delegation policies to create efficient, scalable communication systems for teams.
Advanced Settings and Privacy
While basic distribution lists meet many communication needs, Microsoft 365 and Exchange Online offer advanced privacy and permission settings that provide greater control over who can see, join, and send to your lists. These features are essential for managing sensitive communications, limiting access, and upholding security and compliance requirements.
This section explores how to configure privacy and delivery rules for Distribution Groups and Microsoft 365 Groups to align with your organization’s governance policies.
Creating a private Microsoft 365 Group
❗ Important clarification: Distribution Groups (classic) do not support privacy settings like “Public” or “Private.” These options apply to Microsoft 365 Groups only, which offer email plus collaboration tools (e.g., shared mailbox, calendar, files).
✅ Privacy options for Microsoft 365 Groups:
- Public: Anyone in the organization can view the group, read its content, and join freely.
- Private: Only members and owners can access content. Users must be explicitly invited to join.
🔒 Private Microsoft 365 Groups are ideal for sensitive communications and team collaboration.
How to create a private Microsoft 365 Group:
- Sign in to Outlook on the web.
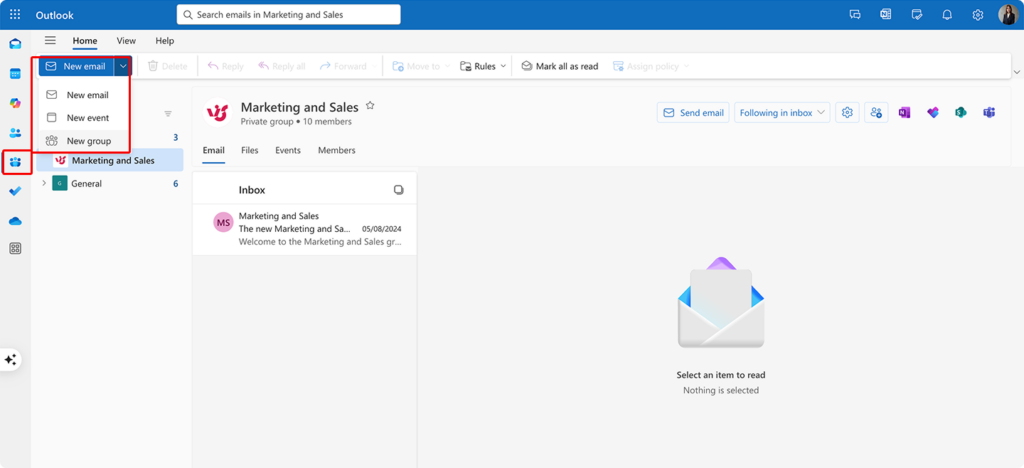
- In the left navigation, click Groups > New group.
- In the creation pane:
- Enter a Group name (e.g., Executive Strategy Team).
- Add a Description.
- Set Privacy to Private—Only approved members can join.
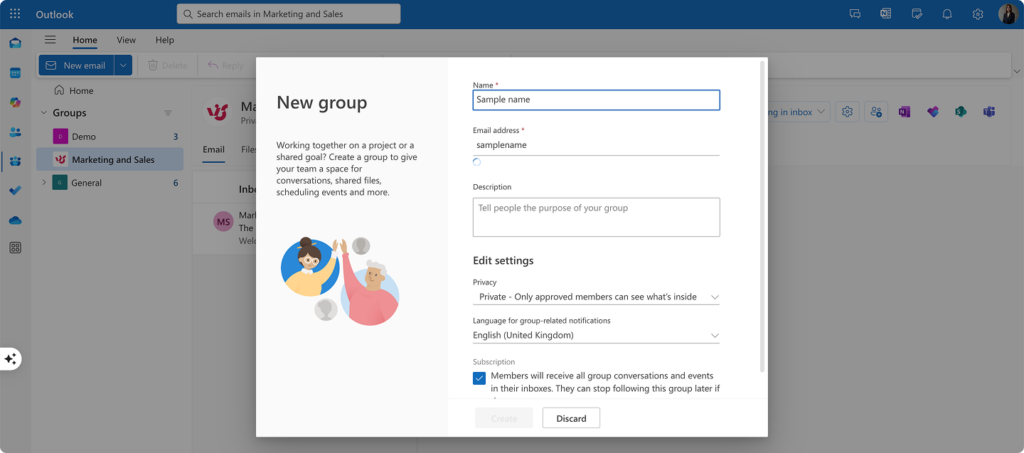
- Add members and designate at least one additional owner.
- Click Create to finalize the group.
📌 Note: Even private Microsoft 365 Groups can send messages to external recipients if guest access and external emailing are allowed by your organization’s settings.
⚠️ Distribution Groups are always public in directory
- Classic Distribution Groups are visible in the Global Address List (GAL) by default.
- You can hide them from the address book using Exchange Admin Center or PowerShell if needed:
Set-DistributionGroup -Identity "GroupName" -HiddenFromAddressListsEnabled $trueSending restrictions and delivery management
To ensure that only appropriate people can send to your group and to avoid misuse, Microsoft 365 provides delivery management settings for both Distribution Groups and Microsoft 365 Groups.
How to restrict who can send to a Distribution Group:
- Go to the Microsoft 365 Admin Center (admin.microsoft.com).
- Navigate to Teams & groups > Active teams & groups.
- Select your Distribution Group.
- Click Mail flow settings, then Manage delivery management settings.
- You’ll be redirected to the Exchange Admin Center.
In the Exchange Admin Center:
- Go to Recipients > Groups.
- Select your group and click the Edit (✏️) icon.
- In the left pane, go to Delivery management.
Delivery options:
- Accept messages from:
- All senders
- Only senders inside the organization
- Only specific senders or groups
- Moderation:
- Enable approval for messages sent to the group.
- Assign moderators and specify senders who bypass moderation.
Message size limit (Optional): Under Message size restrictions, set a maximum message size to prevent attachments from overwhelming inboxes.
Why and when to use privacy controls
Implementing privacy and delivery settings is essential for:
- Security and confidentiality: Use private Microsoft 365 Groups or restricted Distribution Groups for:
- Board or leadership communications
- HR and legal discussions
- Strategic project planning
- Financial reporting
- Intellectual property protection
- Targeted communication
- Ensure messages go only to those who need them.
- Prevent unnecessary exposure to irrelevant information.
- Create purpose-driven communication spaces (e.g., M&A teams, crisis response).
- Spam and phishing prevention: Restrict external senders or require moderation to reduce spam, spoofing, and phishing attempts targeting group addresses.
- Organizational clarity
- Define clear group purposes and boundaries.
- Avoid overuse of “all staff” or “everyone” groups.
- Use privacy to signal that a group contains sensitive or limited-access content.
- Compliance and regulatory requirements
- Support data protection laws (e.g., GDPR, HIPAA).
- Enforce need-to-know access.
- Enable audit trails for sensitive communications.
- Help implement information barriers between departments (e.g., HR vs. Finance).
- Change and transition management: Use private groups to manage:
- Confidential reorganization planning
- Change management communications
- Controlled rollout of sensitive updates
Here’s the summary of best practices discussed above:
| Use Case | Recommended Setting |
| Confidential communication | Private Microsoft 365 Group |
| Simple internal-only mailing list | Distribution Group + internal-only senders |
| Public announcements | Distribution Group (visible in GAL) |
| External collaboration | M365 Group with guest access enabled |
| Spam-prone or large-audience list | Enable moderation or restrict senders |
⚠️ Caution: Overuse of private or hidden groups can lead to information silos. Strive for a balance between transparency and security, and educate users on when to use private vs. public groups appropriately.
Common Errors and Solutions
Even though Outlook and Microsoft 365 provide user-friendly tools for managing distribution lists and groups, users may still encounter issues ranging from permission restrictions to delivery failures. This section addresses the most frequently encountered problems and offers practical solutions to keep your communication workflows running smoothly.
Why can’t I create a distribution list?
If you’re unable to create a distribution list or group, the issue often stems from permission restrictions, licensing, or technical limitations.
- Account or administrator rights restrictions
Problem: You don’t see the option to create a distribution list in Outlook or the Microsoft 365 Admin Center.
Possible causes:
- Your organization restricts group creation through policies.
- Only Microsoft 365 administrators can create Distribution Groups (also called mail-enabled security groups).
- You lack permissions to create Microsoft 365 Groups, which can be restricted via Azure AD settings.
Solutions:
- Contact your IT admin to request the group creation.
- Ask to be added to a security group (e.g., Group Creators) if your organization restricts group creation.
- Admins can manage group creation permissions via Azure AD or Microsoft Entra ID.
Note: Only admins can create classic Distribution Groups. Regular users may be allowed to create Microsoft 365 Groups, depending on policy.
- License and plan limitations
Problem: Your Microsoft 365 subscription doesn’t allow group creation.
Possible causes:
- You’re using a personal Microsoft account, which doesn’t support organizational group features.
- Your Microsoft 365 plan lacks group creation capabilities (unlikely with most business plans).
- You’re using a restricted or outdated version of Outlook.
Solutions:
- Verify that you’re using a Microsoft 365 Business, Enterprise, or Education license.
- For personal use, create a Contact Group in Outlook (a local list stored in your mailbox).
- Consider upgrading your subscription if needed.
- Technical issues with Outlook
Problem: Outlook is malfunctioning or out of sync with Exchange, preventing group creation.
Possible causes:
- Corrupted Outlook profile or cache files.
- Sync issues between Outlook and Exchange Online.
- Outdated Outlook version or browser compatibility issues.
Solutions:
- Restart Outlook or Outlook on the web.
- Clear the Outlook cache:
- Close Outlook.
- Go to
%localappdata%\Microsoft\Outlookin File Explorer. - Rename
.OSTor .PSTfiles (e.g., add.old). - Restart Outlook to rebuild the cache.
- Ensure Outlook is up to date.
- If using Outlook on the web, clear your browser cache or try a different browser.
Why doesn’t the list appear in the “To” field?
You may have successfully created a group, but it doesn’t show up when you try to send an email.
- Synchronization delays
Problem: The group exists but hasn’t appeared in Outlook yet.
Possible causes:
- Azure AD or Exchange Online directory sync is still in progress.
- Outlook’s local cache hasn’t refreshed.
Solutions:
- Wait up to 30–60 minutes for the group to appear in the GAL.
- Restart Outlook to refresh its connection.
- In Outlook on the web, refresh or sign out and back in.
- In mobile apps, force-close and reopen the app.
- Naming and visibility issues
Problem: The group doesn’t appear in autocomplete or directory search.
Possible causes:
- You’re misspelling the group name.
- The group is hidden from the Global Address List (GAL).
- It’s a private Microsoft 365 Group, and you’re not a member.
- The group was renamed recently.
Solutions:
- Double-check the name and try entering the full email address.
- Search the address book or People section directly.
- Ask the group owner or admin to confirm visibility and membership.
- For hidden groups, admins can toggle the setting in Exchange Online:
Set-DistributionGroup -Identity "Group Name" -HiddenFromAddressListsEnabled $false- AutoComplete cache problems
Problem: Outlook’s autocomplete feature is outdated or corrupted.
Possible causes:
- Cached entry is outdated or incorrect.
- List was renamed but the old name remains in cache.
Solutions:
- Clear the AutoComplete cache:
- Go to File > Options > Mail.
- Under Send messages, click Empty Auto-Complete List.
- Manually select the group from the address book.
- Switch to Outlook on the web to verify if the issue is client-specific.
What to do If emails are not reaching members?
You can send messages to the group, but some or all members don’t receive them.
- Email address issues
Problem: The group contains invalid or outdated addresses.
Possible causes:
- Typographical errors or inactive mailboxes.
- Former employees or external contacts still on the list.
Solutions:
- Review the group membership for accuracy.
- Check for bounce-back reports (NDRs).
- Remove or update invalid addresses.
- Send a test email to confirm delivery.
- Group Configuration Issues
Problem: The group is configured with delivery restrictions.
Possible causes:
- The group only accepts messages from internal senders.
- Delivery is restricted to certain users.
- Moderation is enabled.
- Message size limits are exceeded.
- The group is disabled or hidden.
Solutions: Admins can check and update settings in:
- Microsoft 365 Admin Center > Groups > Active groups.
- Exchange Admin Center > Recipients > Groups.
Check the following:
- Delivery management: Who is allowed to send?
- Message approval: Is moderation enabled?
- Group status: Is the group active and visible?
- Email Filtering or Security Issues
Problem: Security filters are blocking or redirecting group emails.
Possible causes:
- Anti-spam systems flag messages to large groups.
- Transport rules are redirecting or rejecting messages.
- User inbox rules move messages to folders.
Solutions:
- Ask recipients to check spam/junk folders.
- Add the group address to safe senders.
- Avoid large attachments; use OneDrive links instead.
- IT admins can review message trace logs in Exchange Admin Center under Mail Flow > Message Trace.
- Message Size and Rate Limiting
Problem: Emails are being throttled or rejected due to size or frequency.
Possible causes:
- Attachments exceed the group’s message size limit.
- Too many messages sent in a short time.
- Microsoft 365 throttling policies are triggered.
Solutions:
- Reduce email size or use file-sharing links.
- Space out high-volume mailings.
- For large audiences, consider using Microsoft 365 Communication Sites, Yammer, or third-party mass email tools like Dynamics 365 Marketing or Mailchimp.
- Consult IT to review sending quotas and throttling policies.
By understanding and addressing these common issues, you can resolve most distribution list problems quickly. For persistent or complex issues, contact your IT administrator—they have access to advanced tools like Exchange message tracing, audit logs, and PowerShell controls that can pinpoint and resolve root causes.
How VirtoSoftware Products Improve Contact and Notification Management
While Outlook provides robust capabilities for creating distribution lists, it falls short when it comes to sophisticated notification management and calendar coordination. For organizations that need more advanced tools to keep their teams aligned and informed, VirtoSoftware offers specialized solutions that extend Outlook’s native functionality. This section explores how VirtoSoftware’s products can enhance your distribution list management with powerful notification and scheduling capabilities.
Enhancing distribution lists with Virto Alerts & Reminders
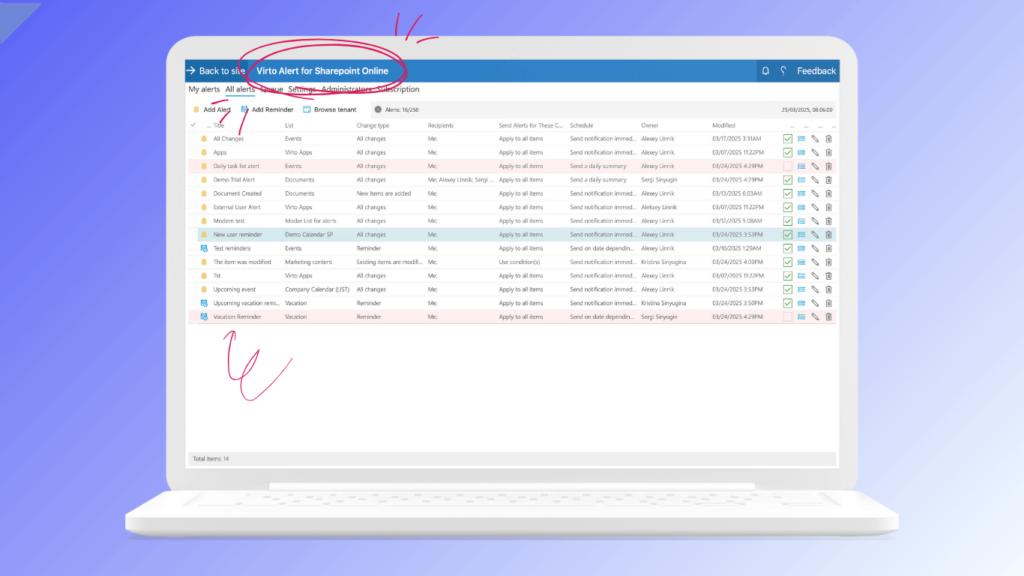
Standard Outlook distribution lists allow you to send emails to multiple recipients, but they lack automated notification capabilities and reminder systems. This is where Virto Alerts & Reminders comes in, providing a comprehensive notification management system that works seamlessly with your existing distribution lists.
With Virto Alerts & Reminders, you can:
- Implement targeted automated notifications
Rather than manually sending reminders to your distribution list members, you can configure the system to automatically notify specific team members about important events, deadlines, or changes. The app’s dynamic alert conditions allow notifications to be triggered based on:
- Changes in SharePoint lists or Microsoft 365 calendars
- Approaching deadlines or milestones
- Document updates or approvals
- Custom-defined conditions relevant to your workflow
- Create customized notification schedules
Unlike Outlook’s basic reminder system, Virto Alerts & Reminders offers flexible scheduling options:
- One-time immediate alerts
- Daily, weekly, or monthly recurring notifications
- Date-based reminders tied to specific project milestones
- Custom scheduling patterns that align with your team’s workflow
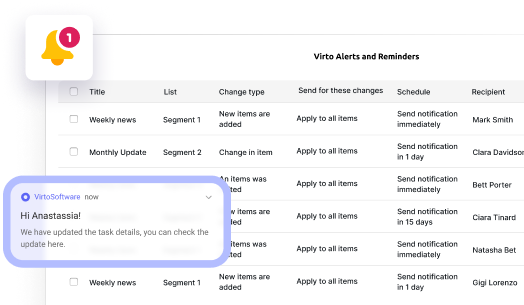
- Deliver engaging, visual notifications
Standard Outlook emails can get lost in busy inboxes. Virto Alerts & Reminders allows you to create engaging notifications using:
- HTML-based templates with custom styling
- Embedded images and visual elements
- Formatted text and tables
- Links to relevant resources or documents
Real-world scenario: Project management notifications
Consider a project manager who has created a distribution list for a cross-departmental team:
- The manager creates a SharePoint list tracking project deliverables and deadlines
- Using Virto Alerts & Reminders, they set up:
- Weekly progress report reminders sent to the entire distribution list every Monday morning
- Task-specific reminders sent to responsible team members 48 hours before each deadline
- Immediate notifications to the team lead when a high-priority item is updated
- Daily digest notifications summarizing all project activities
- The system automatically sends these notifications according to the specified schedule, ensuring that:
- Team members never miss important deadlines
- The project manager doesn’t spend hours sending reminder emails
- Information is delivered in a consistent, branded format
- The right people receive the right information at the right time
This automated approach significantly reduces administrative overhead while improving team accountability and alignment, extending the value of your distribution lists far beyond simple email grouping.
Virto Alerts
Try Virto Virto Alerts App to automate all notifications
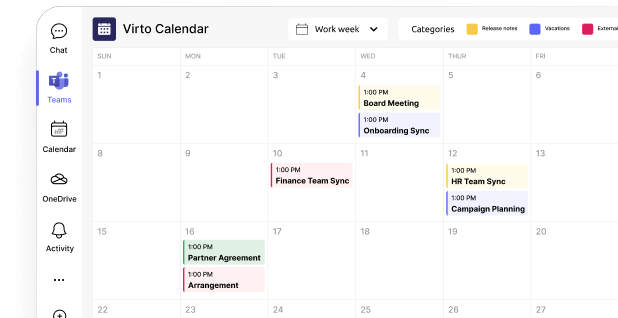
Streamlining team coordination with Virto Calendar App
Distribution lists help you communicate with groups, but coordinating schedules and meetings with those groups can still be challenging. Virto Calendar App addresses this gap by providing comprehensive calendar management capabilities that integrate perfectly with your distribution lists.
- Centralized calendar management
Virto Calendar App serves as a central scheduling hub that brings together multiple calendars from different sources:
- Microsoft 365 and SharePoint calendars
- Outlook personal and team calendars
- External calendars (Google, Apple, iCal)
- Custom event lists and schedules
This centralization makes it easier to find available meeting times for your distribution list members, reducing the back-and-forth typically required for scheduling.
- Visual team scheduling
When working with distribution lists that include team members across departments or locations, visual scheduling becomes crucial:
- Color-coded overlays help identify availability patterns
- Different calendar views (day, week, month, timeline) provide perspective
- Resource allocations and conflicts are immediately visible
- Team member schedules can be compared side-by-side
- Seamless Microsoft 365 integration
Virto Calendar App is fully integrated with the Microsoft 365 ecosystem:
- Distribution lists from Outlook are readily available for meeting scheduling
- Calendar events can trigger notifications through Virto Alerts & Reminders
- Microsoft Teams integration ensures calendar visibility in your collaboration hub
- SharePoint integration connects schedules with project documentation and resources
Real-world scenario: Coordinating a distributed team
Imagine a marketing director managing a distributed team across multiple time zones:
- The director has created an “Marketing Team” distribution list in Outlook containing all team members
- Using Virto Calendar App, they:
- Import all team members’ individual calendars into a consolidated view
- Quickly identify optimal meeting slots that accommodate different time zones
- Schedule regular team meetings by selecting the distribution list as attendees
- Create a dedicated “Marketing Campaigns” calendar visible to the entire team
- Set up resource booking for marketing assets and creative review sessions
- The consolidated calendar view allows the director to:
- Balance workloads by visualizing commitments across the team
- Avoid scheduling conflicts with other department meetings
- Plan campaign activities with awareness of team capacity
- Ensure critical deadlines are visible to everyone
This approach transforms the simple distribution list into a powerful coordination tool, especially valuable for teams that aren’t co-located or work across different schedules.
Merge all calendars in one place
Try Virto Calendar to Sync all data
Combining VirtoSoftware products for maximum impact
While each VirtoSoftware product offers distinct benefits, the real power comes from using them together to create a comprehensive communication and coordination system around your distribution lists:
- Create your distribution lists in Outlook for basic group communication
- Implement Virto Calendar App to visualize schedules and coordinate meetings for those groups
- Add Virto Alerts & Reminders to automate notifications and keep everyone on track
- Integrate with Microsoft Teams to bring this functionality into your collaboration hub
This integrated approach creates a seamless workflow that ensures your team members are always informed, aligned, and coordinated—extending far beyond what standard Outlook distribution lists can provide.
For organizations serious about optimizing team communication and coordination, VirtoSoftware’s specialized tools represent a significant upgrade to basic distribution list functionality, transforming simple email groups into sophisticated communication and coordination systems.
Conclusion
Creating and managing distribution lists in Outlook is a fundamental practice for streamlining communication within any organization. Whether you’re addressing employees, clients, or partners, distribution lists provide a reliable and efficient way to deliver messages to multiple recipients without the need for repetitive manual entry.
By centralizing communication channels, distribution lists help save time, reduce the likelihood of sending errors, and promote consistency across departments. When properly configured, they become a powerful asset for routine announcements, customer support workflows, project coordination, and internal notifications.
Moreover, distribution lists enhance transparency in communication processes, ensuring that the right people receive the right information at the right time. They also support better accountability and alignment across teams, which is especially critical in fast-paced business environments.
For organizations seeking more advanced control and automation, consider integrating Outlook’s native tools with external solutions such as Virto Alerts & Reminders and the Virto Calendar App. These applications extend your Microsoft 365 capabilities by enabling scheduled notifications, calendar-integrated announcements, and automated workflows—allowing your teams to collaborate more effectively and stay ahead of critical tasks.
Why not schedule a quick demo now and install free trial of those apps to test their functionality?
For more in-depth guidance on creating and managing distribution lists and related Outlook features, explore the following resources:
- Create, edit, or delete a contact list (or contact group) in Outlook – Microsoft Support
- How to set up a shared distribution list – Microsoft Community
- Distribution lists vs. contact groups – Microsoft Community
- How to create a distribution list for external emails – Microsoft Community
- How to create a private distribution list – Microsoft Community
To further enhance your Outlook productivity, check out these expert guides from the VirtoSoftware blog: