Efficient communication is the backbone of successful teamwork. Creating email groups in Outlook is a simple yet powerful way to streamline your team communications, saving valuable time and reducing the risk of overlooking key team members when sending important updates.
Email groups allow you to send messages to multiple recipients with a single address, eliminating the tedious task of manually adding each recipient every time. Whether you’re coordinating with your department, managing client communications, or organizing project-specific updates, Outlook’s group functionality helps ensure your messages reach everyone who needs them—quickly and reliably.
Microsoft Outlook makes setting up and managing these groups straightforward, even for those without advanced technical skills. With just a few clicks, you can create custom distribution lists that transform how you communicate with teams, departments, clients, or project groups.
This guide will walk you through the process of creating and managing email groups in Outlook, helping you avoid common pitfalls and implement best practices. By following these steps, you’ll learn not only how to create a group email in Outlook but also how to organize your contacts and communicate with groups more effectively, enhancing collaboration and productivity across your organization.
What Is An Email Group in Outlook and What Is It Used For?
In this section, we’ll explore what email groups in Outlook are, their core functions, and how they can transform your team communication. We’ll look at the key benefits of using email groups, how they streamline workflows, and the different types available to meet your specific needs.
Understanding email groups in Outlook
An email group in Outlook is a way to send messages to multiple people at once using a single group name or email address. Instead of entering each recipient individually, you can address your message to a group and everyone included will receive it.
Depending on the type of group, these collections of contacts can be managed by individual users or centrally by IT administrators. Groups are widely used in professional environments to improve communication efficiency, whether you’re collaborating internally or coordinating with external stakeholders.
What are email groups in Outlook for?
Email groups are designed to simplify and enhance how individuals and teams communicate within Outlook. Whether used for quick updates, project coordination, or company-wide announcements, they offer a centralized way to reach the right people at the right time — all with a single group address. Below are some of the key benefits and use cases that make email groups an essential productivity tool.
- Time savings: Email groups dramatically reduce the time spent on routine communication tasks:
- Send emails to dozens or even hundreds of recipients by entering just one group address
- Eliminate the risk of accidentally omitting important team members from critical communications
- Streamline your workflow by avoiding repetitive entry of the same email addresses
- Reduce administrative overhead, especially valuable for managers overseeing large teams
- Simplified team communication: Groups transform how teams exchange information:
- Address your entire department, project team, or client group with a single entry
- Include both internal and external contacts in your group (depending on group type and permissions)
- Quickly disseminate important announcements about project changes, deadlines, or meeting updates
- Maintain consistent communication channels that everyone can rely on
- Flexible management: Outlook’s group functionality adapts to your changing organizational needs:
- Add or remove members easily as team composition changes
- Choose between different privacy levels (open or closed) depending on sensitivity
- Edit group settings and membership without recreating the entire list
- Organize contacts by project, department, or any other logical grouping that suits your workflow
- Business applications: Email groups support numerous business processes:
- Send meeting invitations, event announcements, and project updates efficiently
- Facilitate remote team collaboration through consistent communication channels
- Integrate with Microsoft 365 tools like Teams, SharePoint, and Planner (for Microsoft 365 Groups)
- Maintain professional communication standards across distributed teams
- Centralized contact and access management: For organizations, email groups offer administrative advantages:
- Centrally manage company-wide contact lists through administrator controls
- Synchronize email groups with your corporate address book for consistency
- Set granular permissions determining who can send to specific groups
- Implement security measures by restricting group access to approved members only
Types of groups in Outlook
Outlook offers several types of groups to accommodate different communication needs:
Contact Groups (formerly Distribution Lists): These are manually created lists of contacts used primarily for sending emails to multiple recipients at once. They’re simple to set up and ideal for basic group communication needs:
- Created by individual users in Outlook
- Simple lists of contacts used for sending emails to multiple recipients
- Managed locally in your Outlook profile
- Best for personal or small team use
- Do not sync across devices or accounts
Microsoft 365 Groups: These provide a comprehensive collaboration experience beyond just email. They include a shared inbox, calendar, file storage, and integrate with Teams and Planner. Microsoft 365 Groups are perfect for project teams that need multiple tools for collaboration.
- Designed for modern collaboration across Microsoft 365
- Includes a shared mailbox, calendar, SharePoint site, OneNote, and Planner
- Automatically integrates with Microsoft Teams, Outlook, and other tools
- Managed via Microsoft 365 admin center
- Supports guest access and external collaboration (if enabled)
Distribution Lists: Usually created at the organizational level, these are designed exclusively for sending messages to multiple recipients. Unlike Microsoft 365 Groups, they don’t include shared workspaces or additional collaboration tools.
- Created and managed by IT administrators in Exchange Online or on-prem Exchange
- Used to send emails to multiple recipients via a single email address
- No shared workspace or collaboration tools
- Often used for company-wide announcements or department-level communication
- Appear in the Global Address List (GAL)
Each type serves different communication needs, allowing you to choose the appropriate format based on your team’s requirements and workflow preferences.
| Group type | Best for |
| Contact Group | Personal use, small teams, quick email lists |
| Distribution List | Org-wide announcements, formal email-only groups |
| Microsoft 365 Group | Project teams, cross-functional collaboration, Teams integration |
Fig. 1. Choosing the Right Group Type.
Recent Updates to Microsoft Outlook and Email Groups
The first quarter of 2025 has seen significant changes in Microsoft Outlook, primarily through the rollout of the new Outlook for Windows. Starting January 6th, 2025, Microsoft began gradually deploying this updated version to Microsoft 365 Business and Premium subscribers, bringing a modernized interface and enhanced functionality.
New Outlook for Windows: Major overhaul
The new Outlook represents Microsoft’s vision for the future of email management with improved performance, an updated design, and new intelligent features. For organizations managing the transition, Microsoft has added monitoring tools in the Microsoft 365 admin center, allowing admins to track migration progress through new usage reports.
While classic Outlook will remain available until 2029, Microsoft is encouraging users to adapt to the new version, which introduces several improvements for email group management.
Email group enhancements
The new Outlook introduces several improvements to email group functionality, making collaboration and communication more efficient. These enhancements streamline how users interact with groups, providing better organization and accessibility options while maintaining compatibility with existing workflows:
Favorite groups feature
One of the most notable improvements for group communications is the introduction of favorite groups. Unlike classic Outlook, the new version allows users to mark frequently used groups as favorites for quick access. This feature extends to people and categories as well, making it easier to organize and prioritize communications.
Contact lists and distribution groups
Contact lists remain fully supported in the new Outlook, maintaining continuity for users accustomed to sending emails to groups of contacts. The interface for creating and managing these lists has been refreshed for improved usability.
Distribution group management is partially available through the Exchange Admin Center portal. While some functionality differences exist compared to classic Outlook, core capabilities for managing distribution lists remain accessible.
Group calendars
The new Outlook preserves support for group calendars, allowing team members to collaboratively schedule and manage events. Recent updates have also improved calendar notifications, which now appear even when Outlook isn’t running.
What’s changed and what’s coming
Some features from classic Outlook are still under development for the new version. For example, favorite shared folders are on the roadmap but not yet implemented. SharePoint calendar sync is not currently supported in the new Outlook.
PST file support is being rolled out in phases. As of January 2025, the new Outlook provides read-only access to mail items within PST files, with expanded capabilities planned for future updates.
Microsoft 365 Groups vs. Distribution lists
It’s worth noting the distinction between different types of groups in Outlook:
- Contact lists/Distribution lists: Simple collections of email addresses for message distribution
- Security groups: Used for both message distribution and permission management
- Microsoft 365 Groups: Collaborative spaces with shared inbox, calendar, and files
For users needing robust functionality beyond simple message distribution, Microsoft 365 Groups offer enhanced collaboration capabilities with shared resources and integration with other Microsoft tools.
Interface and usability improvements
Beyond specific feature updates, the modernized interface of the new Outlook indirectly enhances email group management through improved navigation and more intuitive controls. Visual updates to the compose draft tabs and focused/other experiences implemented in March 2025 further refine the user experience.
Getting started with email groups in new Outlook
For those transitioning to the new Outlook, here’s how to create a contact list:
- Select People in the side panel
- Select a contact you want to add to a new list
- Select Add to list (by right-clicking or using the Ribbon)
- Choose New contact list
- Name your list and save
The new Outlook simplifies these processes while maintaining the core functionality users depend on for group communications.
Looking ahead
While the transition to the new Outlook represents the most significant recent update affecting email groups, Microsoft continues to refine and enhance the experience. Users should stay informed about roadmap items and new feature announcements as Microsoft works to improve group collaboration capabilities throughout 2025.
For organizations managing this transition, now is an ideal time to review email group strategy and ensure teams are trained on the new interface to maximize productivity gains from these updates.
How to Create an Email Group in Outlook Desktop, Mac, and Web
Outlook supports several ways to create and manage email groups, depending on your platform and account type. Whether you’re using Outlook on Windows, Mac, or the web, you can set up group email lists to streamline communication, manage contacts efficiently, and collaborate better with your team.
Below, you’ll find step-by-step instructions for creating a group, managing its members, and using it across Microsoft 365 apps like Teams and Planner.
How do I create a group email list in Outlook?
Here’s how to create a contact group in different versions of Outlook.
✅ Creating a Contact Group in Outlook Desktop (Windows)
- Open Outlook and go to the Home tab.
- Click People at the bottom (or press Ctrl + 3).
- Select New Contact Group in the ribbon.
- Name the group (e.g., “Marketing Team”).
- Click Add Members > choose from:
- From Outlook Contacts
- From Address Book
- New E-mail Contact
- After adding members, click Save & Close.
✅ Creating a Contact Group in Outlook for Mac
- Open Outlook and go to the People view.
- Click the New Contact List button.
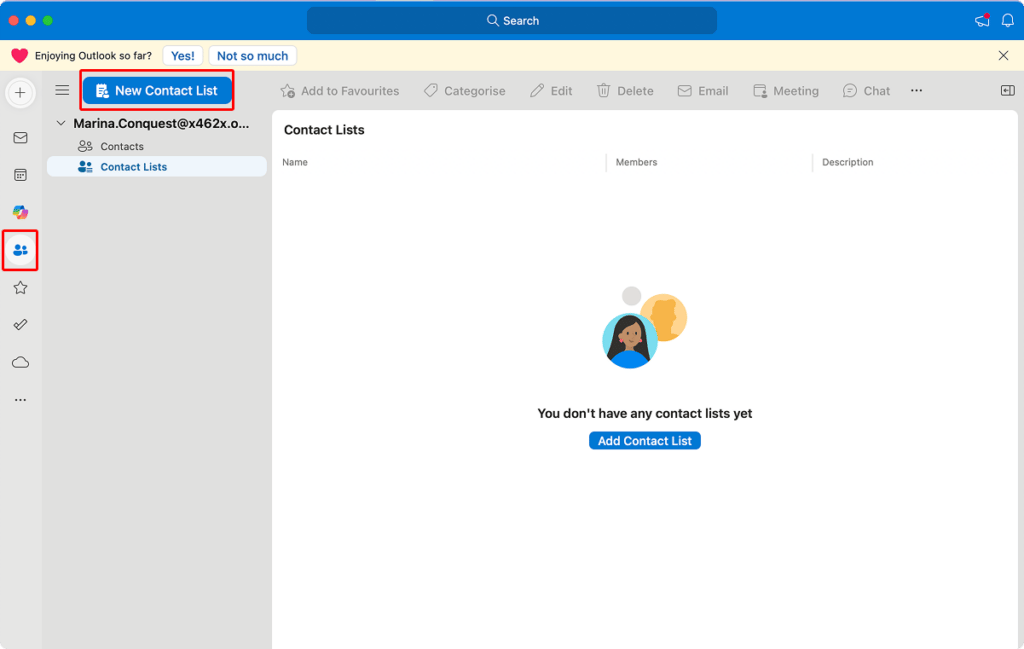
- Enter the name of the group.
- Use the Add button to include contacts from your address book.
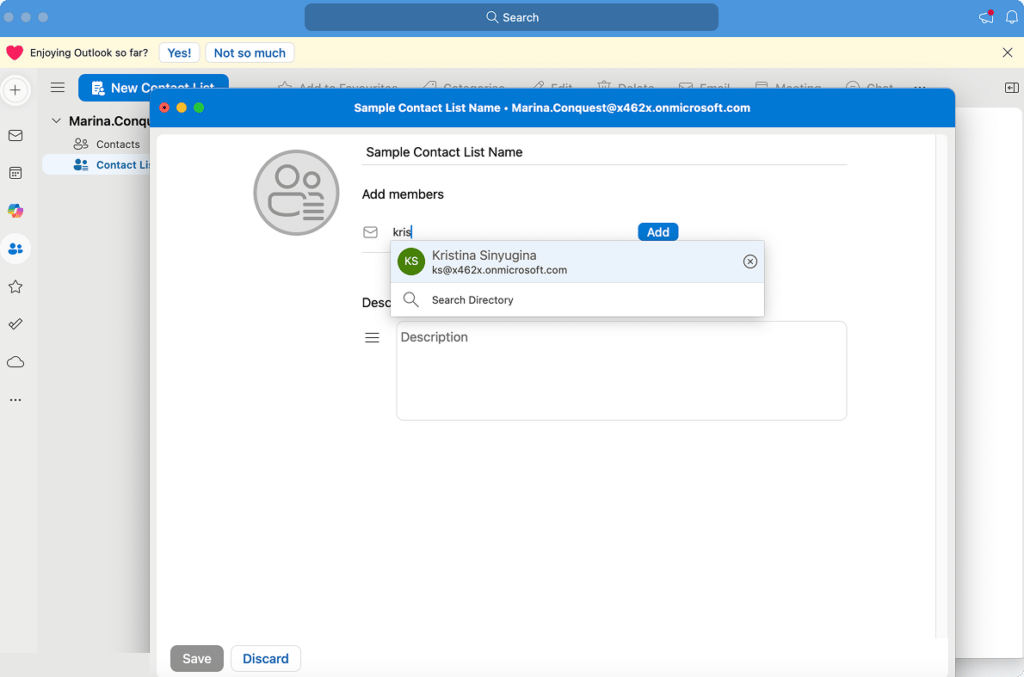
- Click Save when finished.
✅ Creating a Microsoft 365 Group (Outlook on the Web / Admin)
- Go to Outlook on the Web.
- In the left pane, click Groups > New Group.
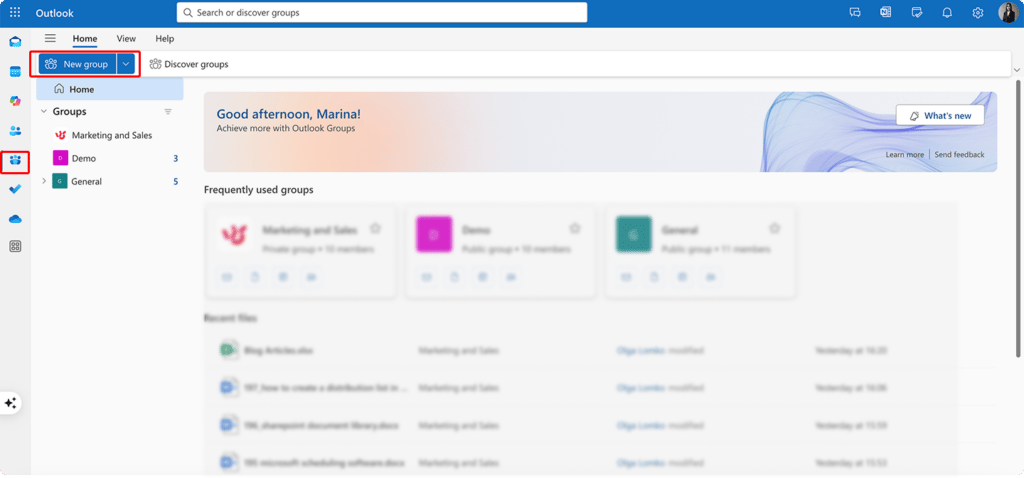
- Enter a group name and description.
- Choose privacy settings: Public or Private.
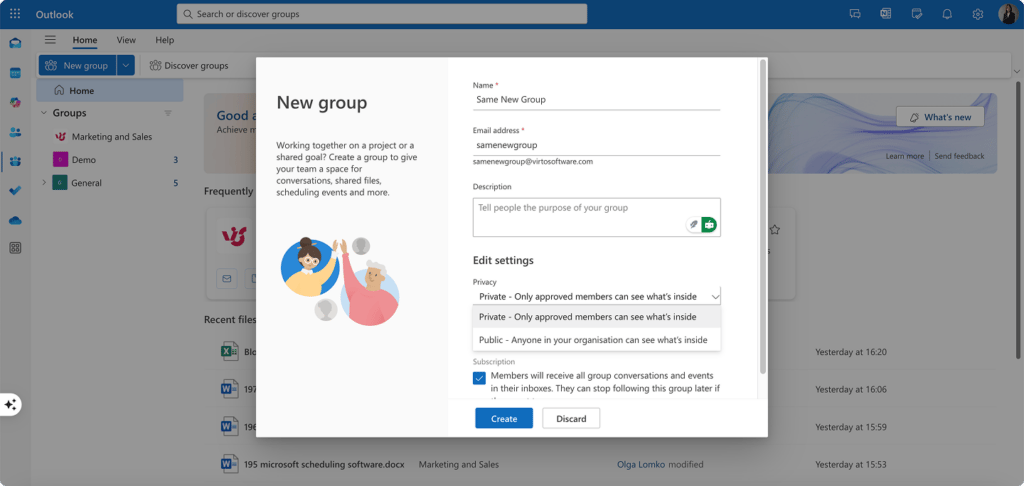
- Add members (internal or external, if allowed).
- Click Create.
🔐 Note: Microsoft 365 Groups require an Exchange Online or Microsoft 365 subscription and may need to be created by an admin or allowed by your organization’s policy.
👉 So, how to create email group in Outlook*? If you’re wondering* how to create group email in Outlook or email group in Outlook*, which are essentially the same things, then* you’d be relieved to know that the process is relatively straightforward. First, click on the “People” or “Contacts” icon in your Outlook window. Then select “New Contact Group”. Name your group, and click “Add Members” to select contacts from your address book or create new ones. Once you’ve added all desired members, click “Save & Close” to create your group, which you can now use as a recipient when composing emails.
How to set up group email in Outlook and manage group settings
After creating your group, you can configure settings and manage members as your needs evolve.
✏️ Edit Members
- Open the group/contact list.
- Click Edit or Manage Group.
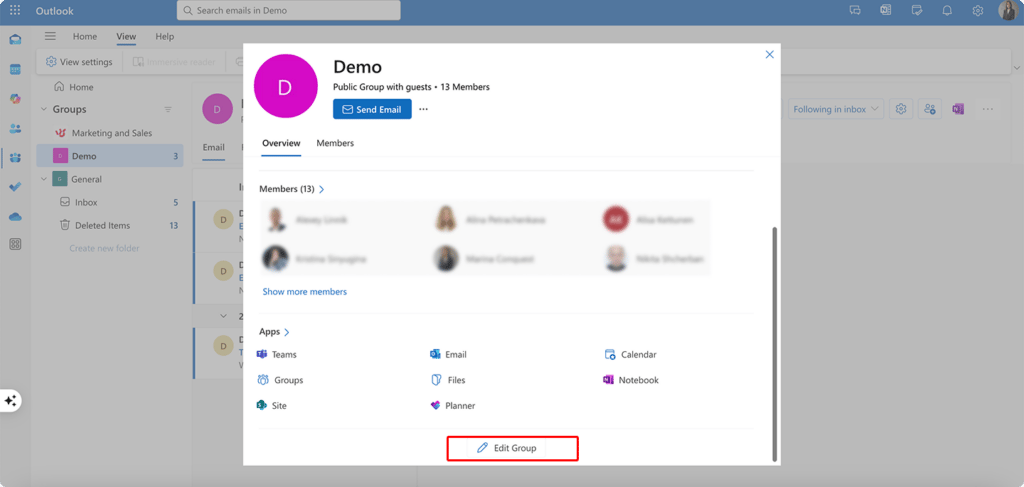
- Add or remove people as needed.
- Save your changes.
🗑️ Can You Delete a Group in Outlook?
Yes—but how (and whether) you can delete a group depends on the type of group and your permissions.
Contact Groups (Personal Groups)
If you created a Contact Group in Outlook (formerly called a Personal Distribution List), you can delete it from your Contacts/People view.
✅ How to Delete a Contact Group (Outlook Desktop):
- Go to People (Ctrl + 3 or click the People icon).
- Find the Contact Group under your contacts list.
- Right-click the group and select Delete, or press the Delete key.
⚠️ Make sure you’re selecting a Contact Group*, not a Microsoft 365 Group.*
Microsoft 365 Groups
You cannot delete a Microsoft 365 Group directly from Outlook unless you are the group owner or an admin.
❌ If you’re not the owner:
- You won’t see a Delete option in Outlook or Outlook on the Web.
- You can leave the group, but not remove it.
✅ If you’re the group owner:
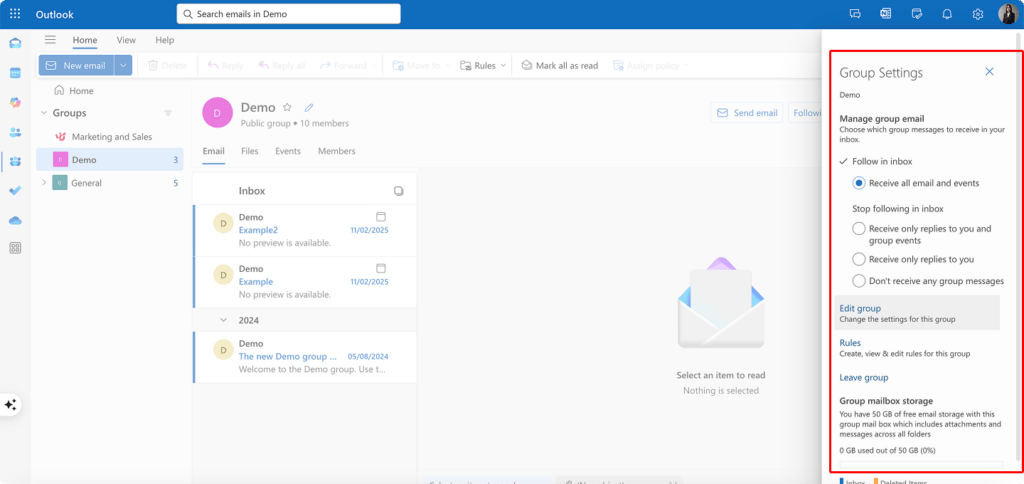
- Go to Outlook on the Web > Groups > select the group
- Click Settings (gear icon) > Edit group
- Scroll down and click Delete group (only available to owners)
✅ Admins:
- Go to the Microsoft 365 Admin Center
- Navigate to Groups > Active groups
- Select the group and click Delete
Distribution Lists (Exchange-based)
These are managed by your organization’s IT department. Only admins can delete distribution lists via:
- Microsoft 365 Admin Center or
- Exchange Admin Center
How to use the created group in Outlook (Desktop, Mac, Web)
Once your group is created, using it is simple across all Outlook platforms:
- When composing a new email, type the group name in the “To” field.
- Outlook will auto-complete the group and send the email to all members.
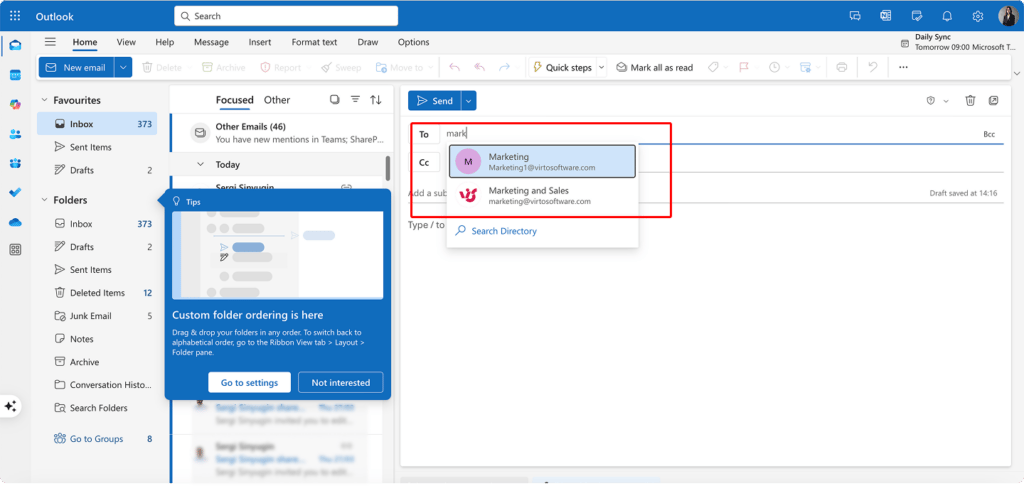
💡 You don’t need to remember each individual’s email address—just the group name.
🔄 Group use across Microsoft 365 tools
Microsoft 365 Groups are more than just email lists—they serve as the foundation for collaboration across the Microsoft 365 ecosystem. Once a group is created, it automatically connects with several other tools to enhance team productivity, streamline file sharing, and centralize communication. Here’s how you can use your group across different Microsoft 365 apps:
- Microsoft Teams: Add a Microsoft 365 Group to a Team for persistent chat, meetings, and collaboration.
- Planner: Assign tasks to group members and view shared task boards.
- SharePoint: Access shared document libraries created with the group.
- Outlook: Use the shared inbox and calendar for team-wide communication and scheduling.
Editing group membership
Here’s how to edit group membership:
- Contact Groups: Open the group in Outlook > People, then click Edit to manage members.
- Microsoft 365 Groups:
- Use Outlook on the Web or the Microsoft 365 Admin Center
- Go to the group > Settings > Members
- Add or remove people as needed
👉 How to create email groups in Outlook for the web vs desktop, what’s the difference? In Outlook for the web, you create Outlook email group**by selecting “People,” then “New Group,” where you set a name, description, and privacy settings. On the desktop app, you go to “Contacts,” click “New Contact Group,” and manually add members from your address book. The web version creates a Microsoft 365 Group with shared resources like a mailbox and calendar, while the desktop version creates a local contact group used only in your Outlook. Web-based groups sync across devices; desktop groups are stored locally unless saved to your Exchange account. The web version is better for collaboration, while the desktop version is simpler for personal lists.
Troubleshooting Common Group Issues with Outlook Create Email Groups
Even with a well-configured email group, users can encounter challenges when creating, managing, or communicating with groups in Outlook. This section addresses the most common issues and provides practical solutions for resolving them. We’ll cover problems with group creation, editing and deletion limitations, and message delivery failures.
Why can’t I create a group in Outlook?
Here are a few reasons why you can’t create a group in Outlook and what to do about it:
✅ Check your Outlook version and account type
Not all Outlook versions and account types support the same group functionality:
- Subscription limitations: Free or basic Microsoft 365 plans may not support Microsoft 365 Groups. Full functionality typically requires Microsoft 365 Business Standard, E3, or higher.
- Account type compatibility: Microsoft 365 Groups are only supported with Microsoft 365 or Exchange Online accounts. They won’t work with standalone POP/IMAP accounts.
- Admin permissions: In enterprise environments, group creation may be limited to users with specific roles or permissions. Check with your IT department if you’re restricted.
- Multiple accounts: If you’re signed into multiple accounts, ensure you’re using the correct Microsoft 365 or Exchange account when trying to create the group.
✅ Privacy and tenant settings
Group creation might be restricted by organizational policies:
- IT restrictions: Admins can limit who is allowed to create Microsoft 365 Groups using Microsoft Entra ID (formerly Azure AD) group creation policies.
- Public group limitations: Some organizations restrict the creation of public groups for security reasons. Try creating a private group instead.
- Tenant-level controls: Microsoft 365 tenant settings may globally block group creation for non-admin users.
How do I edit or delete a group?
Although we’ve already covered how to edit and delete groups, here’s a quick summary of the key points discussed above for easy reference.
✏️ Edit group membership:
Keeping your group membership accurate is essential:
- Access group settings:
- In Outlook for Windows (new UI): Go to People, then open All contact lists. Right-click your group and choose Edit.
- For Microsoft 365 Groups: Open the group in Outlook on the Web, select Members, and manage membership there.
- Update members: Add or remove contacts as needed. Microsoft 365 Group owners can do this via Outlook or the Microsoft 365 admin center.
- Change ownership: In Microsoft 365 Groups, owners can assign other users as co-owners via the Members panel.
- Update group properties: You can rename the group, update its description, or change privacy settings (if you’re the owner or admin).
🗑️ Delete a group
Group deletion depends on the type of group and your permissions:
- Contact Groups (Personal Contact Lists):
- Go to People or Contacts.
- Right-click the Contact Group and select Delete.
- Microsoft 365 Groups:
- Only owners (or admins) can delete the group.
- In Outlook on the Web: Open the group > click the gear icon (Settings) > Edit group > scroll down and select Delete group.
- In the Microsoft 365 Admin Center: Navigate to Groups > Active groups, select the group, and choose Delete.
⚠️ Warning: Deleting a Microsoft 365 Group removes all associated content, including:
- Group inbox conversations
- Files in the connected SharePoint site
- Notes in the shared OneNote notebook
- Tasks in Planner
- Group calendar events
- Soft deletion: Microsoft 365 Groups enter a 30-day soft-deleted state, allowing admins to restore them via PowerShell or the admin center.
Why aren’t emails reaching the entire group?
If your messages aren’t reaching everyone in the group, the issue is often related to group membership, permissions, or email filtering settings. Here’s how to troubleshoot the most common causes.
✅ Check the Contact List or Group membership
Delivery issues are often caused by incorrect or outdated contact information:
- Verify member emails: Make sure all email addresses in the group are accurate and up to date.
- Remove stale contacts: If members have left the company or changed email addresses, update or remove them.
- Group size limits: Outlook and Exchange Online may enforce recipient or message size limits for large distribution lists.
- Hidden members: In Outlook, hidden members (e.g., hidden from address book) may not receive certain internal communications. Check group visibility settings.
🔐 Check message access and permissions
Permissions can block some users from receiving or sending messages to a group:
- Group privacy: Private Microsoft 365 Groups only accept messages from members by default.
- Send permissions:
- Admins or owners can configure:
- Anyone (internal/external)
- Only members
- Specific users or groups
- Admins or owners can configure:
- Guest access: External members (guests) must be explicitly allowed to receive/send emails, and tenant settings must allow external communication.
- Moderation settings: Some groups are configured with moderation enabled. Messages may need approval before delivery.
🧹 Check filters and spam settings
Email filtering systems can block or divert group messages:
- Spam folder: Ask members to check their Junk Email or Spam folders.
- Safe Senders list: Encourage members to add the group email address to their Safe Senders list.
- Mail flow rules: Your organization may have transport rules (e.g., via Exchange Online) that block or redirect certain messages.
- Anti-spam settings: Admins should review Microsoft Defender for Office 365 policies for any anti-spam rules affecting group delivery.
- Conditional routing: Check for any smart routing or mail flow conditions that may be redirecting group messages.
So, how to set up an email group and manage it? As mentioned, setting up or creating email groups in Outlook is straightforward across all platforms. Go to “People” or “Contacts” and select “New Contact Group.” Name the group, click “Add Members,” and choose contacts from your address book or enter email addresses manually. Click “Save & Close” to finish. To manage the group later, open it from your contacts, make changes like adding or removing members, then save again. You can use the group name in the “To” field when sending emails.
Tools for Advanced Communication Management
While Outlook’s built-in email groups are a solid tool for basic team collaboration, they often fall short when it comes to managing complex communication workflows in Microsoft 365 environments. As projects scale and teams become more distributed, users frequently need advanced tools that go beyond simple group messaging.
This is where Virto Alerts & Reminders and Virto Calendar come into play. These two powerful SharePoint and Microsoft 365 apps are designed to enhance communication, automate processes, and eliminate the risk of missed updates or disorganized schedules.
Virto Alerts & Reminders
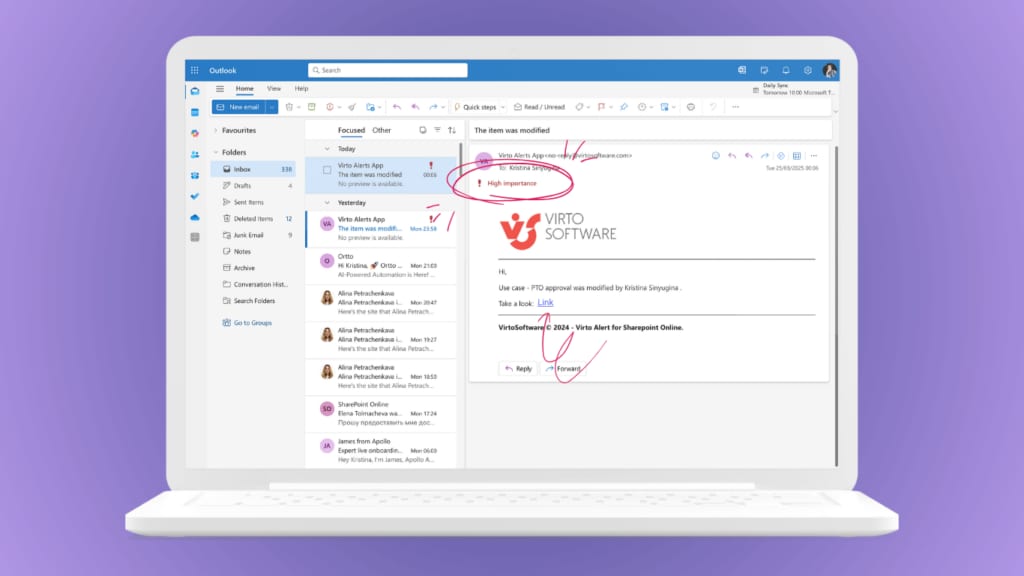
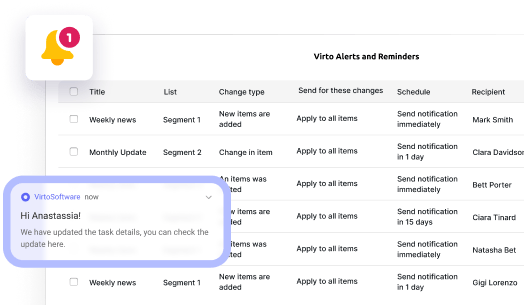
The Virto Alerts & Reminder App allows teams to automate their notification systems, ensuring that important updates are never lost in a cluttered inbox. With features like:
- Automated alerting based on SharePoint list or M365 calendar changes
- Flexible, date-based scheduling by individual users or groups
- HTML-based templates for rich-text, branded notifications
- Integration with Outlook, SharePoint, and Teams
You can create and manage timely, targeted alerts that drive visibility and accountability across your team.
Virto Calendar App
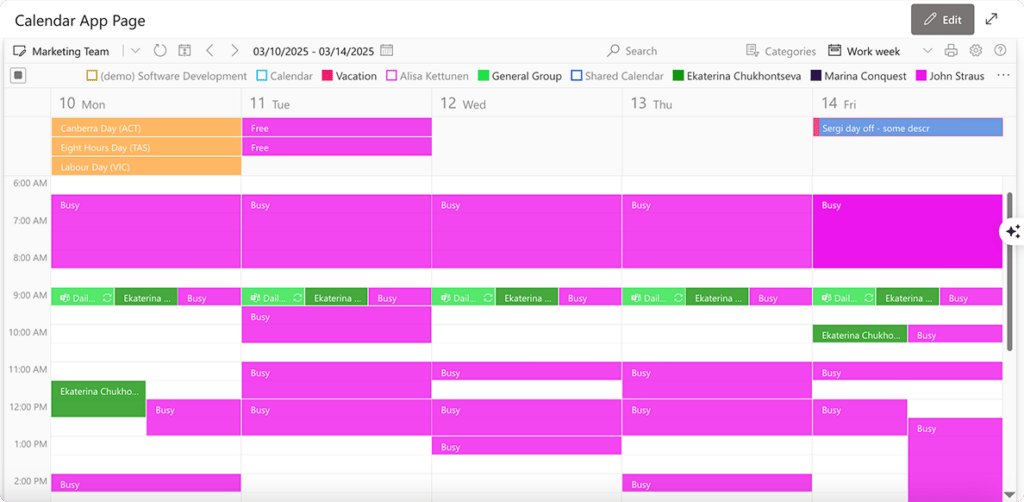
The Virto Calendar App offers a centralized, overlay-style calendar view that brings together multiple data sources—including SharePoint lists, Outlook, Google Calendar, Microsoft Planner, and iCalendar. Key features include:
- Unified scheduling hub for events, shifts, and milestones
- Cross-platform integration with Microsoft Teams and Outlook
- Custom calendar views to support project management, vacation tracking, event planning, and more
- Enterprise-grade security and support for all organization sizes
Use Case: Managing a remote team
Imagine you’re leading a remote team that relies primarily on Outlook for email communication. You’ve created an Outlook group to centralize team messages, but you’re struggling to track deadlines, ensure timely follow-ups, and coordinate meetings across time zones.
With Virto Alerts & Reminders, you can:
- Automatically notify team members of upcoming project milestones
- Send reminders when task due dates approach
- Push alerts directly to Outlook, SharePoint, or Teams—wherever your team works
Meanwhile, Virto Calendar helps you:
- Overlay schedules from multiple Microsoft 365 sources
- View and manage project timelines and availability in one place
- Coordinate meetings and resource bookings without back-and-forth emails
This combination creates a proactive communication environment that supports efficiency, transparency, and alignment—especially vital for hybrid or distributed teams.
➡️ Learn more about Virto Alerts & Reminders
➡️ Explore the Virto Calendar App

Conclusion on How to Make an Email Group in Outlook
Using email groups in Outlook is a powerful way to make teamwork more structured, convenient, and efficient. Whether you’re managing internal communications, coordinating project updates, or streamlining department-wide announcements, Outlook groups help centralize and simplify the way teams stay connected.
Thanks to the step-by-step instructions and best practices provided in this article, you can now confidently create and manage email groups in Outlook—ensuring your teams are organized, informed, and aligned. From creating contact lists to configuring Microsoft 365 Groups, the tools are at your fingertips to enhance collaboration across your organization.
For even greater control over team processes and communication, we recommend extending Outlook’s native capabilities with tools like Virto Alerts & Reminders and the Virto Calendar App. These apps help automate routine tasks, keep teams informed with customizable alerts, and provide a unified calendar view for efficient scheduling—all integrated within your Microsoft 365 environment.
To deepen your understanding and expand your skills, we invite you to explore these useful resources:
Official Microsoft resources:
- Create a contact group in Outlook
- Create a group in Outlook (Microsoft 365 Groups)
- How do I create a group of email contacts on Outlook.com?
- Create, edit, or delete a contact list or contact group
- How do you create email groups? (Microsoft Community)
- How do I create and display Outlook groups? (Microsoft Q&A)