Coordinating meetings can feel like solving a complex puzzle. Outlook’s Scheduling Assistant offers a powerful solution to this challenge, yet many users barely scratch the surface of its capabilities. This built-in tool simplifies the process of finding meeting times that work for everyone, displaying availability across multiple attendees’ calendars at a glance. Despite being right at your fingertips, the Scheduling Assistant remains one of Outlook’s most underutilized features.
While the Scheduling Assistant excels at visualizing free/busy information and identifying optimal meeting slots, it does come with limitations worth understanding. Factors such as calendar permissions, organizational boundaries, and time zone complications can sometimes present obstacles that require workarounds or alternative approaches.
This article will guide you through the essential features of the Scheduling Assistant, providing step-by-step instructions for effective use. We’ll also address common problems you might encounter and offer practical solutions. For situations where the Scheduling Assistant falls short, we’ll explore alternative tools that can enhance your meeting planning capabilities, ensuring you have a complete toolkit for streamlined scheduling regardless of complexity.
What Is Scheduling Assistant in Outlook?
This section explores Microsoft Outlook’s Scheduling Assistant tool, examining its core functionality, key features, and how it integrates with your calendar system. We’ll cover what makes this tool valuable for meeting organizers and how its visual approach to scheduling simplifies the coordination process.
Does Outlook offer a scheduling tool?: What is Outlook Scheduling Assistant?
Yes, Microsoft Outlook includes a robust scheduling tool called the Scheduling Assistant. This feature is specifically designed to simplify the process of coordinating meetings with multiple attendees by visualizing everyone’s availability in one comprehensive view.
What is the Microsoft Scheduling Assistant?
The Scheduling Assistant (or Outlook calendar meeting scheduler) is Outlook’s built-in tool for finding meeting times based on attendee availability. It eliminates the need for back-and-forth emails trying to coordinate schedules, as it automatically compiles and displays calendar information from all invited participants.
The tool provides a visual timeline showing when attendees are free or busy, allowing organizers to find the best time slot for everyone. This timeline presents a clear picture of when schedules overlap and when potential meeting windows exist, making it easy to identify optimal meeting times at a glance.
The Scheduling Assistant integrates seamlessly with the Outlook calendar, allowing you to see everyone’s schedules to help you find the best time for your meeting. It pulls real-time availability data directly from attendees’ calendars within your organization, ensuring you’re working with the most current information.
Key Features of Outlook Calendar Scheduling Assistant
Below are key features of Scheduling Assistant Outlook:
- View attendee availability: Scheduling Assistant allows you to see the schedule of all your meeting invitees, displaying their availability in the form of colored blocks. This color-coding makes it immediately apparent when people are available or have conflicts”
- White: Free
- Blue: Busy
- Light purple: Tentative
- Maroon/Purple: Out of Office
- Gray: Outside working hours
- Striped: Working elsewhere
- AutoPick: The AutoPick feature (called Suggested Times in Outlook on the web) automatically selects the earliest time that works for all required attendees and available resources. This saves time by eliminating the need to manually compare availability across calendars. You can still override the suggestion and choose a different time manually.
- Flexible meeting scheduling: Scheduling Assistant allows you to scroll across days and times to manually select the most convenient meeting slot. This flexibility is helpful when trying to accommodate different availability patterns or time zones.
- Outlook calendar integration: The tool syncs directly with attendees’ Outlook and Exchange calendars, ensuring you’re working with the most up-to-date availability information. You don’t need to manually request calendar updates — changes appear in real time for supported accounts.
- Manage access rights: Users can control who can see their availability information by adjusting calendar permissions. Options include: Free/Busy only, Limited details, Full details. This gives users the ability to share essential scheduling information while protecting private calendar content.
- Visual representation of attendee availability: Scheduling Assistant offers a consolidated, horizontal timeline view of all attendees. This group-based visualization allows you to easily compare multiple schedules, identify overlaps, and find common free times.
- Support for different time zones: When attendees are in different time zones, Scheduling Assistant automatically adjusts the timeline to reflect each person’s local time. This helps avoid confusion and ensures meetings are scheduled at appropriate hours for all participants.
- Display of working hours: The tool respects each user’s defined working hours (as set in their Outlook settings). Time slots outside of working hours appear in gray, helping you avoid scheduling meetings during off-hours or personal time.
- Support for recurring meetings: You can use Scheduling Assistant when setting up recurring meetings to check attendee availability on a recurring basis. However, Outlook primarily checks the first occurrence by default, so it’s best to manually review future recurrences if consistent attendance is a priority.
- Conflict notifications: If the selected meeting time overlaps with a participant’s existing event, Outlook highlights the conflict with a warning. This helps prevent double-booking and allows you to make adjustments before sending the invitation.
- Add rooms and resources: In addition to people, you can add conference rooms or resource mailboxes (such as equipment) to the meeting. Scheduling Assistant checks their availability just like it does for attendees, helping you coordinate logistics beyond just participants.
- Intuitive interface: The Scheduling Assistant interface is clean and intuitive, with a timeline layout that’s easy to read. Even users who aren’t tech-savvy can quickly understand how to view availability, select a time, and finalize a meeting.
Outlook’s Scheduling Assistant offers a highly visual, integrated way to coordinate meetings efficiently. While it’s not a complete scheduling solution for every use case, its core features—including real-time availability, AutoPick suggestions, time zone awareness, and resource booking—make it an essential tool for organizing meetings in modern workplaces.
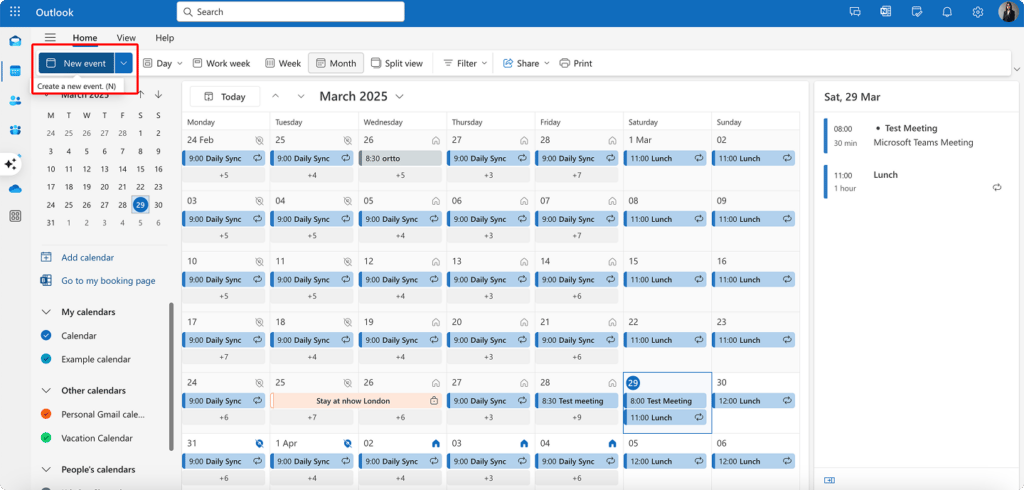
👉Where is Scheduling Assistant in Outlook? Here’s how to find Scheduling Assistant in Outlook: When creating or editing a meeting, click the “Scheduling Assistant” button in the meeting ribbon, typically found near the top of the meeting window. In Outlook Desktop, after starting a new meeting request and adding attendees, you’ll see this button prominently displayed in the ribbon’s meeting tab. For Outlook on the web, create a new event, add attendees, then look for the “Scheduling Assistant” tab at the top of the event creation form. The specific location might vary slightly depending on your Outlook version, but it’s always available when creating meetings with attendees.
Recent Updates to Outlook and Outlook Meeting Scheduling Assistant: What You Need to Know
Microsoft has been rolling out significant enhancements to Outlook’s calendaring and scheduling capabilities throughout 2024 and early 2025. These updates focus on improving collaboration, streamlining meeting planning, and making calendar management more intuitive. Let’s explore the most important changes that will impact how you schedule and manage meetings.
Shared calendar improvements
One of the most substantial improvements affects how shared calendars function in Outlook. If you’ve ever been frustrated by delayed updates or synchronization issues with shared calendars, you’ll appreciate these changes:
- Instant synchronization: Changes to shared calendars now appear immediately for all users. No more waiting several minutes to see updates reflected in your view.
- Pre-loaded calendars: Shared calendars now load instantly when selected rather than taking several seconds to appear.
- Improved series management: When extending or ending a meeting series, past meeting details remain intact. This eliminates the frustrating message about discarding previous changes.
- Simplified response tracking: When you select “Accept > Do Not Send a Response,” organizers can still see your response in the Tracking tab, improving visibility without email clutter.
- Smarter meeting updates: When you modify attendee lists, Outlook automatically determines who needs updates rather than prompting you to decide.
These improvements are now enabled by default across all Microsoft 365 Apps update channels, with the fastest updates coming to Current Channel and Monthly Enterprise Channel users.
Learn more about shared calendars here:
Calendar Scheduling Assistant enhancements
The Scheduling Assistant has received a significant visual and functional overhaul:
- Improved readability: Enhanced grid lines and availability views make it easier to interpret everyone’s schedules at a glance.
- Combined availability bar: A new consolidated view shows overlapping availability across all attendees, making it simpler to identify optimal meeting slots.
- Better time zone handling: Time zones are now displayed only for users in different zones than the organizer, reducing confusion.
- Streamlined workflow: A dedicated Send button has been added directly to the scheduling assistant view, allowing you to finalize meeting invitations without switching contexts.
These updates began rolling out in August 2024 and were completed worldwide by late September 2024.
Calendar notifications and meeting management
Recent releases have also added key features for notification management and meeting updates:
- Background notifications: As of early 2025, you can receive calendar notifications even when Outlook is closed. This ensures you never miss important meetings, even if you’re working in other applications.
- Selective meeting updates: When changing attendee lists, organizers can now choose to send updates only to added or removed attendees rather than notifying everyone, reducing unnecessary emails.
- Attendee management: New capabilities for sorting, searching, and downloading attendee lists make managing large meetings more efficient.
AI-powered scheduling with Copilot
Perhaps the most forward-looking update is the introduction of Chat Assisted Scheduling with Copilot. This feature, released in January 2025, helps you schedule simple meetings such as one-on-ones and focus time by finding optimal times through natural language requests. Simply ask Copilot to find time with someone in your organization, and it identifies the best options based on both calendars.
Getting the most from these updates
To ensure you have access to all these improvements:
- Check which update channel you’re using (Monthly Enterprise Channel and Current Channel receive updates first)
- Make sure you’re running the latest version of Outlook
- For background notifications, enable the “Send notifications when Outlook is closed” setting
These updates collectively transform Outlook’s scheduling capabilities, making it easier than ever to coordinate meetings across teams and time zones while reducing the administrative overhead of calendar management.
How to Use Outlook Scheduling Assistant
In this section, we’ll walk through the practical aspects of using Scheduling Assistant in Outlook. You’ll learn how to launch the tool, add attendees, interpret availability indicators, automatically select optimal meeting times, and customize settings to match your workflow preferences. Whether you’re planning a quick one-on-one meeting or coordinating a large team gathering, these step-by-step instructions will help you master Outlook’s powerful scheduling capabilities.
Launching the Outlook Schedule Assistant and adding attendees
The Scheduling Assistant is your command center for coordinating meeting times that work for everyone. Here’s how to access it and start building your attendee list in Outlook Desktop (Windows/Mac):
- Open a new meeting window in Outlook:
- From the Calendar view, click “New Meeting” in the ribbon
Shortcut: Ctrl + Shift + Q (Windows) or Cmd + Shift + M (Mac) - Alternatively, double-click a time slot in your calendar to open a new meeting request
- From the Calendar view, click “New Meeting” in the ribbon
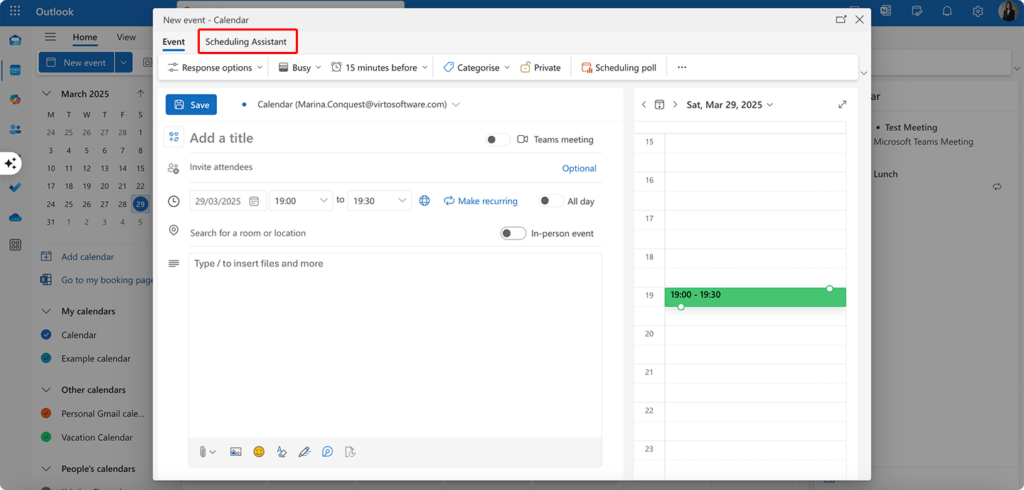
- Access the Scheduling Assistant:
- In the meeting window, click the “Scheduling Assistant” button in the ribbon
(Located in the “Show” group on the Meeting tab) - This switches from the meeting details view to the timeline view, where you can see availability for all invitees
- In the meeting window, click the “Scheduling Assistant” button in the ribbon
- Add attendees and check their availability:
- In the “To” field, enter the names or email addresses of the people you’d like to invite
- Their availability will automatically display in the timeline below
- You can set each attendee as Required, Optional, or a Resource using the dropdown next to their name
- To add a meeting room or resource:
- Click the “Rooms…” button next to the Location field
- Browse and select available rooms from your organization’s directory
- You can also type the room name directly into the Location field if it’s known and configured
🏢 Tip: Room availability will be displayed just like attendee schedules in the timeline, allowing you to book both people and spaces efficiently.
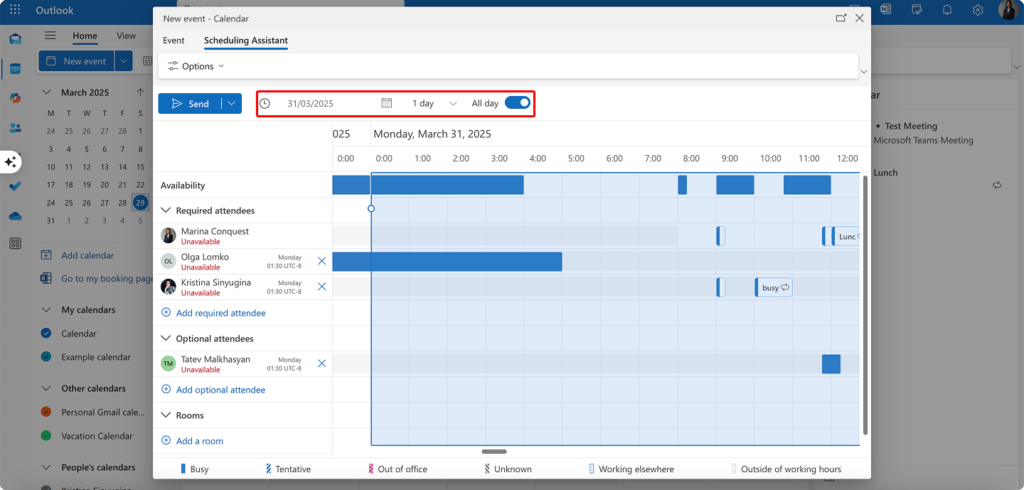
And here’s how to use scheduling assistant in Outlook for the web:
- Open a New Meeting
- Go to Outlook on the web (e.g., outlook.office.com) and navigate to the Calendar
- Click “New Event” or double-click a time slot to open the meeting creation pane
- Click “Scheduling Assistant” tab at the top (or “More Options” to access full meeting settings and then “Scheduling Assistant”)
- Open the Scheduling Assistant
- This will display a timeline view similar to the desktop version, showing attendee availability
- Add attendees and rooms
- Use the “Add attendees” (required & optional) field to enter names or email addresses
- As attendees are added, their availability appears in the scheduling grid
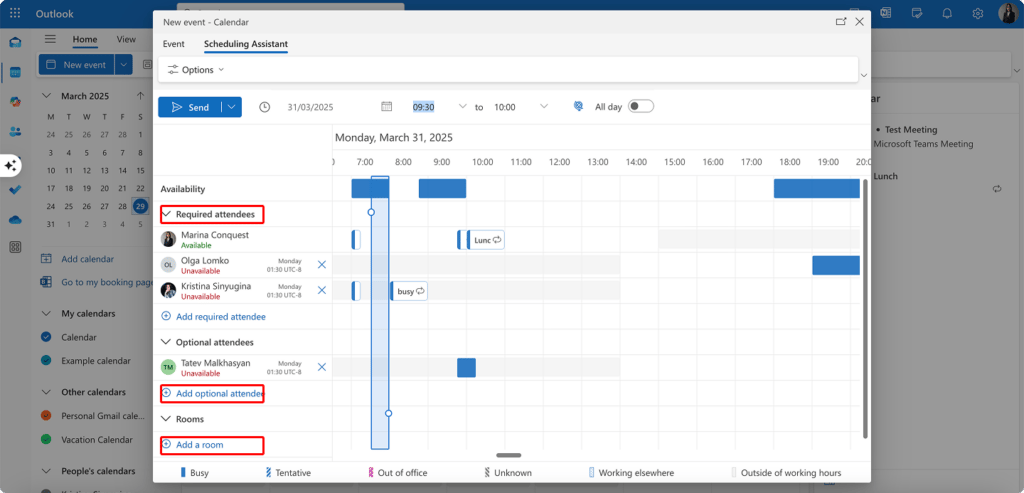
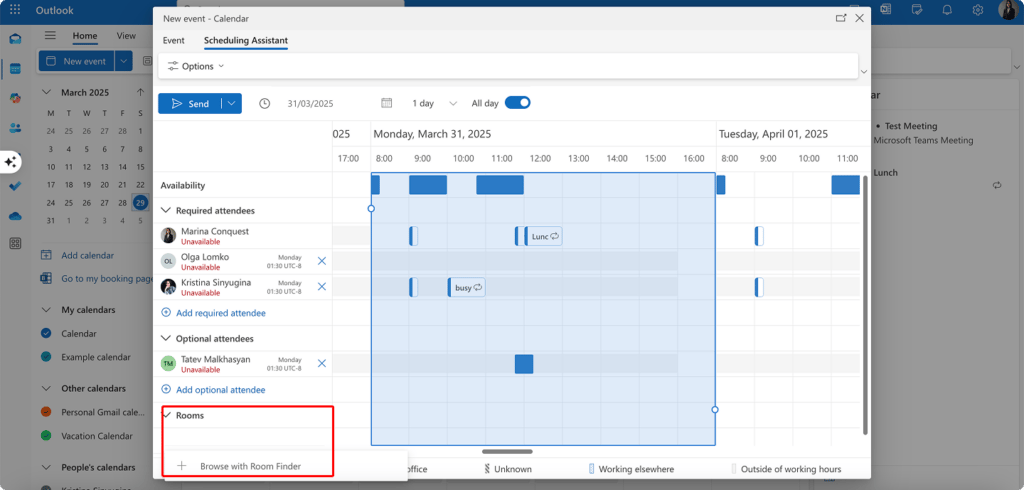
- To add a room or resource:
- Click “Add a room”
- Choose from available conference rooms or type in a known room name
- Availability for both people and rooms will update in real time, based on Microsoft 365 calendar data
🕒 Note: Outlook on the web also supports time zone awareness, so meetings display according to each attendee’s local time.
What do the colors mean in Outlook scheduling assistant?
The Scheduling Assistant uses a color-coded system to help you quickly interpret everyone’s availability:
| Color / Pattern | Meaning |
| White (no shading) | The attendee is Free and available |
| Blue | The attendee is Busy (committed to another event) |
| Light purple | The attendee has a Tentative appointment |
| Dark purple / Maroon | The attendee is Out of Office |
| Gray background | The time falls outside the attendee’s working hours |
| Striped blocks | The attendee is Working Elsewhere (e.g., remote or off-site work) |
Fig. 1. Color guide to Microsoft Outlook Scheduling Assistant.
In some versions of Outlook (especially Outlook on the Web), you may also see text labels next to attendee names or when hovering over the availability grid:
- OOF = Out of Office
- Tentative
- Working Elsewhere
These labels provide further context and help you interpret schedule nuances at a glance.
📝 Regarding “Striped blocks” in the Scheduling Assistant, there are some important nuances to note. Diagonal striped blocks typically represent the “Working Elsewhere” status, indicating when someone is working remotely or off-site. Meanwhile, horizontal striped blocks generally denote “Tentative” appointments where attendance isn’t yet confirmed. Outlook versions and settings may introduce additional visual cues, such as light blue shading for “Free” periods that contain informational appointments, or green highlighting to suggest optimal meeting times. While the visual representation might differ slightly across various Outlook platforms (desktop, web interface, or different Microsoft 365 builds), your fundamental understanding of the color coding system for availability statuses is accurate.
How do I auto pick in Outlook scheduling assistant?: Automatically select meeting times and schedule multiple meetings
When coordinating multiple schedules, Outlook’s AutoPick feature can save you significant time:
- Use AutoPick to find the best time:
- After adding all attendees, look for the “AutoPick” button in the Scheduling Assistant ribbon (In Outlook Web, it’s often replaced by “Suggested times” or “Find a time” depending on the version.)
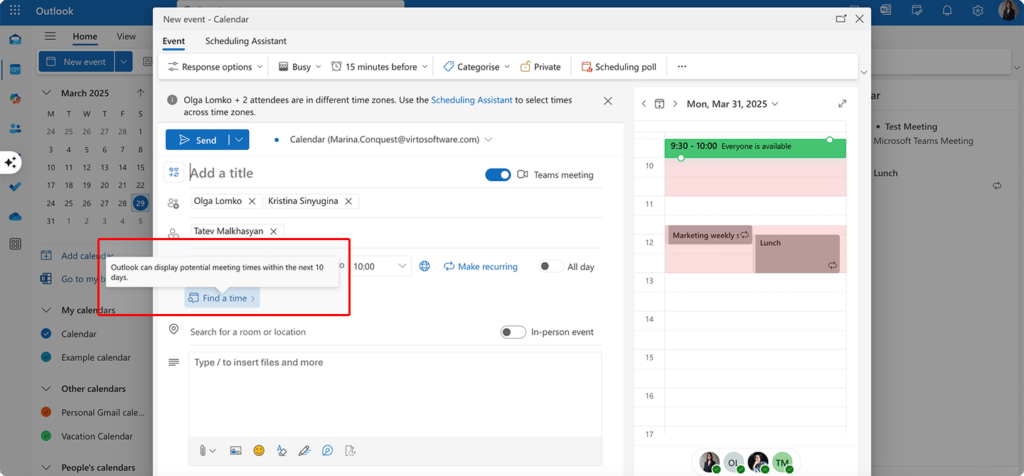
- Click this button, and Outlook will automatically jump to the next available time slot when all attendees are free
- If no time works for everyone, it will suggest the time that accommodates the most people
- View your schedule several days in advance:
- Use the date navigator at the top of the Scheduling Assistant to move forward or backward in time
- Click the right arrow to advance to future dates or use the calendar icon to jump to a specific date
- The timeline will update to show availability across multiple days
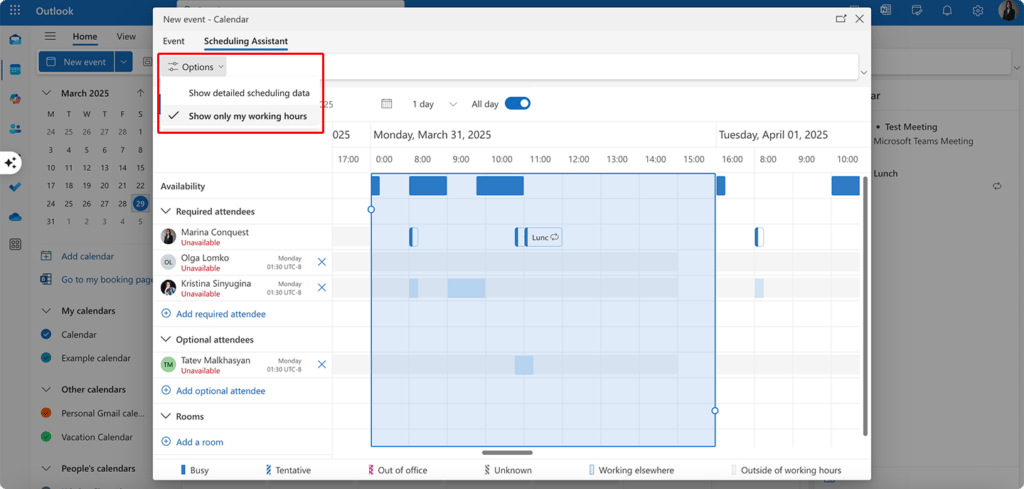
- Schedule meetings with many attendees:
- For large meetings, focus on key decision-makers by clicking the “Options” button and selecting “Show only working hours”
- Use the “Scheduling Information” button to see a condensed view of conflicts (There might not be an explicitly “Scheduling Information” button in your Outlook version; if so, look for the availability summary at the top of the window or the “Tracking” tab after sending the invite)
- Consider using the “Team” view to group attendees by department (this is available only if group calendars are set up)
- For very large groups, check the “All Attendees” row at the top which summarizes overall availability
- Schedule multiple meetings efficiently:
- After sending a meeting invitation, return to your calendar and click “New Meeting” to create the next one.
- Use the Scheduling Assistant again to maintain a consistent view of attendee availability.
- If available, open the Room Finder pane to quickly locate open meeting rooms for each session.
Settings and customization
Tailoring the Scheduling Assistant to your preferences can significantly improve your scheduling efficiency:
How do I change the scheduling assistant view in Outlook?
- Adjust the time scale:
- In the Scheduling Assistant ribbon, look for the time scale dropdown
- Select from options like 30 minutes or change the granularity of time slots manually
- Change the displayed working hours:
- Click “Options” in the Scheduling Assistant ribbon
- Select “Show working hours only” to focus on business hours
- Or turn this off to see the full day including early morning and evening slots
- Customize meeting parameters:
- Start/End Time: Click directly on the timeline to manually select a start time, or type times in the fields above the timeline
- Recurrence: Click the “Recurrence” button to set up repeating meetings (daily, weekly, monthly)
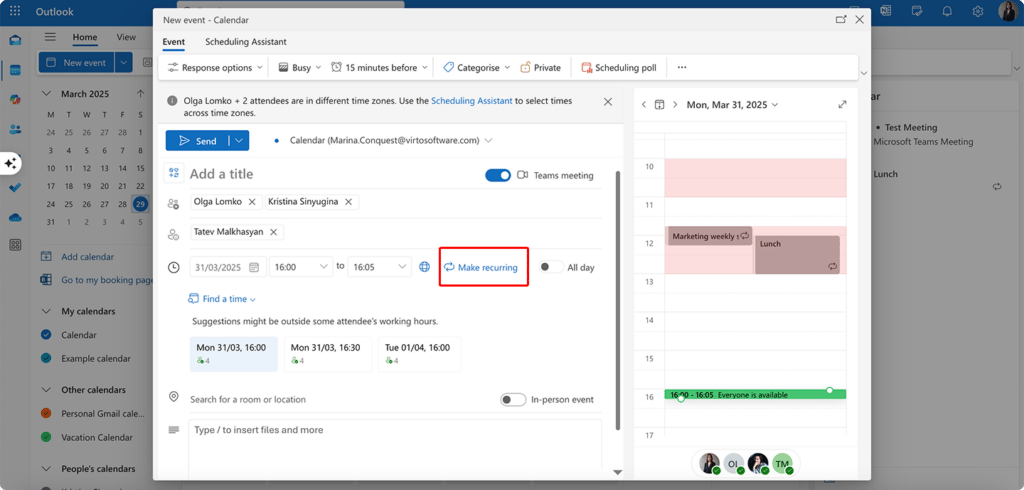
- When setting up recurring meetings, the Scheduling Assistant will verify availability across all instances
- Save your preferences:
- Outlook will remember many of your view settings for future scheduling sessions
- For recurring meetings, you can modify individual instances later if conflicts arise
By mastering these Scheduling Assistant features, you’ll be able to coordinate even complex meetings with minimal back-and-forth, saving time for everyone involved and ensuring maximum attendance at your meetings.
Troubleshooting Common Issues with Scheduling Assistant on Outlook
Even the most powerful tools occasionally encounter hiccups. In this section, we’ll address the most common problems users face when working with Outlook’s Scheduling Assistant and provide practical solutions to get you back on track quickly. Whether the feature isn’t appearing in your interface, attendee availability isn’t displaying correctly, or the suggested meeting times don’t seem optimal, these troubleshooting steps will help you resolve issues and make the most of Outlook’s scheduling capabilities.
Scheduling Assistant is not available in Outlook
If you can’t find or access the Scheduling Assistant feature, here are several potential solutions:
- Make sure your version of Outlook supports this feature: The Scheduling Assistant is available in most modern versions of Outlook, but some limitations exist:
- It’s fully supported in Outlook for Microsoft 365, Outlook 2019, Outlook 2016, and Outlook 2013
- Outlook on the web (OWA) has a similar feature but with a different interface
- Outlook for Mac includes the Scheduling Assistant, though the layout may differ slightly from the Windows version.
- Check your interface settings: The feature might be hidden due to your current view or ribbon configuration:
- Make sure you’re creating a meeting (not just an appointment)
- Look for “Scheduling Assistant” in the “Show” group of the meeting ribbon
- If you’re using a simplified ribbon, click the “More Commands” button (three dots) to see additional options
- Try resetting your ribbon customizations by going to File > Options > Customize Ribbon > Reset
- Check your account settings and company policies: Some account types or organizational policies might restrict access:
- The full Scheduling Assistant is primarily designed for Microsoft Exchange or Microsoft 365 accounts
- IMAP, POP, or Gmail accounts may have limited or no access to the feature
- Your organization might have disabled certain features through Group Policy
- Contact your IT department if you believe this is a permission issue
- Update Outlook to the latest version: Outdated software often lacks current features or contains bugs that affect functionality:
- Go to File > Office Account > Update Options > Update Now
- If you’re using a Microsoft 365 subscription, updates should be automatic
- For standalone versions, ensure you’ve installed all available updates
- Consider upgrading if you’re using a very old version (pre-2013)
Why can’t I find the scheduling assistant in Outlook?
If you’ve checked the solutions above but still can’t locate the Scheduling Assistant, consider these additional factors:
- Make sure you’re in Calendar view, not Mail, when creating the meeting
- Verify you’re creating a meeting with attendees (not just a personal appointment)
- Look for alternative names: in some versions, it might be called “Scheduling View” or “Calendar View”
- Check if you’re using Outlook in a compatible mode (some simplified or basic modes omit features)
Attendee availability is not showing
When attendee schedules aren’t visible or appear incomplete, try these solutions:
- Make sure all attendees have their calendars shared: For availability to display properly, calendars must be accessible:
- Within the same organization, basic free/busy information is usually shared by default
- External attendees’ availability may not show unless explicit calendar sharing is established
- Ask attendees to verify their sharing settings in Outlook (Calendar > Share Calendar)
- For persistent issues, have attendees send you a sharing invitation (Calendar > Share > Share Calendar)
- Check your calendar privacy settings in Outlook: Your own settings might affect what you can see:
- To check how much of your calendar others can see, right-click your calendar > Sharing Permissions, or go to Calendar > Share Calendar > Calendar Permissions.
- If you suspect your calendar isn’t processing invitations correctly, contact your IT admin to check server-side calendar processing rules (Exchange environments only).
- Make sure attendees are using a Microsoft 365 corporate account: Different account types have different capabilities:
- Microsoft 365 or Exchange accounts offer the most comprehensive availability information
- Personal accounts (Outlook.com, Hotmail) have more limited sharing capabilities
- Non-Microsoft accounts (Gmail, Yahoo) typically won’t show availability unless manually shared
- Some shared resources or distribution lists may not show availability unless configured by your IT admin. Room mailboxes must be set up with booking policies to appear in Scheduling Assistant.
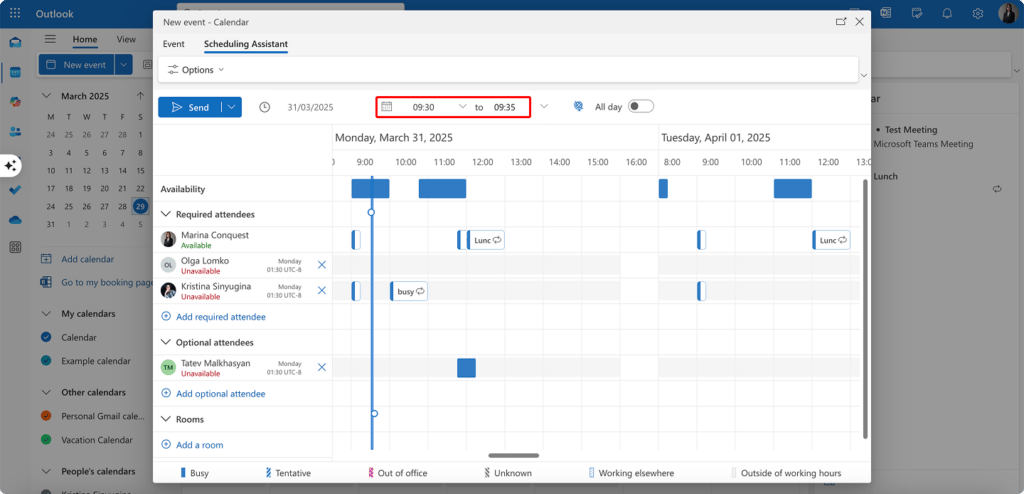
How to check availability in Outlook scheduling assistant?
To verify that you’re properly seeing everyone’s availability:
- Add all attendees to the meeting invitation
- Switch to the Scheduling Assistant view
- Look for color-coded blocks in the timeline
- If a person’s row shows an empty white timeline, their availability isn’t being shared
- For immediate testing, add a colleague whose calendar you know is properly shared
Can others see my Outlook calendar details in Scheduling Assistant?
By default, others can see your free/busy status but not specific details:
- Basic sharing shows only your availability status (Free, Busy, Tentative, Out of Office)
- Meeting subjects, locations, and other details remain private unless you explicitly share them
- To check your sharing settings, go to Calendar > Share Calendar > Properties
- You can adjust the level of detail others can see (Availability only, Limited details, Full details)
The Scheduling Assistant suggests an inconvenient time
If the automatically suggested times don’t work well, investigate these potential causes:
- Check all attendees’ time zone settings: Time zone mismatches are a common culprit:
- In the meeting window, verify the time zone setting (usually shown near the date/time selector)
- Check your personal time zone setting (File > Options > Calendar > Time zones)
- For attendees in different time zones, Outlook should automatically adjust, but verify this is working
- Consider explicitly noting time zones in the meeting subject or body for clarity
- Make sure there are no conflicting events that affect the time selection: Hidden conflicts can impact suggestions:
- Look for tentative meetings that might not appear as solid blocks
- Check for all-day events that might not register as conflicts
- Verify that recurring meetings are properly represented
- Consider “personal” appointments that might be marked as private
- Manually change the meeting time if automatic selection is inconvenient: Override automatic suggestions when needed:
- Click directly on a green (available) area in the timeline
- Drag the blue meeting block to your preferred time slot
- Use the time selectors above the timeline to manually input specific times
- Check the “All Attendees” row to ensure your manual selection works for everyone
- Consider using additional tools to find the best meeting time: When built-in tools aren’t sufficient:
- Use the “Poll for time” feature in Outlook Web App to let attendees vote on preferred times
- Consider third-party scheduling tools like Doodle or Microsoft FindTime
- For complex scheduling across organizations, consider sending multiple time options in the meeting notes
- Use the “Propose New Time” feature to allow attendees to suggest alternatives. This is only available after a meeting invite has been sent and cannot be used by the organizer—only by invitees.
By addressing these common issues, you’ll be able to use the Scheduling Assistant more effectively and overcome the typical obstacles that might otherwise hamper your meeting planning process.
Advanced Meeting Scheduling Capabilities Beyond Schedule Assistant
While Outlook’s Scheduling Assistant is excellent for everyday coordination, power users and teams with more complex needs can unlock even greater efficiency by tapping into the broader Microsoft 365 ecosystem, external calendar integrations, and automation tools. This section explores how to extend Outlook’s native scheduling capabilities to create a seamless, intelligent meeting management experience across platforms.
Microsoft 365 integration
Outlook becomes significantly more powerful when combined with other Microsoft 365 tools:
- Teams integration
- Automatic Teams links: When creating a meeting in Outlook, toggle “Teams Meeting” in the ribbon to generate a Teams link automatically.
- Channel scheduling: Schedule meetings directly in Teams channels (via Teams or Outlook on the web) to maintain context and automatically include all channel members.
- Join reminders: Get desktop or mobile notifications before your Teams meetings, even if Outlook isn’t open.
- Meeting recordings: Teams meetings scheduled via Outlook can be recorded, with the video automatically saved to OneDrive or SharePoint, depending on who initiates the recording and how the meeting is set up.
- Planner and To Do Integration
- Task synchronization: Convert meeting notes or action items into tasks in Microsoft Planner or To Do.
- Deadline coordination: Use Planner’s Schedule view alongside your Outlook calendar to visualize task deadlines and meetings together.
- Meeting preparation: Create To Do lists associated with upcoming meetings to ensure readiness.
- Follow-up tracking: Automate task creation from meeting outcomes for better accountability.
- SharePoint and OneDrive coordination
- Collaborative agendas: Use shared Word or OneNote files stored in OneDrive or SharePoint to co-build agendas before meetings.
- Document review meetings: Schedule meetings with links to relevant files so attendees can access materials directly.
- Team calendar visibility: Embed Outlook calendars in SharePoint pages using calendar web parts (for classic SharePoint sites).
- Resource booking: Use SharePoint lists with Power Automate to manage booking of non-standard resources (e.g. equipment, labs).
Sync with external calendars
For organizations using multiple platforms or working with outside collaborators, calendar synchronization becomes essential.
- Google calendar integration
- Limited native sync: Outlook desktop does not support direct two-way sync with Google Calendar. However, Outlook on the web allows viewing Google calendars when accounts are connected.
- Enterprise sync: Organizations using Google Workspace Sync for Microsoft Outlook (GWSMO) can enable calendar sync for business accounts.
- Manual ICS subscription: You can add a Google Calendar as an internet calendar (ICS) to Outlook, but this is read-only.
- Unified view on mobile: The Outlook mobile app supports showing both Outlook and Google calendars, if both accounts are added manually.
- Other calendar platforms
- Apple Calendar (iCloud): Subscribe to iCloud calendars in Outlook to view personal and work events together (read-only).
- ICS web calendars: Add public calendars (e.g., holidays, events) via ICS subscriptions.
- Publishing your Outlook calendar: Share your availability with others using a published ICS link.
- Third-party integrations: Use tools like Zapier, Microsoft Power Automate, or SyncGene to connect Outlook with external calendar and scheduling platforms.
Multiple account management
If you manage multiple calendars across work and personal accounts:
- Side-by-side calendars: View multiple calendars in parallel within Outlook.
- Color coding: Assign distinct colors to each calendar for easy differentiation.
- Selective publishing: Control what calendar data is shared externally or across organizations.
- Primary calendar designation: Set a default calendar for new meetings, while keeping others visible for reference.
Automation and reminders
Leverage automation to reduce repetitive tasks and enhance scheduling intelligence:
- Multiple reminders: Set staggered reminders (e.g., 1 day, 1 hour, 15 minutes) for better preparation.
- Category-based alerts: Use Outlook categories to apply different reminder settings based on meeting type.
- Early conflict alerts: Outlook flags potential conflicts as soon as they arise—before finalizing a meeting.
⚠️ Note: Outlook does not currently support location-based or travel-time reminders natively. This feature is available in Google Calendar and Apple Calendar.
Scheduling automation with Power Automate
With Microsoft Power Automate, you can build workflows that streamline meeting management:
- Auto-scheduling: Trigger meeting creation based on project milestones or form submissions.
- Calendar digests: Send yourself or your team daily or weekly summaries of upcoming meetings.
- Attendance tracking: Log attendee responses or actual participation into SharePoint lists or Excel.
- Follow-up automation: Automatically send recap emails with notes and action items after meetings.
AI-powered scheduling
Outlook and Microsoft 365 are incorporating AI to make scheduling smarter:
- Microsoft Copilot (in preview/rollout):
- Use natural language to ask Copilot to find time with specific people.
- Get suggestions for optimal times based on work patterns and availability.
- Identify meetings that could be shortened, skipped, or combined.
- Automatically block focus time around deadlines or high-priority projects.
⚠️ Note: Microsoft Copilot features are rolling out gradually and may require specific Microsoft 365 licensing (e.g., E3/E5 with Copilot add-on).
Cross-device coordination
Stay on top of your schedule wherever you are:
- Outlook mobile app: Schedule, view availability, and join meetings on the go with full Scheduling Assistant support.
- Calendar widgets: Add Outlook calendar widgets to your phone’s home screen for quick access.
- Smartwatch integration: Get meeting reminders and join links on Apple Watch or Android smartwatches.
- Voice assistants: Use Cortana (Windows), Siri (iOS), or Google Assistant to check your schedule or add meetings by voice.
By tapping into these advanced tools and integrations, Outlook transforms from a basic scheduling tool into a comprehensive, cross-platform meeting management system. Whether you’re managing a global team, coordinating with external partners, or simply looking to optimize your day, these features help reduce friction, save time, and improve collaboration across your digital workspace.
Limitations of the MS Outlook Scheduling Assistant
Despite its many strengths, Outlook’s Scheduling Assistant isn’t without shortcomings. Understanding these limitations is essential for setting realistic expectations and developing workarounds when necessary. In this section, we’ll examine the tool’s constraints regarding meeting customization, large team management, and integration capabilities. Recognizing these boundaries will help you navigate situations where you might need alternative solutions, especially in dynamic, fast-paced work environments that demand greater flexibility than what the standard Scheduling Assistant provides.
Limited meeting customization options
While the Scheduling Assistant handles basic scheduling well, it lacks flexibility in several key areas:
- Recurring meeting limitations:
- Pattern rigidity: The tool only supports standard recurrence patterns (daily, weekly, monthly) without the ability to create custom patterns like “first Monday and third Thursday”
- Exception handling: Making changes to a single occurrence in a series often creates confusion, with updates sometimes applying to the entire series unexpectedly
- Date range constraints: There’s no easy way to schedule recurring meetings that skip holiday periods or follow fiscal quarters
- Attendee variations: You cannot easily vary the attendee list for different occurrences of a recurring meeting without creating separate series
- Meeting format restrictions:
- Duration increments: Outlook only supports fixed duration increments (usually 5-minute steps). You can create non-standard durations manually (e.g., 40 minutes), but only by manually editing start and end times—not via dropdowns.
- Template limitations: There’s no native way to create and save meeting templates with predefined settings for different meeting types
- Location flexibility: The tool struggles with hybrid meetings where some attendees are in-person and others remote
- Resource allocation: You cannot specify different resources (like equipment or catering) for different segments of a meeting
Challenging to customize for large teams
The Scheduling Assistant’s design shows its limitations when dealing with larger groups:
- Visualization constraints
- Attendee limit issues: When scheduling meetings with dozens of attendees, the view becomes cluttered and difficult to interpret
- Team grouping: There’s no native way to group attendees by department or role for easier availability analysis
- Hierarchy representation: The tool doesn’t visually distinguish between executives, team members, and optional attendees
- Decision flow: For large teams, it’s difficult to prioritize key decision-makers’ availability over others
📝 Outlook distinguishes optional attendees visually, but does not support grouping or prioritizing attendees by role or department.
- Coordination complexities
- Delegate management: When multiple assistants manage executives’ calendars, permission conflicts often arise
- Group availability: No easy way to see aggregate availability of functional teams rather than individuals
- Voting mechanisms: Limited options for allowing teams to vote on preferred times
- Notification management: No way to customize or stagger notifications for different attendee groups
📝 While Outlook Web and Microsoft FindTime provide some polling capabilities, the desktop Scheduling Assistant itself lacks built-in voting or preference collection.
Limited integration with external calendars
In today’s collaborative environment, the Scheduling Assistant’s primarily Microsoft-focused design creates barriers:
- Cross-platform challenges
- Non-Microsoft platforms: Integration with Google Workspace, Apple Calendar, or other popular platforms requires workarounds
- Free/busy information: External attendees’ availability often shows as “No information” even when they’re available
- Privacy settings: Inconsistent handling of privacy settings between different calendar systems
- Subscription calendars: Limited support for web-based calendar subscriptions like holiday calendars or industry events
📝 Outlook does not natively support real-time two-way sync with Google or Apple calendars. ICS feeds are read-only and may sync infrequently.
- Third-party tool compatibility
- Scheduling apps: Minimal integration with specialized scheduling tools like Doodle or Calendly
- CRM systems: Difficult to coordinate scheduling with customer information from CRM platforms
- Project management: No direct connection with project timeline tools to align meetings with deliverables
- Event platforms: Cannot easily coordinate with event management systems used for webinars or conferences
Impact in fast-paced environments
These limitations become particularly problematic in dynamic work settings:
- Agility constraints
- Ad-hoc scheduling: The tool struggles with last-minute scheduling that requires quick coordination across multiple parties
- Time zone adaptability: Managing global teams across multiple time zones becomes cumbersome when schedules change frequently
- Rapid rescheduling: Mass updates to meeting times during emergency situations can become error-prone
- Flexible work hours: The system assumes standard work schedules, creating friction for teams with flexible arrangements
- Workflow disruptions
- Context switching: Scheduling complex meetings often requires moving between multiple tools, breaking concentration
- Decision bottlenecks: Waiting for availability information can delay critical meeting arrangements
- Setup overhead: The time required to properly configure complex meetings can be prohibitive in time-sensitive situations
- Multi-platform participants: Teams working across organizational boundaries face particular challenges with inconsistent calendar data
While Outlook’s Scheduling Assistant is a powerful and widely used tool, it has notable limitations—especially for large, distributed teams or complex meeting scenarios. These include restricted customization for recurring meetings, limited visibility in large groups, minimal external calendar integration, and lack of advanced automation. Recognizing these constraints allows teams to set realistic expectations and adopt supplementary tools like Microsoft FindTime, Power Automate, or third-party schedulers for more flexible and dynamic coordination.

VirtoSoftware Calendar as an Alternative Solution to Outlook Scheduler Assistant
While Outlook’s Scheduling Assistant handles basic meeting coordination, organizations with complex scheduling needs often require more robust tools to manage their time effectively. In this section, we’ll explore how VirtoSoftware’s Calendar App can complement or extend Outlook’s native capabilities, offering solutions to many of the limitations we discussed earlier. From unified calendar views and advanced team collaboration to multi-source integration and mobile accessibility, we’ll examine how this alternative approach can transform your scheduling workflow while maintaining compatibility with Microsoft’s ecosystem.
Unified calendar view
One of the most powerful features of VirtoSoftware Calendar is its ability to consolidate multiple calendars into a single, comprehensive view:
- Combine multiple Outlook calendars
- Centralized dashboard: View personal, team, department, and organization-wide calendars simultaneously in one interface
- Contextual organization: Group related calendars together (e.g., project calendars alongside team member schedules)
- Customizable layouts: Toggle calendars on/off for focused views without permanently removing them
- Interactive timeline: Navigate seamlessly across day, week, month, year, flat year, and agenda views while maintaining multi-calendar visibility
- Support for multiple calendar systems
- Cross-platform compatibility: Integrate Exchange, SharePoint, and Microsoft 365 calendars within one view
- Consistent interface: Access the same unified view whether working in SharePoint or Teams
- Synchronized updates: Changes made in any connected calendar automatically reflect across the system
- Hierarchical organization: Organize calendars by teams, departments, or projects for intuitive navigation
Advanced scheduling and team collaboration
VirtoSoftware Calendar transforms scheduling from an individual task to a collaborative team activity:
- Team calendar management in Microsoft Teams
- In-channel calendars: Embed shared calendars directly in Teams channels, keeping scheduling within your collaboration context
- Group scheduling: Plan team activities with full visibility of everyone’s commitments
- Seamless transitions: Move effortlessly between conversation, scheduling, and document sharing within the same interface
- Real-time collaboration: See updates instantly when team members add or modify events
- Collaborative planning capabilities
- Project timelines: Visualize project milestones, deadlines, and team availability in a unified view
- Resource allocation: Coordinate team members across multiple projects with clear visibility into workloads
- Approval workflows: Implement approval processes for time-off requests, meeting bookings, or resource reservations
- Meeting coordination: Plan multi-team gatherings with full visibility into everyone’s availability
Color-coded events and categories
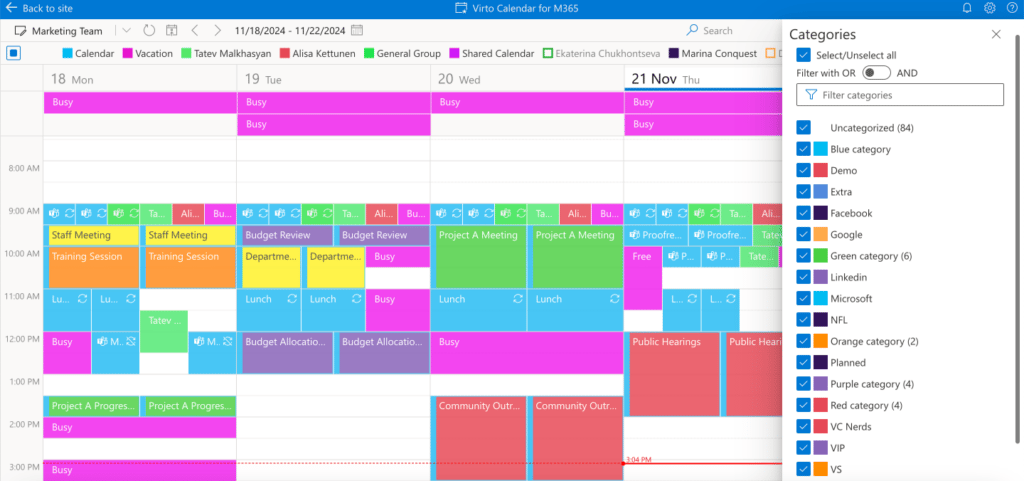
Visual organization features in VirtoSoftware Calendar make it easier to interpret complex schedules at a glance:
- Intuitive visual differentiation
- Event type coding: Distinguish between meetings, deadlines, vacations, and team tasks through consistent color schemes
- Priority indicators: Highlight high-priority events with special colors or icons
- Duration visualization: Better understand meeting lengths and schedule density through proportional display
- Status representation: Distinguish between tentative, confirmed, and canceled events through visual cues
- Customizable visual organization
- Personal color preferences: Allow users to customize colors based on their visual preferences
- Category-based coloring: Apply consistent colors to similar events across different calendars
- Department-specific schemes: Create standardized color systems for different departments
- Conditional formatting: Automatically apply colors based on event attributes (e.g., location, attendee count, or duration)
Event syncing and multi-source integration
One of VirtoSoftware Calendar’s most powerful features is its ability to bridge different calendar ecosystems:
- Cross-platform calendar integration
- Microsoft ecosystem: Seamlessly connect with Outlook, SharePoint, and Exchange calendars
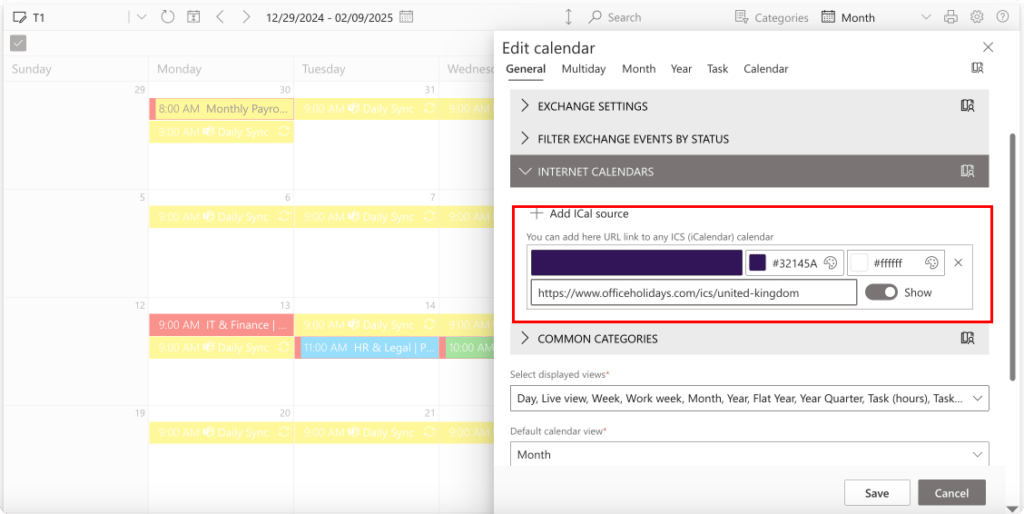
- External platforms: Incorporate Google Calendar, iCal feeds, and other third-party calendar systems
- HTTP feeds support: Connect to calendar feeds using HTTP URLs, expanding compatibility with older systems
- Custom connectors: Integrate with specialized industry calendars or legacy systems
- Real-time conflict prevention
- Cross-calendar awareness: Instantly see conflicts even when they occur across different calendar systems
- Smart suggestions: Receive alternative scheduling options when conflicts are detected
- Resource availability: Check for meeting room and equipment availability across systems
- Multisource view: Hide empty calendars to focus only on those with scheduled events, as featured in recent updates
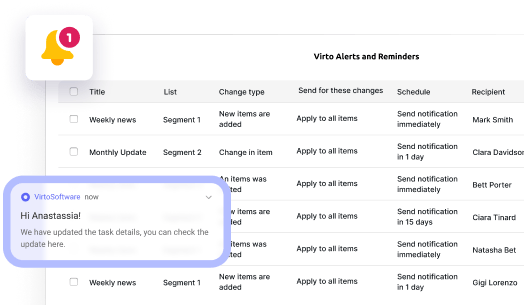
Automatic reminders and notifications (when used in conjunction with Virto Alerts & Reminder App)
VirtoSoftware Calendar (when used alongside Virto Alerts & Reminder App) helps ensure everyone stays on schedule through comprehensive notification systems:
- Multi-channel notifications
- Email alerts: Send customizable email reminders for upcoming meetings
- Teams notifications: Receive alerts directly within your workflow in Microsoft Teams
- Mobile push notifications: Stay informed even when away from your desk
- Desktop alerts: Get timely reminders while working on other tasks
- Attendance management
- RSVP tracking: Monitor attendee responses across all connected calendars
- Reminder escalation: Send additional notifications for non-responders
- Custom notification timing: Configure when reminders are sent based on event importance
- Team awareness: Let managers see upcoming team commitments at a glance
Book conference rooms and resources
The app provides enhanced capabilities for managing physical resources:
- Advanced room booking
- Room Finder integration: Works with Outlook Room Finder while adding additional filtering and visualization options
- Equipment bundling: Book necessary equipment alongside meeting rooms
- Capacity optimization: Match room size to attendee count to prevent over/under-utilization
- Location-based suggestions: Recommend rooms based on attendee locations
- Resource management
- Equipment tracking: Schedule shared resources like projectors, video conferencing systems, or special equipment
- Service coordination: Book catering, IT support, or other services alongside meetings
- Availability visualization: See at a glance which resources are available during specific time slots
- Booking policies: Enforce organizational policies for resource usage and reservations
Availability on mobile devices and Microsoft Teams
VirtoSoftware Calendar ensures schedule access from anywhere:
- Seamless cross-device experience
- Responsive design: Access the same powerful features across desktop, tablet, and mobile devices
- Native Teams integration: View and manage calendars directly within Microsoft Teams
- Offline capabilities: View scheduled events even without internet connection
- Mobile-optimized interface: Enjoy touch-friendly controls designed for on-the-go use
- Context switching elimination
- In-app scheduling: Create and modify events without leaving your current workflow
- Contextual information: See relevant documents, conversations, and calendar events together
- Unified notifications: Receive all calendar alerts in one place rather than across multiple apps
- Persistent access: Maintain consistent calendar access regardless of which device you’re using
Advanced permissions and role-based access
VirtoSoftware Calendar provides granular control over calendar information:
- Sophisticated permission management
- Role-based access: Assign different capabilities based on organizational roles
- Hierarchical permissions: Create nested permission structures that match your organizational chart
- Selective sharing: Share specific calendars or events with particular individuals or groups
- Temporary access: Grant time-limited permissions for contractors or temporary team members
- Complex organization support
- Multi-department coordination: Manage permissions across organizational boundaries
- External collaboration: Securely share calendar information with clients or partners
- Privacy protection: Control which details are visible to different audience segments
- Delegation capabilities: Allow assistants to manage calendars on behalf of executives
Combining Schedule Assistant Outlook and VirtoSoftware calendar
These tools work best when used together, complementing each other’s strengths. Here are practical scenarios showing their combined power:
Scenario 1: Cross-platform project coordination
A project manager needs to schedule a meeting with a distributed team across different time zones and calendar platforms.
Combined approach:
- Use Outlook Scheduling Assistant to find an optimal time slot based on internal team members’ availability
- Verify this time against external collaborators’ Google Calendars through Virto Calendar’s multi-source view
- Book the meeting in Outlook, with Virto Calendar ensuring visibility across all platforms
- Utilize Virto Calendar’s color-coding to distinguish this cross-team meeting from internal discussions
- Leverage automated reminders through both systems to accommodate different team members’ preferences
This approach ensures that all participants, regardless of their location or calendar platform, can be effectively coordinated, overcoming the Scheduling Assistant’s limited external calendar integration.
Scenario 2: Balancing team availability and time-off management
An HR manager needs to track team vacations while scheduling important meetings and interviews.
Combined approach:
- Maintain vacation requests and approvals in Virto Calendar with its specialized workflow capabilities
- Use the consolidated vacation view in Virto Calendar to identify optimal periods for company-wide meetings
- Apply Outlook Scheduling Assistant to find specific time slots when key participants are available
- Schedule interview panels around team availability with awareness of approved time-off
- Utilize Virto’s permission system to ensure appropriate privacy for vacation details while making high-level availability transparent
This integrated approach addresses the Scheduling Assistant’s limitations in handling different event types while maintaining its strengths in finding optimal meeting times among available participants.
Scenario 3: Sales team coordination in Microsoft Teams
A sales team needs to balance weekly internal meetings with customer appointments and pipeline reviews.
Combined approach:
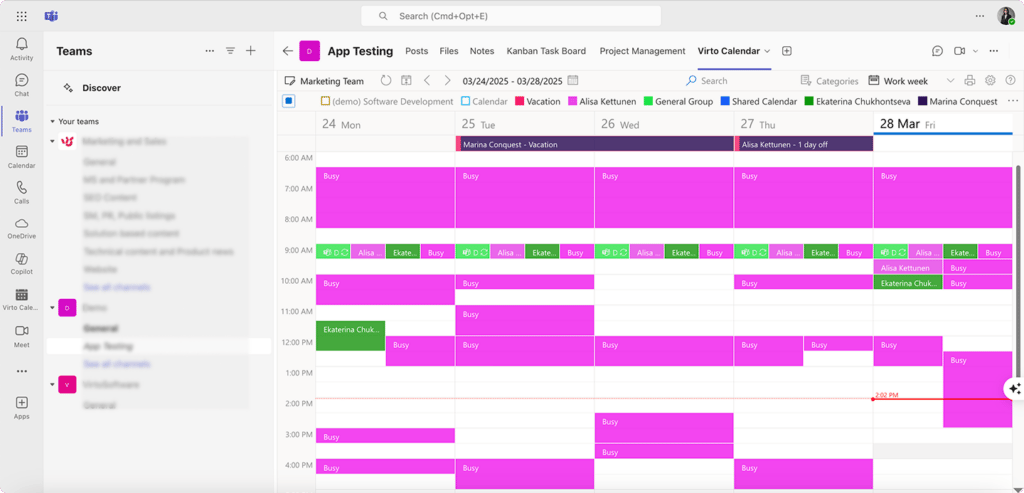
- Embed Virto Calendar directly in Microsoft Teams channels for at-a-glance visibility of team activities
- Use Outlook Scheduling Assistant for arranging customer meetings that accommodate both internal team members and external clients
- Color-code different meeting types in Virto Calendar to distinguish internal reviews from customer engagements
- Leverage Virto Canedar’s multi-source integration to incorporate CRM appointment data alongside Outlook meetings
- Utilize Virto Calendar’s mobile capabilities to keep field sales representatives connected to the team schedule
This scenario showcases how Teams integration can provide contextual scheduling information that complements the Scheduling Assistant’s core meeting arrangement capabilities, creating a seamless workflow for sales professionals who need to balance internal and external commitments.
Conclusion on Scheduling Assistant Outlook
Outlook’s Scheduling Assistant remains an invaluable tool for basic meeting coordination within organizations. Its streamlined interface for finding available time slots, suggesting optimal meeting times, and integrating with Room Finder makes it a staple for everyday scheduling needs. However, as we’ve explored throughout this article, it does come with notable limitations—particularly when managing large teams, coordinating across multiple calendars, or integrating with external systems. These constraints can become significant obstacles in today’s complex, fast-paced work environments where cross-functional collaboration and flexible scheduling are essential.
For organizations seeking more robust scheduling capabilities, VirtoSoftware’s Calendar App for Microsoft Teams and SharePoint Online offers a compelling alternative that extends and enhances Outlook’s native functionality. With its unified calendar view, advanced integration capabilities, and powerful collaboration features, the Virto Calendar App effectively addresses many of the Scheduling Assistant’s shortcomings. By consolidating multiple data sources—including Outlook calendars, SharePoint lists, Planner tasks, and external calendars—into a single, comprehensive view, it eliminates the need to switch between different platforms and provides greater scheduling visibility and flexibility.
The Virto Calendar App particularly shines in scenarios requiring sophisticated team coordination, such as managing geographically distributed teams, organizing complex project timelines, or coordinating resources across departments. Its color-coding features, customizable permissions, and multi-source integration capabilities make it an excellent complement to Outlook’s Scheduling Assistant, allowing users to leverage the strengths of both tools based on their specific scheduling needs.
Rather than viewing these solutions as competing alternatives, consider them complementary tools in your productivity arsenal. The Scheduling Assistant excels at quickly finding available meeting times for small groups, while Virto Calendar App provides the comprehensive overview and advanced features needed for complex scheduling scenarios. Together, they form a powerful combination that can significantly reduce scheduling conflicts, save valuable time, and increase productivity across your organization.
For a deeper understanding of these tools and their capabilities, we encourage you:
- Schedule a free quick demonstration of VirtoSoftware’s apps
- Browse the site and install free versions of the apps
- Explore these additional resources:
Official Microsoft resources:
- Use the Scheduling Assistant and Room Finder for meetings in Outlook
- Schedule a meeting or event in Outlook
- How do I use the Scheduling Assistant to find meeting times?
- Schedule with Outlook on the web
VirtoSoftware resources: