SharePoint Share with External Users: Best Practices for Collaborating
Discover how to leverage SharePoint's external sharing capabilities to securely share resources, streamline joint projects, and overcome common collaboration hurdles.
Effective collaboration with external partners, clients, and vendors is often key to success. SharePoint’s external sharing feature provides a powerful platform to achieve this, enabling organizations to securely share documents, lists, and other resources with individuals outside their organization. This capability is essential for businesses and teams working with external partners on joint projects, proposals, or other initiatives that demand shared access to information.
This article will:
- Explain the concept of external sharing in SharePoint and why it’s an essential tool for collaboration.
- Provide step-by-step instructions on how to set up and use SharePoint’s external sharing feature effectively.
- Discuss potential issues, such as security concerns or access management challenges, and offer practical solutions to address them.
- Explore alternative solutions for managing external access, such as the Virto Calendar App for SharePoint Online & Microsoft 365 and Virto Calendar Web Part for SharePoint On-Premises, which offer additional features and flexibility for both online and on-premises environments.
From configuring access to troubleshooting issues, this guide will equip you with actionable insights to make external collaboration smooth, secure, and simple.
What Is External Sharing in SharePoint?
In this section, we will explore the concept of external sharing in SharePoint, its purpose, key terms, and real-world use cases. We’ll also discuss when to use this feature, weigh its advantages and limitations, and explain why external sharing might sometimes fail due to configuration or permission issues.
What is SharePoint share with external users?
External sharing in SharePoint is a feature that allows you to securely share sites, documents, and folders with people outside your organization. These external users can include partners, contractors, consultants, or customers who need access to specific content for collaboration, without requiring an account within your enterprise tenant.
The primary purpose of external sharing is to facilitate business collaboration by enabling:
- Seamless communication and document-sharing with external partners.
- Secure access to files and folders for contractors or vendors working on specific projects.
- Sharing content with customers for review and feedback without granting them full access to your internal systems.
👉 Can SharePoint be shared with external users? Yes, SharePoint includes robust external sharing capabilities, but this requires proper configuration to ensure secure and efficient collaboration.
What is the difference between external users and guest users in SharePoint?
In this section, we’ll cover the definitions of external users and guests, as well as the differences between the two.
- External users: External users are individuals outside your organization who are invited to access SharePoint by using their own email accounts. They sign in with a Microsoft account or a work/school account and can work on shared content with varying permission levels, just like internal users. Their access is authenticated and can be managed through permissions.
- Guests: Guests are a specific subset of external users. They can access shared content without requiring a Microsoft account or authentication. Instead, they use a one-time passcode or temporary link provided to them. Their access is typically more limited, ad hoc, and short-term, suitable for scenarios like sharing a single document for review.
Here’s a table comparing external users and guests in SharePoint:
| Aspect | External users | Guests |
| Definition | Individuals outside your organization who are invited to access SharePoint content using their own email accounts. | A subset of external users who access shared content using a one-time passcode or temporary link. |
| Authentication | Authenticated access via a Microsoft account, work, or school account. | No authentication required; access is granted via a one-time passcode or temporary link. |
| Access permissions | Can have the same permission levels as internal users (e.g., view, edit, contribute). | Typically limited to viewing or editing specific content with restricted permissions. |
| Use case | Long-term collaboration with external partners, contractors, or vendors. | Ad hoc or short-term access for reviewing specific documents or folders. |
| Access management | Managed through the SharePoint admin center, where permissions can be customized. | Access is controlled via shared links and expires or is revoked as per link settings. |
| Email address | Requires an email address tied to a Microsoft account or other supported account. | Can use any email address to receive a one-time link; does not require a Microsoft account. |
| Link expiry | Access does not expire unless explicitly revoked or governed by policies. | Access is typically short-term and governed by link expiration settings. |
| Security | Provides more controlled and secure access with authenticated sign-ins. | Less secure, as access is based on link sharing and may rely on email ownership verification. |
| Collaboration features | Can participate in co-authoring, workflows, and other SharePoint features. | Limited interaction; primarily used for viewing or editing specific shared documents or folders. |
| Example use case | Providing a contractor with ongoing access to a project site for collaboration. | Sending a client a document for review or feedback using a one-time access link. |
Please note, however, that the distinction between “external users” and “guest users” can now be considered outdated. Microsoft has recently simplified its terminology, and now “guest users” is the preferred and encompassing term for all external users in SharePoint and Microsoft 365.
👉 What are SharePoint external users? SharePoint external users, now often referred to simply as guest users, are individuals outside your organization who are granted access to your SharePoint environment. They might include clients, partners, vendors, or other collaborators who need to access specific SharePoint resources like sites, files, lists, or libraries. These users are typically invited via email or by sharing a direct link, and they are assigned specific permissions that determine their level of access, ranging from view-only to full editing capabilities. External users exist within your organization’s Azure Active Directory (Azure AD) as guests, allowing for managed access and tracking. This facilitates collaboration while maintaining security and control over your organization’s data.
Examples of SharePoint external sharing
External sharing in SharePoint is a practical and efficient solution for collaborating with individuals outside your organization. It allows businesses to securely share content while maintaining control over access and permissions. Here are some examples of how external sharing can be used effectively:
Collaborating on a project with a contractor
When working with external contractors or vendors on a project, SharePoint external sharing enables seamless collaboration by providing access to specific files or folders.
- How it works: You can grant access to a contractor using their email address, allowing them to view, edit, or upload documents as needed. For instance, contractors may need access to blueprints, budgets, or project plans stored in a specific folder.
- Benefits:
- Only the necessary project-related files are shared, ensuring the rest of your SharePoint site remains private.
- Contractors can directly contribute to the project by editing documents, uploading deliverables, or providing feedback.
- Permissions can be revoked once the project is completed.
Distributing documents to clients for review
When you need to share documents such as contracts, proposals, or reports with clients, external sharing provides a secure and efficient way to do so.
- How it works: A document can be shared with a client using a secure link. Depending on the settings, the client can either view the document or add comments and suggestions. For sensitive material, you can set the link to expire after a specific period.
- Benefits:
- Clients can access the document without needing to download it, ensuring version control.
- Comments and feedback can be collected directly within the document, streamlining the review process.
- Documents shared for review can be protected with permissions that prevent further sharing or downloading.
Discussing shared plans with external consultants
External consultants often play a key role in planning and strategy discussions. SharePoint external sharing makes it easy to provide them with access to relevant plans, schedules, and communications.
- How it works: A folder containing the project timeline, meeting agendas, and related resources can be shared with the consultant. They can review the material, make updates, and upload any supporting documents.
- Benefits:
- Centralized access to all relevant information ensures everyone is working from the same set of documents.
- Consultants can collaborate in real-time using built-in tools like co-authoring or by adding comments to documents.
- Access can be restricted to specific folders or files, ensuring sensitive information remains secure.
When to use SharePoint sharing with external users
While SharePoint external sharing provides a flexible and straightforward way to share content, it’s most effective in specific scenarios. Here, we’ll explore the best-case scenarios for using external sharing and discuss alternatives for more complex or sensitive collaboration requirements.
Best-case scenarios
External sharing in SharePoint works best in situations where temporary, quick, and controlled access to specific content is needed. Below are detailed examples of when you should use this feature:
When partners or vendors need temporary access to specific documents or folders
Scenario: You’re collaborating with a vendor on a procurement project or working with an external partner on a marketing campaign. They need access to certain files (e.g., contracts, product specifications, or timelines) to complete their tasks.
How it works: SharePoint allows you to provide access to specific files or folders by inviting external users via their email address. Permissions can be configured to allow viewing, editing, or commenting as required.
Why use external sharing:
- Avoids creating full user accounts for temporary collaborators.
- Ensures that only the necessary documents or folders are shared, keeping the rest of the site private.
- Access can be revoked once the work is completed.
Sharing project files or deliverables with clients using a limited-time link
Scenario: A client requires access to review deliverables, such as a project report, presentation, or design mockup, without needing long-term access to your SharePoint environment.
How it works: You can generate a secure, time-limited link that allows the client to view or edit the document. The link can be set to expire after a specific period or upon project completion.
Why use external sharing:
- Provides a hassle-free way for clients to access content without creating user accounts.
- Time-limited links ensure access is temporary and controlled.
- Prevents unauthorized sharing or downloading of sensitive deliverables.
Collaborating with contractors who need to edit or work on shared documents temporarily
Scenario: You’re working with a contractor on a proposal or technical document that requires input and edits from both parties.
How it works: Invite the contractor as an external user, granting them editing permissions on the specific files or folders they need to work on. Changes can be tracked using SharePoint’s version history and co-authoring features.
Why use external sharing:
- Allows real-time collaboration without compromising security.
- Ensures that only authorized individuals can access and edit the document.
- Access can be revoked as soon as the contractor’s work is complete.
Alternatives to Sharepoint online external sharing
While external sharing is a powerful and versatile tool, it’s not always the best solution for every situation. In cases involving long-term collaboration or highly confidential data, alternative approaches may be more appropriate:
Deeper collaboration
When to use: If you’re working with an external partner or contractor on a long-term project or need them to access multiple sites or applications within your system.
Alternative: Instead of relying on external sharing, create dedicated user accounts for these collaborators within your system.
Benefits:
- Provides greater control over permissions and access levels.
- Allows external users to fully integrate into your workflows and systems.
- Suitable for ongoing partnerships where frequent access is required.
Drawbacks:
- Requires additional administrative effort to create and manage accounts.
- May incur licensing costs depending on your SharePoint or Microsoft 365 plan.
Sensitive data
When to use: For highly confidential or sensitive information (e.g., legal documents, financial data, or trade secrets), external sharing may not offer the level of security required.
Alternative: Use internal information-sharing channels with stricter access controls or leverage tools designed specifically for secure file sharing, such as Azure Information Protection or Microsoft Purview.
Benefits:
- Ensures confidential data is only accessible to internal, trusted personnel.
- Enables advanced security features such as encryption, data loss prevention (DLP), and auditing.
Drawbacks:
- Limits external collaboration, potentially slowing down workflows.
- Requires additional tools or configurations for secure communication with external parties.
Advantages and limitations of external access
Like any tool, SharePoint external sharing comes with its own set of advantages and limitations. Understanding these can help you maximize its potential while minimizing risks and challenges. Below, we’ll explore the benefits and drawbacks of external access in SharePoint.
Advantages
- Time-saving: External sharing allows you to quickly connect with external users without the need to create new user accounts within your system. This makes it an excellent option for ad-hoc or temporary collaboration, as it eliminates the administrative overhead of account provisioning, licensing, and management.
- Flexibility: SharePoint’s external sharing feature provides granular control over what is shared. You can share specific files, folders, or entire sites without exposing the rest of your SharePoint environment. This ensures that external users only have access to the content they need to collaborate on, keeping other sensitive or irrelevant information private.
- Security: Despite enabling collaboration with external users, SharePoint ensures secure access through various mechanisms:
- Permissions can be assigned at the file or folder level, allowing you to control what external users can view, edit, or share.
- You can restrict actions such as downloading files or resharing content, adding an extra layer of control.
- Links can be set to expire after a specific duration, ensuring temporary access.
Limitations
- Limited features: External users may not have the same level of access to all SharePoint functionalities as internal users. For instance:
- Certain integrations with other Microsoft 365 apps, such as Power Automate workflows or advanced reporting features, may not be available to external users.
- Some customizations or third-party apps used in your SharePoint environment may not work for external users.
- Sharing restrictions: External sharing can encounter challenges due to organizational settings or user permissions. Some common restrictions include:
- Tenant or site-level restrictions: External sharing must be enabled at both the tenant (organization-wide) level and the individual site level. If one of these settings is disabled, sharing will not work.
- Insufficient permissions: Users attempting to share content externally must have the necessary permissions. For example, only users with “Edit” or higher permissions on a file or folder can share it externally.
- File type or content restrictions: Certain file types or content may be restricted by organizational policies, preventing them from being shared externally.
By carefully weighing the advantages and limitations of external access, organizations can make informed decisions about when and how to use this feature effectively. Proper configuration and understanding of restrictions can further enhance the user experience while maintaining security and compliance.
Why may a user not be able to share a SharePoint file externally?
Users may encounter issues sharing externally due to a variety of reasons:
- Organization-wide settings: External sharing might be disabled at the tenant level (organization-wide). If external sharing is turned off globally, it overrides all site-level or item-specific sharing settings.
- Site-level policies: Even if external sharing is allowed organization-wide, it can be restricted at the SharePoint site level. For example, a site administrator may have disabled external sharing for a specific site to maintain tighter controls on sensitive information.
- Item-specific sharing settings: The file or folder a user is trying to share may have unique permissions set at the item level, preventing external sharing. For instance, sharing may be disabled for that specific item, or the user might not have the ability to override those settings.
- User permissions: The user attempting to share the file must have sufficient permissions (e.g., Contribute, Edit, or higher). Users with only Read or Viewaccess cannot share items externally.
- External user acceptance: Invited external users must accept the sharing invitation sent to their email before accessing the shared content. If they fail to accept or their email address is incorrect, they won’t be able to access the file.
- Granular security and compliance policies: Organizations often enforce detailed security policies that can restrict external sharing. These may include:
- Blocking external sharing with specific domains (e.g., competitors or personal email addresses).
- Requiring external users to authenticate via Multi-Factor Authentication (MFA).
- Enforcing data loss prevention (DLP) policies that prevent sharing sensitive or classified information.
- Guest user quotas: Microsoft 365/SharePoint Online enforces limits on the number of guest users an organization can invite. If the organization has reached its quota for external guests, new invitations may be blocked until existing guest users are removed or the limit is increased.
- Licensing restrictions: Certain SharePoint Online plans may have limitations on external sharing. For example, basic or lower-tier plans might restrict advanced external sharing features, such as sharing with anonymous users or enabling external collaboration on specific sites.
- Conditional access policies: Access might be blocked based on conditional access rules enforced by the organization. These rules could include restrictions based on:
- The location of the external user (e.g., blocking access from specific countries).
- The device being used (e.g., requiring managed or compliant devices).
- The time of access (e.g., access limited to specific hours).
- Temporary technical issues: SharePoint Online or Microsoft 365 services may occasionally experience temporary outages or disruptions that impact external sharing functionality. In such cases, users should check the Microsoft 365 Service Health Dashboard for updates.
By understanding these potential roadblocks, administrators and users can diagnose and resolve external sharing issues more effectively. Regularly reviewing organizational settings, site policies, and compliance requirements can ensure smooth collaboration with external users while maintaining robust security and compliance standards.
SharePoint External Access Policies and Settings
Managing external access in SharePoint requires a balance between enabling collaboration and maintaining security. This section discusses the key aspects of external access policies, including how company policies shape the approach to external sharing, and the global settings in SharePoint that administrators can configure to control access effectively. By understanding these policies and settings, organizations can ensure data is shared securely and in compliance with business and regulatory requirements.
Company policies and external sharing SharePoint
Company policies are fundamental in shaping how external access is managed within SharePoint. These policies ensure alignment with organizational objectives, security requirements, industry regulations, and compliance standards. They provide the framework for configuring external sharing settings and user permissions, ensuring that data sharing is both secure and purposeful.
Security policy and external access
Organizational policies dictate the parameters of external data sharing, specifying what can be shared, with whom, and under what conditions. These policies form the basis for configuring external sharing settings in SharePoint, helping to balance collaboration needs with security and compliance requirements.
Here are the main factors influencing external access restrictions:
- Data sensitivity
- The level of confidentiality directly impacts sharing restrictions. Highly sensitive data—such as financial records, intellectual property, or personal data—may be completely restricted from external access.
- Different levels of sensitivity may require tailored controls, such as:
- View-Only Access: For external users who only need to review information.
- No Sharing: For data that is too critical to be exposed outside the organization.
- Business needs
- External sharing should align with specific business requirements. Access must be granted only to files, folders, or sites directly relevant to collaborative efforts, minimizing unnecessary exposure of unrelated data.
- Legal and regulatory compliance
- Policies must comply with data privacy regulations like:
- GDPR (General Data Protection Regulation) in the EU.
- CCPA (California Consumer Privacy Act) in California.
- HIPAA (Health Insurance Portability and Accountability Act) in the U.S. for healthcare data.
- These regulations may specify how organizations handle, store, and share data, often requiring strict consent management, data retention policies, and audit trails.
- Policies must comply with data privacy regulations like:
- Contractual Obligations
- Agreements with clients, vendors, or partners may include specific clauses regarding data sharing, confidentiality, or intellectual property protection. These obligations directly influence how external access is structured in SharePoint.
Types of restrictions and controls
Organizations can implement various restrictions and controls to manage external access effectively:
- Prohibiting external access: For highly sensitive environments, companies may completely disable external sharing to eliminate the risk of data leaks.
- Domain-based restrictions: External sharing can be limited to specific email domains (e.g., @partnercompany.com) to ensure that only trusted partners can access the shared data.
- Role-based access control (RBAC)
- Granting permissions based on roles ensures external users only have access to what they need. For example:
- View: For reviewers who only need to read documents.
- Edit: For collaborators who need to make changes.
- Contribute: For users who need to upload or create new files.
- Granting permissions based on roles ensures external users only have access to what they need. For example:
- Approval workflows: External sharing requests can be subject to an approval process. This adds oversight, ensuring sharing is aligned with company policies and approved by relevant stakeholders.
- Time-limited access: Temporary links or time-bound permissions ensure that external access is automatically revoked once the collaboration is complete.
- Download restrictions: Preventing downloads ensures external users can view documents online without saving a local copy, reducing the risk of unauthorized redistribution.
- File-type restrictions: Limiting the types of files that can be shared externally (e.g., blocking .exe or other potentially dangerous file types) minimizes security risks.
- Data loss prevention (DLP): DLP policies can automatically detect and prevent the sharing of sensitive information, such as credit card numbers, personally identifiable information (PII), or trade secrets.
- Auditing and monitoring: Regularly tracking external sharing activity provides insights into who accessed what information and when. This enables better control, accountability, and compliance reporting.
- Multi-factor authentication (MFA): Enforcing MFA for external users significantly strengthens security by requiring additional verification steps, such as a one-time password or a mobile app notification, in addition to a username and password.
By carefully aligning SharePoint’s external sharing settings with company policies, organizations can foster secure, compliant collaboration while mitigating potential risks. These policies should be tailored to the organization’s unique needs and reviewed regularly to address evolving regulatory requirements and security threats. A proactive approach to managing external access ensures that sensitive data remains protected, and external collaboration is both efficient and secure.
SharePoint external sharing global settings
SharePoint administrators have significant control over external sharing through global settings available in the SharePoint admin center and the Microsoft 365 admin center. These settings provide organizations with the ability to define the overall framework for external collaboration, ensuring consistent enforcement of security and compliance policies across the environment.
Turning external sharing on or off at the organization level
External sharing can be enabled or disabled for the entire organization. This setting acts as the “master switch” for external sharing. If external sharing is disabled at this level, it overrides all other settings, including site-level configurations.
Here’s how it’s done via SharePoint admin center:
- Navigate to the SharePoint admin center.
- Go to Policies > Sharing.
- Under External sharing, select the desired sharing level from the following options:
- Anyone: Allows sharing with external users without requiring them to sign in or create a Microsoft account. This option provides maximum convenience but poses the highest security risk.
- New and existing guests: Allows sharing with external users who have or must create a Microsoft account. This provides better control than “Anyone” by requiring authentication.
- Existing guests only: Restricts sharing to external users who are already added to your directory. This ensures that only pre-approved external users can access content.
- Only people in your organization: Disables external sharing entirely, restricting access to internal users only.
- Additional refinements can be applied, such as:
- Allowing or disallowing guests to share items they have access to.
- Requiring external users to accept sharing invitations or authenticate before accessing content.
Configuring access levels within the organization
Global settings determine whether external sharing is possible on a broad level, but administrators can further manage who within the organization can share externally:
- Default sharing settings for site owners
- Administrators can configure default external sharing settings for newly created sites.
- While site owners can modify these settings later, the default configuration establishes a baseline that aligns with organizational policies.
- Limiting external sharing to specific security groups
- External sharing can be restricted to specific security groups. This allows only designated users or groups—such as team leads, managers, or IT staff—to share externally, regardless of their site permissions.
- This is particularly useful for safeguarding sensitive data or meeting compliance requirements in regulated industries.
Different policies for SharePoint and OneDrive
Although external sharing settings for SharePoint and OneDrive are managed on the same Sharing page in the SharePoint admin center, administrators can apply different levels of restriction for each platform:
- SharePoint
- External sharing can be configured at the global level for all SharePoint sites or customized on a per-site basis.
- For example, administrators can:
- Allow external sharing for a project or team site while restricting it for sensitive sites (e.g., HR or finance).
- Override global sharing settings for specific sites to align with project-specific requirements.
- OneDrive
- Administrators can control external sharing for all OneDrive accounts or allow individual users to manage their own sharing settings.
- Restrictions can also be applied to specific security groups. For example, external sharing might only be allowed for certain departments, such as sales or marketing, while being disabled for others.
Important considerations
- Site-level overrides
- Site owners can typically adjust the external sharing settings for their sites, but these adjustments are subject to restrictions imposed by global and organizational policies.
- For example, if the global policy only allows sharing with “Existing Guests,” site owners cannot enable “Anyone” sharing at the site level.
- Sensitivity labels (Microsoft Purview Information Protection)
- Sensitivity labels allow for more granular control over document sharing.
- Labels can classify documents based on their sensitivity (e.g., “Confidential” or “Public”) and enforce automatic sharing restrictions, such as preventing external sharing for highly sensitive files.
- Conditional access policies
- Conditional access policies can refine external access based on factors such as:
- User location: Restricting access from certain geographic regions.
- Device compliance: Allowing access only from managed or compliant devices.
- Authentication method: Enforcing stronger authentication methods, such as MFA, for external users.
- Conditional access policies can refine external access based on factors such as:
- Guest user management
- Regularly review and manage guest user accounts to ensure that access is revoked when it is no longer needed.
- Guest accounts can accumulate over time, potentially creating security risks if not properly managed.
By combining global settings with site-level configurations, sensitivity labels, and conditional access policies, organizations can create a robust external sharing framework. This framework can balance the need for collaboration with security and compliance requirements. Regular reviews of external sharing activity and guest user accounts ensure that external access remains controlled and aligned with business objectives and regulatory standards.
Site Access in SharePoint & Sharing SharePoint Site with External Users
Managing site access in SharePoint is key to ensuring smooth collaboration while maintaining the security and integrity of your organization’s data. This section explains site-level access in SharePoint, how to share a site with external users, how to manage access permissions, and how to troubleshoot common issues.
What is site access in SharePoint?
Site access in SharePoint refers to the ability to grant users—both internal and external—permission to access specific SharePoint sites. By providing site-level access, organizations can enable seamless collaboration on team projects, client engagements, or cross-departmental initiatives.
Best scenarios for site-level access
Site-level access in SharePoint is particularly useful when multiple users—either from within the organization or external partners—need coordinated access to a centralized location. It allows administrators to manage permissions at the site level, making it easier to control who has access to what, while still enabling seamless collaboration. Below are some of the most common and effective use cases for site-level access:
- Project collaboration
When teams work on complex projects, they often need a shared space to:
- Store and organize project-related documents: This ensures that all team members can access the latest versions of files, avoiding version control issues.
- Track tasks and deadlines: Many SharePoint sites integrate with tools like Microsoft Planner or task lists, providing a clear view of assignments and timelines.
- Facilitate communication: Through integrated discussion boards, comments, or links to tools like Microsoft Teams, teams can easily communicate without relying on scattered emails.
- Collaborate with external stakeholders: By granting external users access to a project site, organizations can ensure that external team members or consultants have the information and resources they need without exposing unrelated content.
- Client engagements
Sharing a specific SharePoint site with clients creates a controlled and secure environment for collaboration. For example:
- Reviewing deliverables: Clients can log in to view completed work, proposals, or reports without needing repeated email exchanges.
- Providing feedback: Clients can leave comments, approve documents, or suggest changes directly within the site.
- Uploading necessary files: Clients can securely upload files, such as contracts, input documents, or specifications, directly to the site without exposing their broader systems or needing alternative file-sharing methods.
This fosters transparency and improves communication, ensuring that both parties remain aligned throughout the engagement.
- Vendor partnerships
Vendor and contractor relationships often require controlled access to specific resources or information. Site-level access is ideal for:
- Procurement Collaboration: Vendors can review procurement documents, contracts, or orders in real time, ensuring they have access to the latest requirements and updates.
- Development Projects: SharePoint sites can serve as collaboration hubs for contractors working on development or implementation projects. Vendors can upload deliverables, review requirements, or collaborate on tasks directly within the site.
- Secure Communication: Instead of relying on unsecured email exchanges, vendors can use the SharePoint site to securely share sensitive documents or receive access to necessary resources.
By limiting access to a specific site, organizations can maintain strict control over what vendors can see and do, reducing the risk of data leakage or unauthorized access.
👉 Can you share a SharePoint site with external users? Yes, SharePoint supports sharing sites with external users, provided external sharing is enabled for the organization and the specific site. External users can be invited as guests, allowing them to view, edit, or contribute to the site, depending on the permissions granted.
How to share SharePoint site with external users
Sharing a SharePoint site with external users is straightforward. Below are step-by-step instructions on how to share a SharePoint site with external users to get you started:
- Open the site
- Navigate to the SharePoint site that you want to share.
- Go to settings
- Click the gear icon in the upper-right corner and select Site permissions from the dropdown menu.
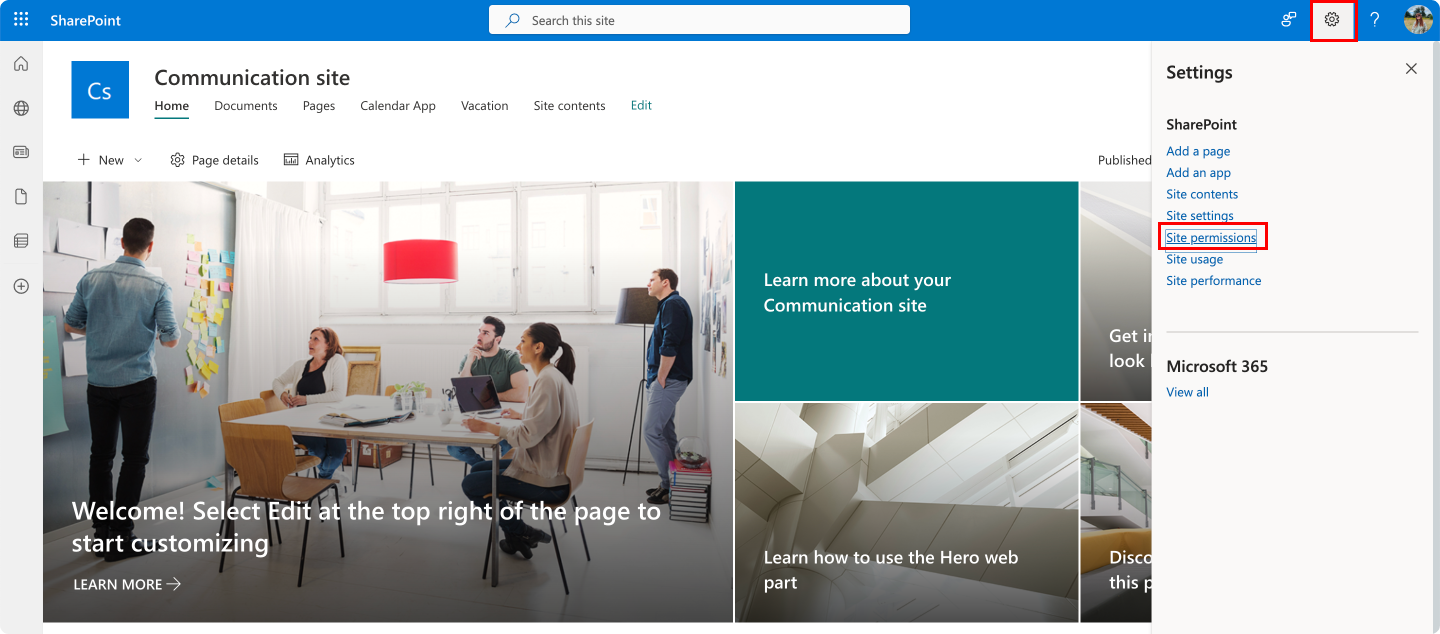
- Click invite users
- Under the permissions section, click Share site.

- Specify external users’ email addresses
- Enter the email addresses of the external users you want to invite. Ensure these are valid addresses outside your organization.
- Send the invitation
- Click Send to invite the external users. They will receive an email with a link to access the site.
If you have owner permissions, you may see other options, like the Add Membersbutton. If that’s the case, follow the instructions:
- Under the permissions section, click Add members and choose one of the following:
- Add members to group: Add users to a specific Microsoft 365 group associated with the site. This option automatically assigns them access based on the group’s permissions.
- Share site only: Share the site directly without adding users to the group. This is useful for granting temporary access or specific permissions.
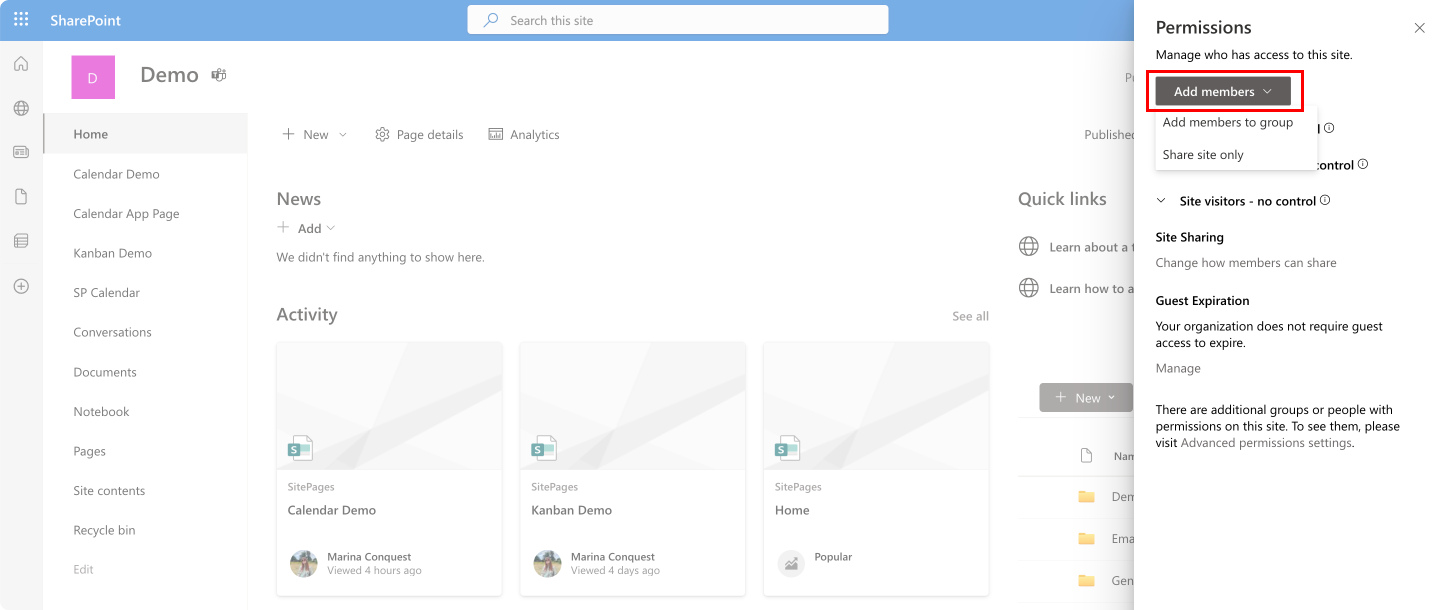
- Click Share site only to invite an external user using their email address.
- Navigate to your added user in the members section and assign the desired access level (for instance, Read or Full control).
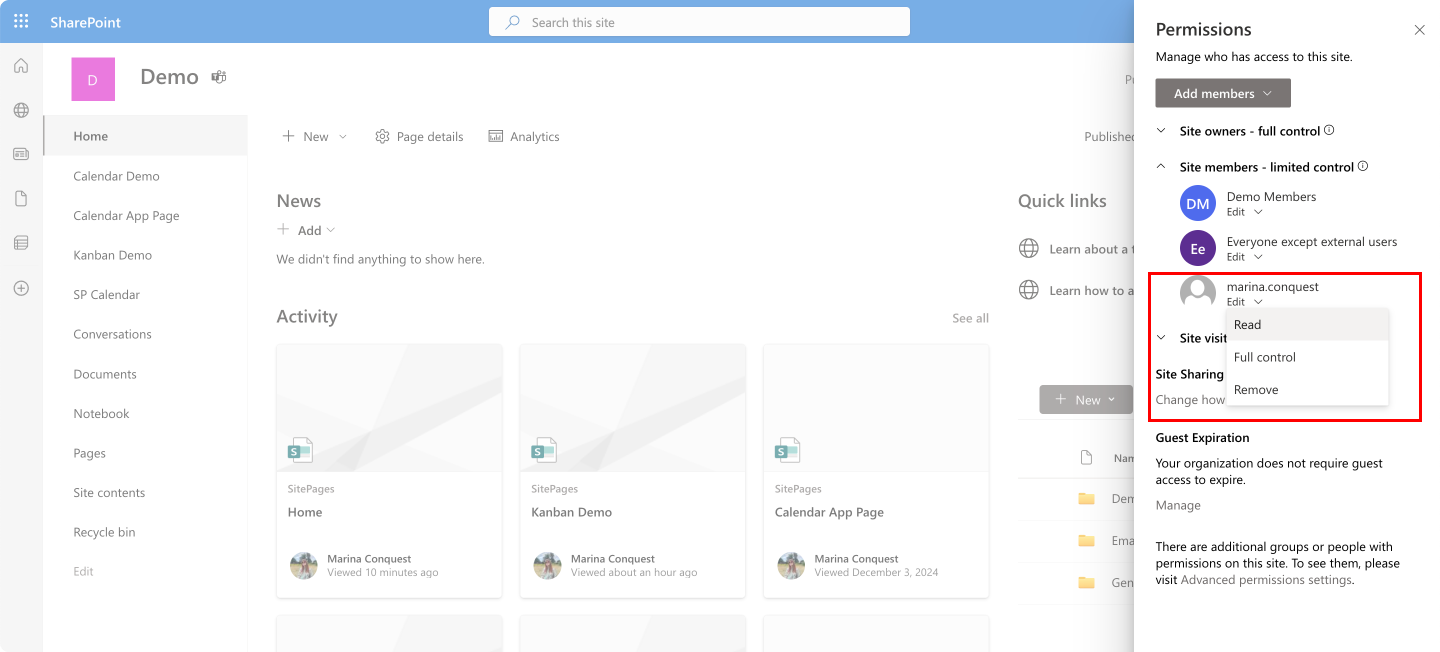
As a SharePoint site owner, you can also see other options for managing site permissions. These options, accessible through the Site permissions panel, provide granular control over how the site and its contents are accessed and shared.

- Site sharing
The Site Sharing option allows site owners to define how sharing works within the site—both for the site itself and for its files and folders. This option ensures that sharing aligns with your organization’s security policies and collaboration needs.
- Purpose: Control how the site and its contents (files and folders) can be shared, and specify who is allowed to share. This helps maintain consistency in sharing practices and prevents unauthorized access.
- Options to configure:
- Site owners and members can share files, folders, and the site:
- This option gives both site owners and members (with Edit permissions) the ability to share the site itself as well as individual files and folders.
- Use this setting for sites where broader collaboration is required, and members need the ability to share resources freely.
- Site owners and members, and people with Edit permissions, can share files and folders, but only site owners can share the site:
- Members and users with Edit permissions can share files and folders but cannot share the site itself.
- Only site owners have the authority to share the site.
- This setting is ideal for maintaining tighter control over site-level sharing while allowing collaboration for specific files and folders.
- Only site owners can share files, folders, and the site:
- This option restricts all sharing activities—whether for files, folders, or the site itself—exclusively to site owners.
- Recommended for sites that contain sensitive information or where sharing must be closely monitored and controlled.
By customizing these options, site owners can ensure that sharing permissions are aligned with organizational policies and that only authorized users can share content.
- Guest expiration
This setting manages the lifespan of access granted to external users (guests).
- Purpose: Automates the process of revoking access for guest users after a period of inactivity or a set timeframe. This enhances security and reduces the risk of stale guest accounts.
- Options:
- Default setting (No expiration): Guests retain access indefinitely unless manually removed by a site owner or administrator. This is the default if guest expiration is not configured at the organization level.
- Custom expiration (If enabled): If enabled by the SharePoint administrator, site owners might be able to configure expiration policies for their site. This could involve setting a specific number of days after last activity or a fixed expiration date.
- Advanced permissions settings (Permissions page)
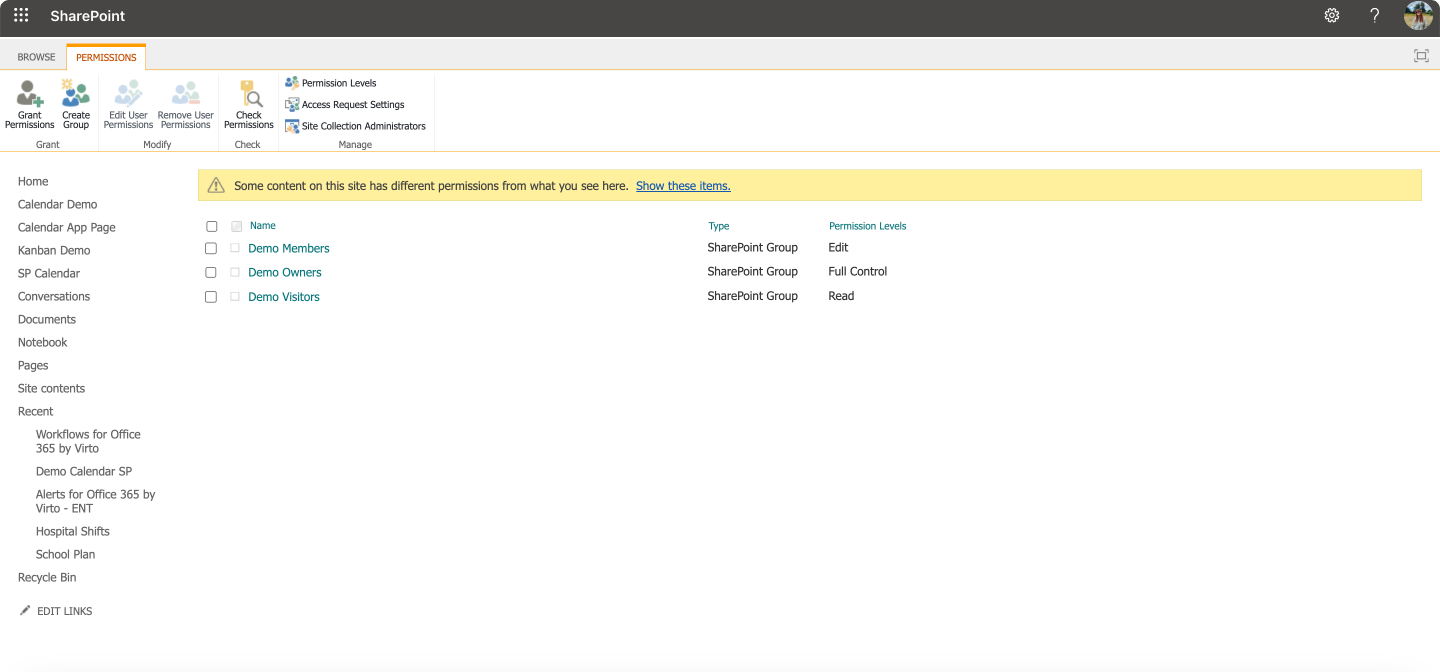
This section provides a comprehensive view and management interface for all site permissions.
- Purpose: Offers granular control over user and group permissions, allowing site owners to:
- View all users and groups with access to the site.
- Edit or remove permissions for specific users or groups.
- Add users to SharePoint groups (Owners, Members, Visitors).
- See how permissions are inherited (from parent sites) and break inheritance if necessary to customize permissions for the current site.
- Create custom permission levels.
- Manage access requests.
So, how to enable external sharing SharePoint online?
Enabling external sharing in SharePoint requires configuring settings at both the organization level (via the SharePoint admin center) and the site level. To simplify the process, below are the consolidated instructions from earlier sections in a comprehensive, step-by-step guide for easy reference:
- Organization-level configuration (SharePoint admin center)
This step is essential. If external sharing is disabled at the organization level, you won’t be able to enable it for individual sites.
- Navigate to the SharePoint admin center: Sign in as a SharePoint administrator.
- Go to Policies > Sharing: This is the correct location for managing external sharing settings.
- Configure the external sharing setting: Choose the appropriate level of external sharing:
- Anyone: (Least restrictive) Allows sharing with people outside your organization without requiring a Microsoft account. Use with extreme caution.
- New and existing guests: Allows sharing with external users who have or create a Microsoft account.
- Existing guests only: Restricts sharing to external users who already exist in your directory.
- Only people in your organization: Disables external sharing entirely.
- Additional settings: On the same page, you can configure additional options like:
- Allow guests to share items: Control whether external users can, in turn, share content with others.
- Guest access expiration: Configure how long guest access remains active.
- Save changes: Ensure you save the changes you’ve made at the organization level.
- Site-level configuration
After configuring the organization-level settings, you can manage external sharing for individual sites.
- Navigate to the site: Go to the SharePoint site where you want to enable external sharing.
- Access Site permissions: Click the settings gear icon (top right) and then click Site permissions.
- Sharing settings:
- Site sharing: This setting controls who can share the site itself and its contents with others. Choose between allowing all site members to share the site or restricting it to site owners only.
By default, sites inherit the external sharing settings configured at the organization level. However, site owners can typically override these settings unless inheritance is enforced by a higher-level policy.
👉 So, how do I give external access to a SharePoint site? As discussed, to give external access to a SharePoint site, enable external sharing at both the organization and site levels, then invite external users by email. You can assign them specific permissions, depending on their collaboration needs. If you’re wondering, “How do I allow external guest access to SharePoint?”, then the same process applies, as the distinction between the terms guest and external users has been simplified.
Managing site access
Effective site access management is essential for balancing collaboration needs with security requirements. By granting users only the necessary permissions, you can protect sensitive data and minimize potential risks.
How to check who has access to a SharePoint Site
- Navigate to the site: Open the SharePoint site you want to review.
- Access site permissions: Click the settings gear icon (top right) and select Site permissions.
- Review users and groups: The Site permissions panel displays a list of users and groups with access. This includes SharePoint groups such as Owners, Members, and Visitors, as well as any other individual users or groups who have been granted access.

- View individual permissions: Click on a specific user or group to see their assigned permission level.
How to remove or change an external user’s permissions
- Access site permissions: Navigate to the Site permissions panel as described above.
- Locate the external user: Find the guest user whose permissions you want to modify.
- Remove access: Click next to the user’s name and select Remove. This action revokes the user’s access to the site.
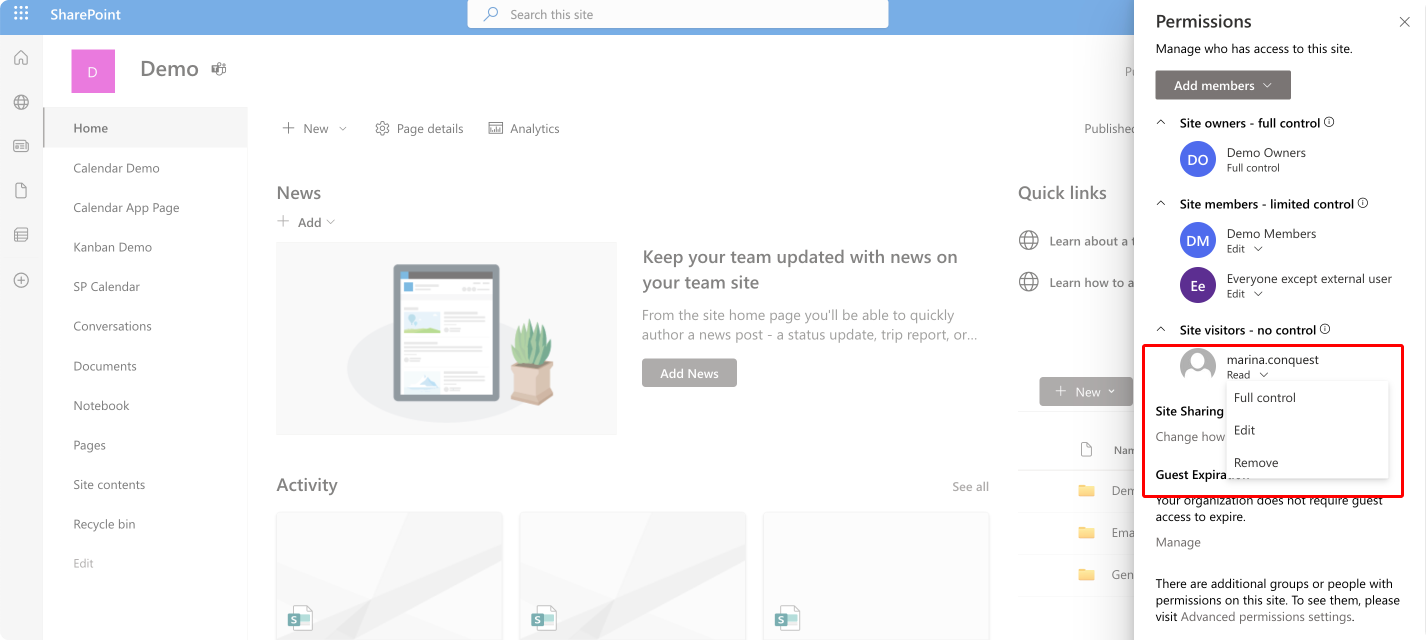
- Change Permissions: To modify a user’s permissions, click next to their name and choose the new permission level based on their requirements.
Granting the minimum required level of access (principle of least privilege)
To enhance security, always follow the principle of least privilege by granting users only the minimum access they need to perform their tasks:
- External users
- Start with Read access for external collaborators.
- Grant higher permissions (e.g., Edit) only if they need to actively modify content or collaborate on documents.
- Internal users
- Similarly, assign the lowest permission level required for internal users based on their roles and responsibilities.
- Regular reviews
- Periodically review and update permissions to ensure they remain appropriate and aligned with current responsibilities. This reduces the risk of unnecessary or excessive access.
Additional considerations
- Sensitivity labels
- Use Sensitivity labels (available through Microsoft Purview Information Protection) to classify and protect files based on their sensitivity. Labels can enforce sharing restrictions automatically, even if a user has higher permissions.
- Conditional access policies
- Configure Conditional access policies to add extra security measures for external users, such as:
- Requiring multi-factor authentication (MFA).
- Restricting access based on location, device, or other factors.
- Configure Conditional access policies to add extra security measures for external users, such as:
- Guest user management
- Regularly review and manage guest accounts to ensure access is revoked when no longer needed.
- Use the Guest expiration feature to automate this process, setting access to expire after a specified period of inactivity.
By following these best practices and leveraging SharePoint’s available tools, you can effectively manage site access. This approach fosters secure collaboration while safeguarding sensitive information, ensuring that users have only the access they truly need.
Common problems and solutions
External sharing in SharePoint can sometimes encounter issues, but most problems can be resolved with a systematic troubleshooting approach. Below is a guide to address common challenges:
What to do if an invitation does not reach an external user
If an external user does not receive the invitation email, follow these steps:
- Verify the email address: Double-check the recipient’s email address for typos or inaccuracies.
- Resend the invitation: Go to the Site permissions panel and locate the pending invitation under the “Sharing” section (name may vary based on your SharePoint version). Resend the invitation.
- Check spam/junk folders: Ask the external user to check their spam or junk email folder in case the invitation was incorrectly flagged.
- Use a direct sharing link
- If the invitation email continues to fail, create a direct sharing link with the appropriate permissions and send it via another channel (e.g., email, chat).
- Note: Be cautious with sharing links to ensure they are password-protected or expire after a set time, if necessary.
- Verify sharing settings
- Confirm that external sharing is enabled at both levels:
- Organization level: Check in the SharePoint admin center under Policies > Sharing.
- Site level: Check the Site permissions panel.
- Confirm that external sharing is enabled at both levels:
- Check for invitation limits: Some organizations impose limits on the number of pending invitations a user can have. If the external user has too many pending invitations, they may not receive new ones. Clear old invitations if necessary.
- Contact IT support: If none of the above works, contact IT support. They can investigate potential email delivery issues or network-related problems.
How to resolve the “User cannot access” error
If an external user receives a “User cannot access” error, try these steps:
- Confirm invitation acceptance: Ensure the external user has accepted the sharing invitation and completed any required authentication steps.
- Verify permissions: Check the user’s permissions in the Site permissionspanel. Ensure they are assigned the appropriate permission level (View, Edit, or Contribute) to access the site or content.
- Recheck external sharing settings: Confirm that external sharing is enabled at both the organization and site levels. Sometimes, settings may have been inadvertently changed.
- Authentication requirements: If your organization enforces multi-factor authentication (MFA) or other conditional access policies, ensure the user has completed the required authentication steps.
- Guest access expiration: Verify if the guest user’s access has expired (if your organization uses the guest expiration feature). If expired, resend the invitation or reassign access.
- Sensitivity labels and data loss prevention (DLP): Check if the site or specific content is protected by sensitivity labels or DLP policies. These policies may block external access. Review and adjust the policies if necessary.
- Blocked users: Ensure the external user is not explicitly blocked from accessing the SharePoint site or your organization’s environment.
- Licensing issues: External users may require specific licenses to access certain features or content in SharePoint. Verify if the necessary licensing requirements are met.
- Azure Active Directory (Azure AD) guest status: Contact your IT team to confirm the external user is correctly listed as a guest in your Azure AD. Ensure there are no restrictions or errors in their Azure AD profile.
- Browser issues: Ask the external user to clear their browser cache and cookies or try another browser. Browser-related issues can sometimes interfere with SharePoint access.
By systematically checking these points, you can often identify and resolve common external sharing issues in SharePoint. If the issue persists after following these steps, escalate the problem to your IT support team. They can use advanced diagnostic tools and access backend systems to investigate further.
👉 Where do I find SharePoint external sharing settings? SharePoint external sharing settings are primarily managed within the SharePoint admin center, accessible through the Microsoft 365 admin center. After logging in, navigate to the SharePoint admin center. In the left-hand navigation, under “Policies,” you’ll find “Sharing.” This section allows configuration of external sharing for your entire organization, including choices like allowing sharing only with authenticated guests (requiring them to sign in) or using “Anyone” links (allowing access without sign-in). While you can see a list of active sites in the SharePoint admin center, you generally manage individual site-level sharing settings directly within each site. Navigate to the specific site, click the settings gear icon (top right), then “Site permissions,” and then change how people can share.
Accessing Documents in OneDrive: OneDrive External Sharing
OneDrive is a powerful tool for storing, sharing, and collaborating on documents. As part of the Microsoft 365 suite, it integrates seamlessly with SharePoint, allowing both internal and external users to collaborate efficiently. Below, we’ll explore the basics of sharing in OneDrive, how to set up sharing, and best practices for managing permissions and security.
What is OneDrive sharing, and how does it relate to SharePoint?
OneDrive and SharePoint are both part of Microsoft 365 and provide cloud-based storage and collaboration capabilities. While they serve distinct purposes, they are deeply integrated and share underlying technologies.
OneDrive:
- Personal cloud storage: OneDrive provides individual users with a private space to store, manage, and share their files. Think of it as your personal document library in the cloud.
- Sharing individual files and folders: OneDrive is optimized for sharing individual files or folders with specific people, both inside and outside your organization. You can control permissions (view, edit) and set expiration dates for shared links.
- Syncing across devices: OneDrive syncs your files across your computers and mobile devices, ensuring you have access to the latest versions wherever you go.
SharePoint:
- Team collaboration: SharePoint facilitates team-based collaboration by providing shared workspaces (sites) where teams can store, organize, and co-author documents, lists, and other content.
- Site-level sharing: SharePoint allows you to share entire sites with teams or groups, granting access to all content within the site. You can also manage permissions at the site, library, folder, and item levels.
- Structured collaboration features: SharePoint offers features like version history, metadata, workflows, and content approval processes to support structured collaboration and content management.
The relationship between OneDrive and SharePoint (Modern SharePoint)
In modern SharePoint environments, the relationship between OneDrive and SharePoint is even closer:
- Shared libraries powered by OneDrive: Document libraries in SharePoint team sites are now powered by the same technology as OneDrive. This provides a consistent user experience and enables seamless syncing of SharePoint files to your computer using the OneDrive sync client.
- Files on-demand: This feature allows you to see all your OneDrive and SharePoint files in File Explorer without having to download them all, saving disk space. You can choose to sync specific files or folders or access them online as needed.
- Sharing from SharePoint leverages OneDrive: When you share a file or folder from a SharePoint document library, the sharing experience is very similar to sharing from OneDrive. You use the same sharing dialog and options.
- OneDrive as the default save location: In many cases, OneDrive is configured as the default save location for Office documents. This encourages users to save their files in the cloud and facilitates easier sharing.
Examples:
- OneDrive: Sharing a draft presentation with a colleague for feedback, storing personal photos and videos, syncing work files between your laptop and desktop computer.
- SharePoint: Collaborating on a team project proposal within a shared document library, managing a team’s task list, creating a company intranet site.
Here’s the summarized key differences between OneDrive and SharePoint for easy reference:
| Feature | OneDrive | SharePoint |
| Purpose | Personal file storage and sharing | Team collaboration and content management |
| Focus | Individual files and folders | Sites, libraries, lists, and other content |
| Sharing | Sharing with specific individuals | Sharing with teams, groups, or the entire organization |
| Structure | Less structured, personal organization | More structured, team-based organization |
By understanding the distinct roles and the close integration of OneDrive and SharePoint, you can leverage both platforms effectively for individual productivity and team collaboration.
When should you use OneDrive for external sharing?
OneDrive is a suitable choice for external sharing in the following scenarios:
- Sharing individual files or small sets of files: When you need to share a specific document, spreadsheet, presentation, or a small collection of related files with an external collaborator, OneDrive is often the simplest and most efficient option.
- Short-term collaborations or one-off sharing: If the collaboration is temporary or you only need to share the files once, using OneDrive avoids the need to grant access to a larger SharePoint site or library.
- Sharing files that don’t require structured collaboration: For files that don’t require version history, metadata, workflows, or other SharePoint collaboration features, OneDrive provides a streamlined sharing experience.
- Personal files or drafts: If you’re sharing personal work files, drafts, or documents that aren’t intended for broader team or organizational access, OneDrive is the appropriate location.
- Scenarios where a SharePoint site isn’t available or practical: If a dedicated SharePoint site doesn’t exist for the collaboration or creating one would be excessive overhead (e.g., sharing a file with a client who doesn’t have access to your SharePoint environment), OneDrive offers a convenient alternative.
- Quick and easy sharing: OneDrive’s simplified sharing interface makes it ideal for situations where you need to share a file quickly and easily without navigating complex permissions or site structures.
When to consider SharePoint instead of OneDrive
While OneDrive is convenient for many external sharing scenarios, SharePoint is generally preferred for:
- Long-term collaborations: For ongoing projects or collaborations with external users, a SharePoint site provides a more structured and manageable environment.
- Sharing larger sets of files or entire libraries: If you need to share a significant number of files or an entire document library, SharePoint is better equipped to handle the organization and access control.
- Collaborations requiring structured features: When you need version history, metadata, workflows, content approval, or other SharePoint collaboration features, using a SharePoint site is essential.
- Team-based external collaboration: If multiple internal and external users need to collaborate on the same set of documents, a SharePoint team site provides a centralized workspace.
- Formal document management or compliance requirements: For scenarios with strict document management or compliance requirements, SharePoint offers more robust features for control, auditing, and retention.
By carefully considering these factors, you can choose the most appropriate platform—OneDrive or SharePoint—for your external sharing needs, balancing ease of use with security and collaboration requirements. Remember that even when sharing via OneDrive, organizational sharing policies and security settings still apply.
Sharing individual documents vs. sharing a site
The core difference lies in the scope of access granted:
Sharing individual documents (OneDrive):
- Granular control: You grant access to specific files or folders, without giving the recipient access to any other content in your OneDrive or SharePoint environment.
- Simplified sharing: The sharing process is typically simpler and faster, involving fewer steps and options.
- Limited collaboration features: While co-authoring might be possible, other collaboration features like version history, metadata, or workflows are often less prominent or unavailable when sharing individual files.
- Better suited for smaller collaborations or one-off sharing: Ideal for sharing drafts, feedback documents, or files that don’t require ongoing collaboration.
- Less context: Recipients only see the shared files or folders, without the surrounding context of a larger site or library. This can be advantageous for simplicity but might also lead to confusion if the files are part of a larger project or initiative.
Sharing a site (SharePoint):
- Broader access: Sharing a site grants access to all content within that site, including multiple libraries, lists, pages, and other resources. You can also control permissions at different levels (site, library, folder, item) to manage access more granularly.
- Enhanced collaboration features: SharePoint sites provide a full suite of collaboration features, including version history, metadata, workflows, content approval, discussions, and more.
- Centralized workspace: A SharePoint site acts as a central hub for team collaboration, providing a structured environment for organizing and managing shared content.
- Better suited for larger teams and ongoing projects: Ideal for projects, initiatives, or teams that require ongoing collaboration, structured document management, and advanced sharing controls.
- Rich context: Recipients see the shared content within the context of the site, which can improve clarity and understanding, especially for complex projects or initiatives.
- More management overhead: Managing a SharePoint site requires more administrative effort than sharing individual files, including configuring permissions, managing metadata, and maintaining site structure.
Example scenario:
Imagine you’re working on a project proposal.
- OneDrive: You might use OneDrive to share a draft version of the proposal with a colleague for feedback before sharing it with the broader team.
- SharePoint: Once the proposal is finalized, you would likely store it in a SharePoint document library within a project site and share the site with the entire project team for collaboration and review.
Here’s a summary of the differences between sharing individual documents in OneDrive and sharing a SharePoint site.
| Feature | Sharing individual documents (OneDrive) | Sharing a site (SharePoint) |
| Scope of access | Specific files or folders | Entire site and its contents |
| Collaboration features | Limited | Extensive |
| Context | Less | More |
| Management overhead | Lower | Higher |
| Ideal use cases | Small collaborations, one-off sharing, individual files | Larger teams, ongoing projects, structured collaboration |
Choosing the right approach depends on the specific context, the size of the collaboration, and the required features. Often, a combination of OneDrive and SharePoint is the most effective solution, using OneDrive for initial drafts and individual feedback and then transitioning to SharePoint for broader team collaboration and document management.
How Do I Manage External Sharing on OneDrive?
Managing external sharing for OneDrive involves a combination of organizational-level policies, site-level settings (for the OneDrive sites themselves), and individual user settings.
- Organizational-level settings (SharePoint Admin Center):
- Sharing policies: These policies control the overall external sharing behavior across your organization. You can define which domains are allowed or blocked for sharing, set default sharing links (e.g., “Specific people” or “Anyone with the link”), configure link expiration times, and enforce password protection or other security measures for shared links. These policies provide the broadest level of control.
- Device access policies: You can configure policies to manage how external users access SharePoint and OneDrive content from different devices, such as requiring managed devices or multi-factor authentication.
- OneDrive site-level settings:
Each user’s OneDrive is technically a SharePoint site. While many settings are inherited from the organizational level, some can be configured at the OneDrive site level:
- Sharing settings: You can further restrict sharing settings for individual OneDrives beyond the organizational defaults. For example, you could disable external sharing entirely for specific OneDrives or restrict the types of sharing links allowed. This level of control is usually managed by IT administrators or through PowerShell scripts.
- Individual user settings (OneDrive interface):
- Sharing individual files and folders: Users can manage sharing for individual files and folders within their OneDrive through the OneDrive web interface, sync client, or Office applications. They can choose who to share with, set permissions (view, edit), and configure link options (e.g., expiration, password protection). These settings are constrained by the organizational and site-level policies.
Key considerations:
- Inheritance: OneDrive sharing settings inherit from the organizational policies. Site-level settings can further restrict these policies, and individual sharing actions are limited by both the site and organizational settings.
- Sensitivity labels: Microsoft Purview Information Protection sensitivity labels can further restrict sharing based on the sensitivity of the content. Even if external sharing is generally allowed, a sensitivity label might prevent sharing outside the organization.
- Conditional Access Policies: These policies can add further security layers, such as requiring MFA for external users or restricting access based on location or device.
- Guest user management: Regularly review and manage guest user accounts in Azure AD to ensure that access is revoked when no longer needed.
Managing external sharing on OneDrive requires a multi-layered approach, combining organizational policies, site-level settings, and user-level controls. By understanding these different levels of configuration, you can effectively manage external access to OneDrive content while maintaining security and compliance.
👉 Where can I find OneDrive sharing settings? You can access your personal OneDrive sharing settings through the OneDrive website’s settings menu or the OneDrive sync client’s settings. For organization-wide OneDrive settings, administrators use the OneDrive admin center within the Microsoft 365 admin center. Some OneDrive sharing settings, especially those related to SharePoint interaction, are also managed in the SharePoint admin center.
How to set up sharing in OneDrive
Here’s a step-by-step guide to sharing a document or folder in OneDrive with an external user:
- Open OneDrive and locate the item:
- Web app: Access OneDrive through your web browser.
- Sync client: Open the OneDrive folder on your computer (if you’ve synced your OneDrive).
- Office app: If you’re working on the document in an Office app (Word, Excel, PowerPoint), you can often share directly from the application’s “Share” menu.
- Select the file or folder to share: Click or right-click on the file or folder you want to share.
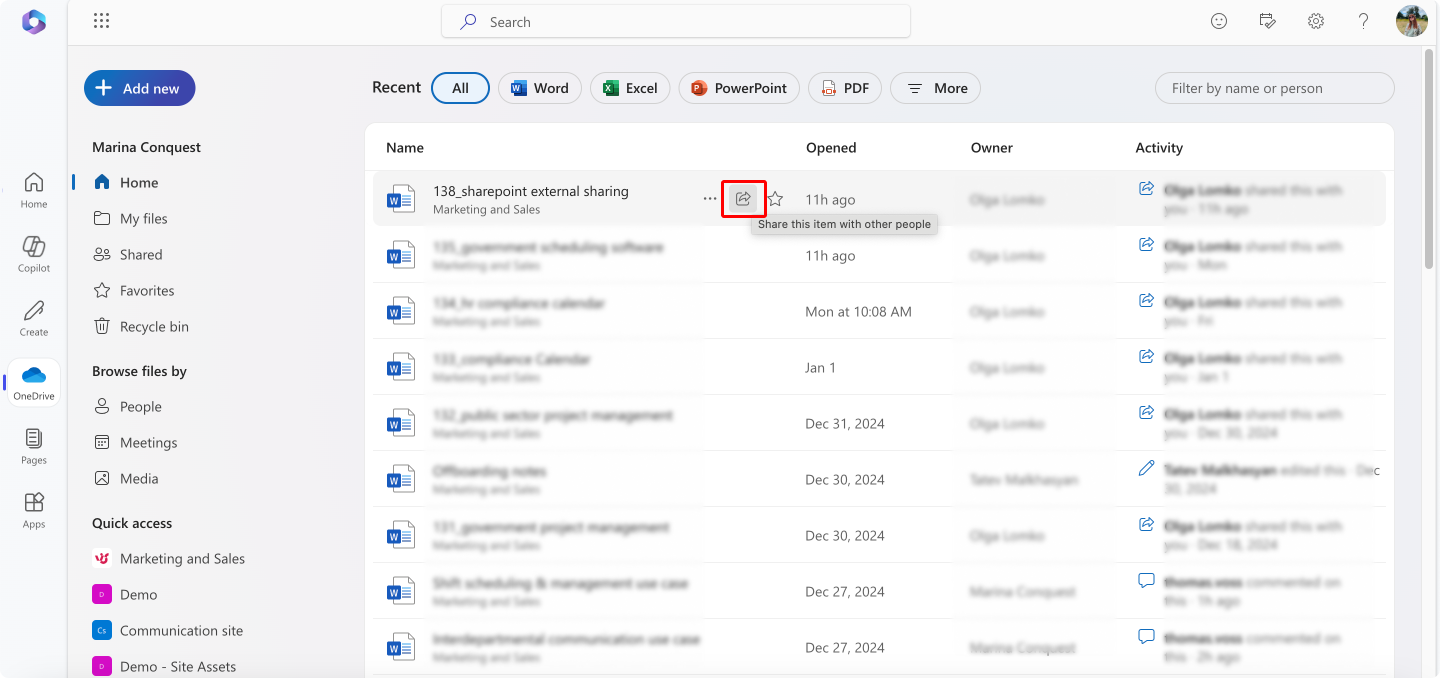
- Click the “Share” button: Look for the share icon (typically an upward-pointing arrow or a person icon with a plus sign).
- Invite people outside your organization: Add their email address and specify sharing preferences.

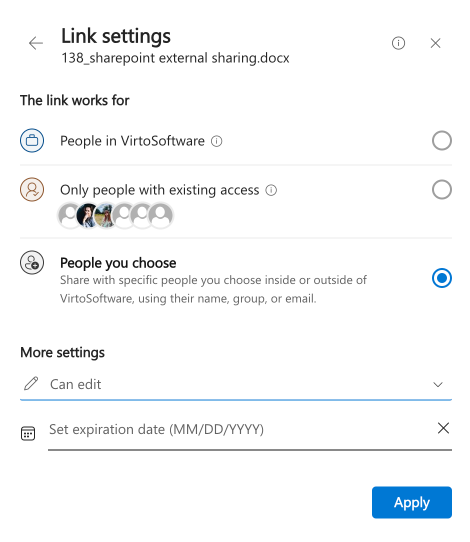
- Choose sharing settings: Alternatively, click the Link settings to invite people by the link and configure sharing preferences:
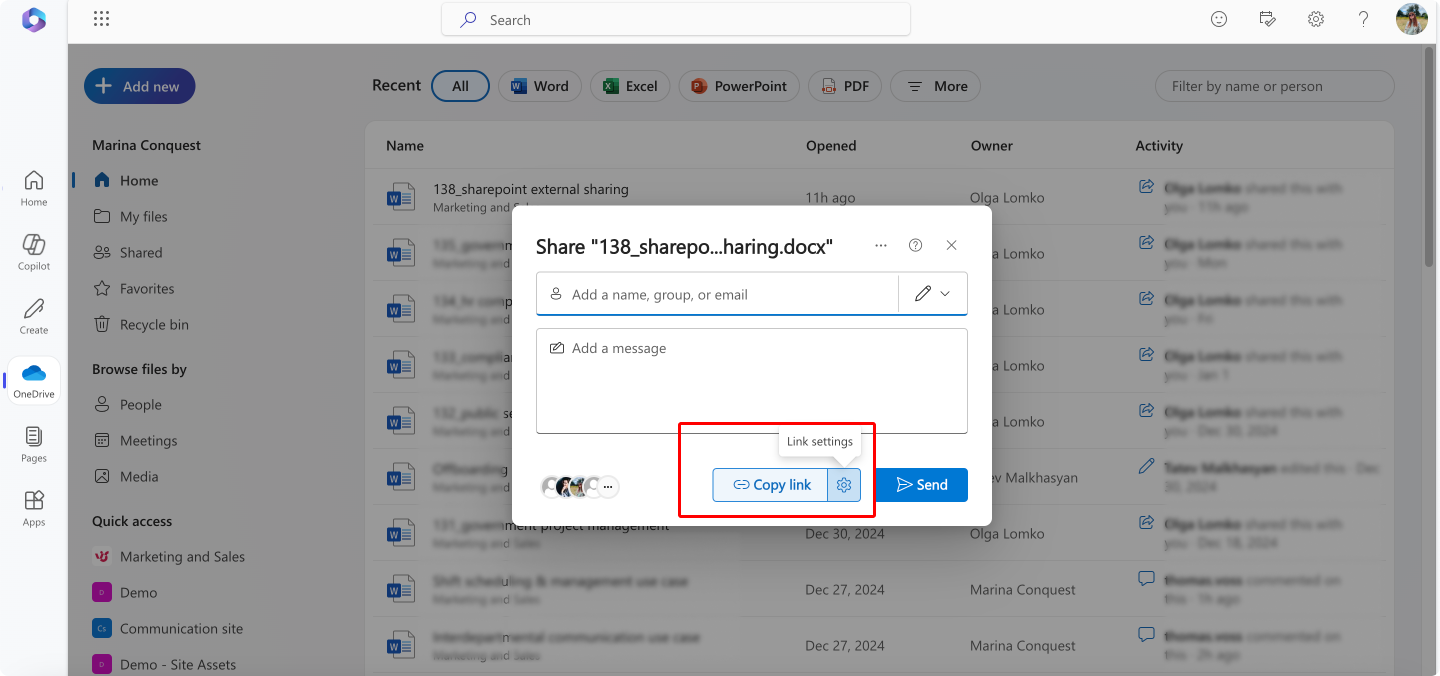
- People in [Your Organization]: This option restricts access to users within your organization. It’s not suitable for sharing with external users.
- Only people with existing access: This option reshares the item with people in your organization who already have access.
- People you choose: This is the option for external sharing. It allows you to specify the email addresses of the individuals you want to grant access to.
- Specify access rights:
- Can edit: Allows recipients to make changes to the file.
- Can review: Allows recipients to suggest changes.
- Can view: Allows recipients to view the file but not make changes. This is the recommended default for sensitive information.
- Can’t download: Allows recipients to view the file but not download.
- Set an expiration date: Specify a date after which the sharing link will expire, revoking access for the recipient. This is a crucial security measure, especially for sensitive files.
- Add recipients and an optional message: Enter the email addresses of the external users you want to share with. Include a brief message explaining the purpose of sharing the file.
- Send or copy the link:
- Send: Click “Send” to email the sharing link directly to the recipients.
- Copy link: Copy the sharing link to share it through other channels (e.g., chat, messaging apps).
- Manage access (after sharing): You can manage existing shared links by returning to the “Share” dialog. You can change permissions, stop sharing, or update advanced settings.
By following these steps and carefully considering the security implications of each sharing option, you can effectively and securely share files and folders in OneDrive with external users. Always prioritize the most restrictive sharing settings that meet your collaboration needs.
👉How to share SharePoint folder with external users? If you’re wondering how to share a SharePoint folder or how to share files in SharePoint with external users, then the process is similar to the described above. Navigate to the SharePoint site folder or file you want to share, click the Share button, specify your recipients by adding their email address, or click on Link settings to configure your sharing preferences.
Managing permissions and security in OneDrive
Effective permission management is crucial to protect sensitive data and ensure that external sharing doesn’t lead to unauthorized access. Below are best practices for managing permissions and security in OneDrive.
How to change or revoke access rights for external users
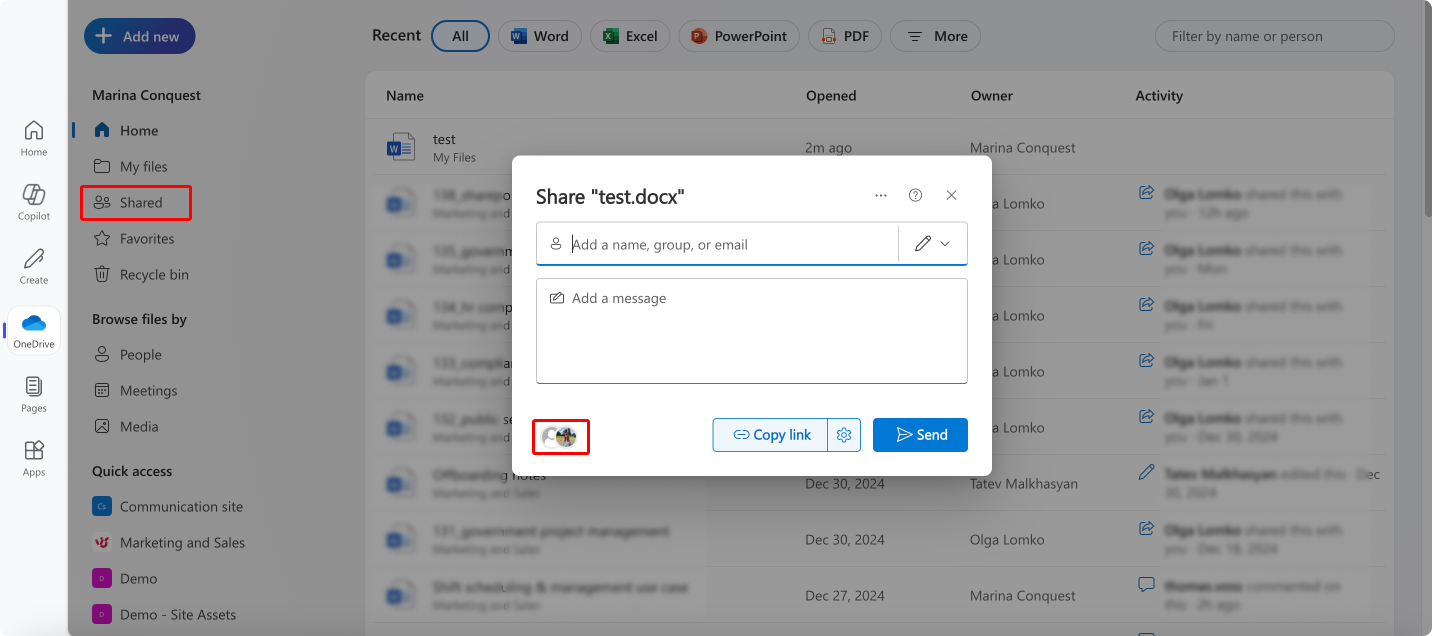
- View shared files: In OneDrive, click Shared from the left-hand menu to see all files and folders you’ve shared.
- Manage permissions
- Select the file or folder, click the ellipsis (…), choose Share, and click on the people at the bottom of the window.
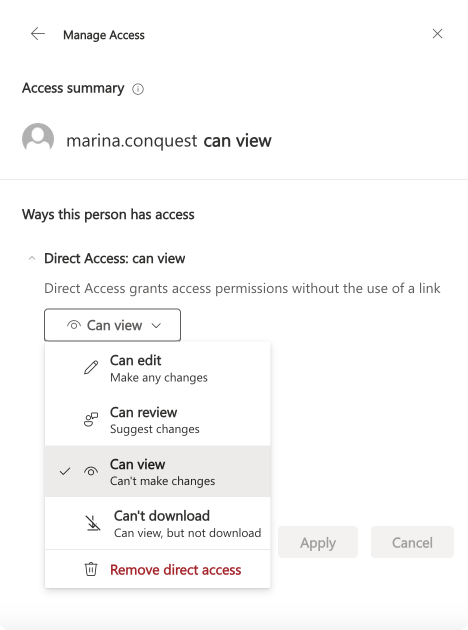
- Here, you can:
- Change permissions: Switch between different levels of permissions.
- Remove access: Revoke the user’s access entirely by deleting their permissions.
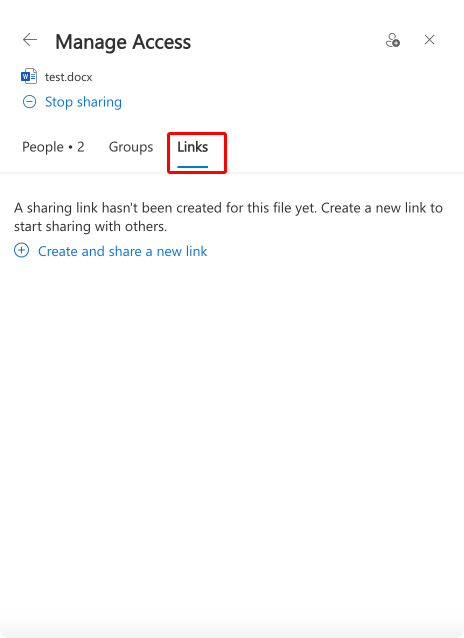
- Stop sharing entirely
- In the Manage access panel, choose Links to disable all active links and permissions for the file or folder.
Why regularly reviewing permissions is important
Regularly reviewing and managing permissions for shared files, especially those shared externally, is crucial for maintaining security, compliance, and data governance. Here’s why:
- Minimize security risks: Over time, access granted to external users can become a security liability. Employees leave organizations, projects end, and relationships change. Stale permissions increase the risk of unauthorized access, data breaches, and accidental data leakage. Regular reviews help identify and revoke unnecessary access, reducing the attack surface.
- Ensure compliance: Many industries have regulations (e.g., GDPR, HIPAA) that mandate strict control over data access. Regular permission reviews help demonstrate compliance by ensuring that only authorized individuals have access to sensitive information. This is essential for avoiding penalties and maintaining a strong security posture.
- Improve data governance: Regular reviews contribute to better data governance by providing a clear picture of who has access to what data. This visibility helps organizations manage data lifecycle, enforce data retention policies, and prevent data sprawl.
- Maintain control over shared data: External sharing, while valuable for collaboration, can lead to data proliferation if not managed carefully. Regular reviews help maintain control over where your data resides and who can access it, preventing unauthorized distribution and ensuring data integrity.
- Limit the impact of compromised accounts: If an external user’s account is compromised, reviewing permissions regularly can limit the potential damage. By promptly revoking access for inactive or unnecessary accounts, you reduce the risk of a compromised account being used to access sensitive data.
Recommendations for restricting unauthorized distribution
Here are some best practices for controlling access and preventing unauthorized distribution:
- Principle of least privilege: Grant users only the minimum level of access they need to perform their tasks. Avoid granting excessive permissions “just in case.” This principle is fundamental to security and should be applied to all sharing scenarios. For example, if a user only needs to view a document, grant them “View” access, not “Edit” access. This limits the potential damage if their account is compromised.
- Use expiration dates for shared links: Always set expiration dates for externally shared links, especially for sensitive information. This limits the window of access and reduces the risk of the link being shared further without your knowledge.
- Leverage sensitivity labels (Microsoft Purview Information Protection): Apply sensitivity labels to classify files based on their sensitivity (e.g., Confidential, Public). These labels can automatically enforce sharing restrictions, preventing users from sharing sensitive data inappropriately.
- Monitor sharing activity: Regularly review OneDrive and SharePoint audit logs to monitor file sharing activity. Look for unusual patterns, unauthorized access attempts, or excessive sharing. This proactive monitoring can help identify and address potential security issues early on.
- Educate users on secure sharing practices: Provide training and guidance to your users on best practices for external sharing. Emphasize the importance of using the appropriate sharing settings, setting expiration dates, and protecting sensitive information.
- Automate permission reviews: Where possible, use automation tools or scripts to periodically review external sharing permissions and identify stale or unnecessary access. This can significantly reduce the administrative burden and improve the consistency of reviews.
Following security best practices is key to ensuring external collaboration remains low-risk while high-value. This includes thoughtful permissioning and regular user access reviews. With a vigilant strategy that safeguards data without compromising agility, external sharing can unlock speed and innovation through closer coordination across organizations.
How to share with people without a Microsoft account
As we’ve discovered, sharing with people outside your organization who don’t have Microsoft accounts is possible in SharePoint and OneDrive. These external users are typically treated as “guests.” Here’s a review of possible options for sharing.
Sharing options for people without a Microsoft account:
- Sharing links: These links don’t require a Microsoft account or any sign-in. Anyone with the link can access the shared content. This is the easiest way to share. Important: Organizational settings might restrict or disable this option. Use it with caution and always implement additional security measures like expiration dates (and password protection if you have such an option).
- Sharing with specific people (using email addresses): This is the more common and secure method for sharing with external users. Even if the recipient doesn’t have a Microsoft account, SharePoint/OneDrive will guide them through a process to access the shared content. Here’s how it works:
- Invitation email: When you share with an external user’s email address, they receive an invitation email.
- Guest access options: The recipient has a few options:
- Sign in with a Microsoft account (if they have one): This is the simplest option if they already have an account.
- Create a Microsoft account: They can create a free Microsoft account using their existing email address.
- One-time passcode: If the recipient doesn’t want to create a Microsoft account, they can request a one-time passcode. This passcode is sent to their email address and allows them temporary access to the shared content. This option offers a good balance between convenience and security.
- Organizational account (if applicable): In some cases, the recipient might be able to use their own organizational account (if their organization supports it) through Azure AD B2B collaboration.
- Access granted: Once the recipient completes one of these steps, they gain access to the shared content.
By understanding these different guest access options and their security implications, you can effectively collaborate with external users even if they don’t have Microsoft accounts. Always prioritize secure sharing practices to protect your data.
Step-by-step instructions: How to share files & folders
We’ve already provided instructions for external sharing (including for those without a Microsoft account) above. Here’s a review for easy reference:
- Sharing links:
- Select the content: In SharePoint/OneDrive, locate the file or folder.
- Open sharing: Click the Share button (icon varies depending on the platform).
- Go to Link settings: In the sharing dialog, click on Link settings.
- Select recipients: Choose “Anyone” to share with anyone without requiring sign-in or “People you choose” to share with specific people inside or outside of your organization, using their name, group, or email.
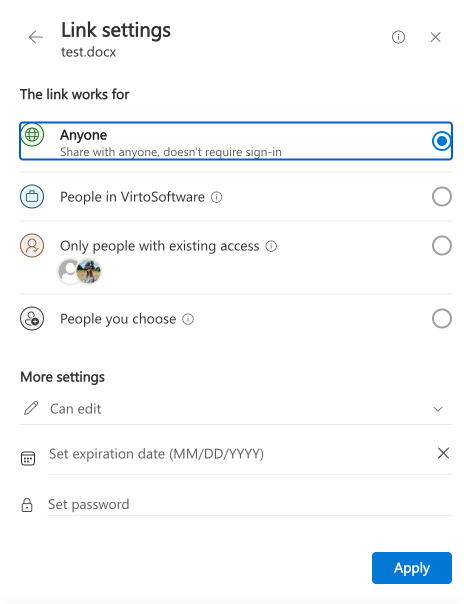
- Set Permissions: Choose the level of permissions to grant, such as Can viewor Can edit.
- Additional security (optional):
- Set an expiration date.
- Restrict downloading (may apply to all users or only guests).
- Set a password (if available).
- Copy and share: Copy the link and send it to the recipient.
- Guest access (Specific individuals):
- Select the Content: In SharePoint/OneDrive, locate the file or folder.
- Invite People: Click Share.
- Enter Email Address: Enter the recipient’s email address.
- Set Permissions: Choose the level of permissions to grant.
- Send Invitation: Click Send. The guest will receive an email with instructions. They may need to create a free Microsoft account to access the content.
👉 Can SharePoint forms be shared externally? Yes, SharePoint forms can be shared externally by enabling external sharing on the site that hosts the forms. External users can access the forms via a shared link, provided they have the necessary permissions.
Add a Domain for External Sharing
Adding domains for external sharing in SharePoint is an essential step in maintaining control over who can access your organization’s shared content. This section will guide you through the process of configuring domain restrictions to enhance security and ensure that external sharing is limited to trusted organizations. You’ll learn what it means to add a domain, step-by-step instructions for setting it up, and best practices to follow for optimal protection. By the end of this section, you’ll have the tools to manage external sharing effectively and reduce the risk of unauthorized access.
What is adding a domain in SharePoint?
Adding a domain in SharePoint allows you to control external sharing by permitting or restricting access based on email domains. This enhances security by ensuring only authorized external partners or organizations with specific email addresses can access your SharePoint and OneDrive resources. This is sometimes referred to as “domain allowlisting” (for permitted domains) or “domain blocklisting” (for restricted domains).
Example: If you collaborate with @partnercompany.com, you can allow access only to users with that email domain while blocking others.
Step-by-step instructions: How do I add a domain to SharePoint external sharing?
- Accessing the admin center settings:
- Sign in: Sign in to the Microsoft 365 admin center (admin.microsoft.com).
- Open SharePoint admin center: In the left-hand navigation, find and select “SharePoint” (it might be under “Admin centers”).
- Setting up domain restrictions:
- Navigate to sharing policies: Go to Policies > Sharing. (The exact path might vary slightly based on your SharePoint/Microsoft 365 version).
- External sharing settings: Under the “External sharing” section, you’ll find options to control external sharing. The specific options available depend on your subscription and configuration. Look for the settings related to domain restrictions. This might be labeled “Limit external sharing by domain” or similar.
- Adding domains:
- Allowed domains (Allowlist): Enter the domains you want to permit (e.g., @partnercompany.com). Separate multiple domains with commas or spaces (check the specific instructions on the screen).
- Blocked domains (Blocklist): Enter the domains you want to explicitly block. This is useful if you want to prevent sharing with specific organizations.
- Important considerations:
- Priority: If a domain is on both the allowlist and blocklist, the blocklist usually takes precedence.
- Subdomains: Clarify whether subdomains (e.g., subdomain.partnercompany.com) are automatically included when you add a domain. The behavior might depend on the SharePoint version.
- Interaction with other settings: Domain restrictions work in conjunction with other external sharing settings. For example, you can allow external sharing only with specific domains and require guests to authenticate.
- Applying the settings:
- Save Changes: Click “Save” to apply the domain restrictions. These settings will apply to all SharePoint and OneDrive sites within your organization (unless overridden at the site level, if allowed).
- Modifying or removing domains:
- Return to Sharing Policies: Go back to Policies > Sharing in the SharePoint admin center.
- Edit Domain Lists: Modify the allowed/blocked domain lists as needed.
- Save Changes: Save the changes to update the domain restrictions.
Best practices for setting up domains
To maximize security and ensure smooth collaboration, follow these best practices:
1. Principle of least privilege (limit access):
- Only allow essential domains: Permit only those domains absolutely necessary for collaboration. Avoid adding generic domains or domains you haven’t verified.
- Regularly review and update: Periodically audit the allowed and blocked domain lists. Remove outdated or no longer needed domains to minimize security risks. Establish a regular review schedule (e.g., quarterly).
2. Combine with other security measures:
- Conditional access policies: Consider using Conditional Access policies in Azure Active Directory to enforce multi-factor authentication (MFA) for external users accessing SharePoint. This adds a crucial layer of security.
- Sensitivity labels and data loss prevention (DLP): Apply sensitivity labels to sensitive documents and configure DLP policies to prevent external users from downloading, printing, or sharing sensitive information.
- Activity monitoring: Regularly monitor the activity of external users in SharePoint. Look for unusual access patterns or suspicious downloads. SharePoint audit logs can provide valuable insights.
- Short-term sharing options: For temporary collaboration, use sharing links with expiration dates or limited permissions instead of adding a domain permanently.
3. Wildcard usage (use with caution):
- Understand the implications: Wildcards (e.g., @*.partnercompany.com) allow access from all subdomains. Use them cautiously, as they can broaden access significantly. Document why a wildcard is necessary if you use one.
- Validate subdomain control: Before using a wildcard, ensure the partner organization controls all subdomains under the specified domain. Otherwise, you might unintentionally grant access to subdomains they don’t manage.
4. Communication and training:
- Inform users about policies: Clearly communicate your external sharing policies to internal users. Explain the importance of domain restrictions and the risks of oversharing.
- Train users on secure sharing practices: Provide training on how to share content securely with external users, including how to use guest links appropriately and how to recognize phishing attempts.
5. Stay informed about SharePoint updates:
- Keep up-to-date: Microsoft regularly updates SharePoint’s security features. Stay informed about these changes and adjust your domain sharing policies accordingly. Subscribe to relevant Microsoft blogs or newsletters.
External collaboration through SharePoint offers tremendous potential to accelerate business goals, but only with the right security foundations in place. By ensuring that security underpins all external access configurations, teams can confidently benefit from streamlined partnerships while preventing valuable information from falling into the wrong hands.
Solving Common Problems with SharePoint Share with External Users
External sharing in SharePoint can sometimes present challenges. Here’s a breakdown of common issues and their solutions:
Organization-level restrictions
Problem: A user can’t share externally because the organization has disabled external sharing.
Solution:
- Verify organization-level settings:
- In the Microsoft 365 admin center, go to Settings -> Org settings -> External sharing.
- Ensure external sharing is enabled for SharePoint and OneDrive. Note the different levels of external sharing available (e.g., allowing sharing with authenticated users only, allowing anonymous “Anyone” links).
- Contact your IT administrator: If you’re not a global administrator, contact your IT department to request changes to these settings.
Site-level restrictions
Problem: Sharing is blocked at the site level.
Solution:
- Check site sharing settings:
- In the SharePoint site, go to Settings (gear icon) -> Site permissions.
- Click Sharing settings.
- Ensure external sharing is enabled for the site. The site settings cannot be more permissive than the organization-level settings.
- Contact the site owner: If you don’t have the necessary permissions, contact the site owner to modify the sharing settings.
Microsoft 365 Group and Team connected sites
Problem: For sites connected to a Microsoft 365 Group or Team, the sharing settings are controlled at the group/team level. Changes made at the site level will be overridden by the group/team settings.
Solution:
- Manage sharing settings through the Microsoft 365 group or team interface.
List/Library-Level Restrictions
Problem: Sharing is restricted within a specific document library.
Solution:
- Verify document library settings:
- In the document library, go to Settings (gear icon) -> Library settings.
- Under Permissions and Management, click Permissions for this document library.
- Check if unique permissions are enabled for the library. If so, ensure external sharing is allowed. If not, the library inherits permissions from the site, so adjust the site-level settings.
Item-level permissions: Why may a user not be able to share a SharePoint File externally
Problem: An individual file or folder has specific permissions that prevent external sharing.
Solution:
- Check item permissions:
- Select the file or folder. In the command bar, click the i (information) icon or Manage access.
- Review the existing permissions. If necessary, stop inheriting permissions and grant specific permissions to external users.
- Ensure sufficient permissions: Only the item owner or a user with “Manage permissions” rights can modify these settings.
Guest user acceptance issues
Problem: The external user has trouble accepting the sharing invitation or accessing the shared content.
Solution:
- Check spam/junk folders: Advise the external user to check their spam or junk email folders for the invitation.
- Resend the invitation: If the invitation has expired or is lost, resend it.
- Verify email address: Double-check that the correct email address was used for the invitation.
- Troubleshooting guest access: Guide the external user through the guest access process, including options for signing in with a Microsoft account, creating a new account, or using a one-time passcode.
By understanding and addressing these common problems, you can ensure smooth and secure external sharing in SharePoint. Remember to check settings at all relevant levels—organisation, site, and item—and adjust permissions accordingly. Clear communication with external users and IT administrators is also essential for resolving sharing issues effectively.
Other issues with SharePoint external access: Community-shared challenges and solutions
To address the challenge of securely sharing specific SharePoint Online folders with external users while restricting access to the rest of the site, we researched various online resources and community forums. We found consistent discussions on this topic, particularly within the r/sharepoint subreddit. Several recurring challenges and recommended solutions emerged from these discussions, which we’ve summarized below. These insights provide valuable guidance for implementing a secure and manageable external sharing strategy.
Post 1: Site for external sharing of data: Can SharePoint be shared externally?
See the challenge & proposed solutions described here.
- Challenge: The user wants to migrate from a file-sharing service to SharePoint Online. They need to create a SharePoint site exclusively for external sharing where external users can only access a designated folder, upload, download, and create subfolders within that folder. All other SharePoint functionalities should be disabled.
- Proposed solutions:
- User#1: Create a separate document library, break permission inheritance, create distinct groups for internal and external users with specific permissions, and add external users (as guests in Azure AD) to the appropriate group.
- User#2: Suggests a blog post detailing the creation of a client/customer/vendor portal in SharePoint Online.
- User#3: Proposes a more complex solution using Power Automate to generate unique URLs and temporary access codes for enhanced security. This approach is more suitable for scenarios requiring very granular control and potentially sensitive data.
Post 2: Company wants external users to access one singular folder and nothing else
See the challenge & proposed solutions described here.
- Challenge: Similar to Post 1, the user needs to grant external users access to a single folder within a SharePoint site without giving them access to the rest of the site’s content.
- Proposed solutions:
- User#1: Recommends creating a separate document library with unique permissions, rather than using a folder within an existing library, to minimize the risk of accidental oversharing. This is the most common and generally recommended approach.
- User#2: Supports the separate document library approach as a best practice.
- User#3: Suggests simply sharing the folder directly, but acknowledges potential security risks due to the possibility of accidentally sharing the entire site.
- User#4: Provides detailed steps for creating a permission group for external users, breaking inheritance on the library, and adding the group to the library with appropriate permissions. This is essentially the same as RabidHanuman’s suggestion in Document 1.
- User#5: Reiterates the risk of accidental oversharing when sharing a folder directly.
- User#6: Suggests a separate document library or even a new site collection, depending on the scale and isolation requirements.
Overall analysis and recommendations:
The consensus across both posts is that creating a separate document librarywith unique permissions is the best approach for isolating external user access to a specific folder. This method is more secure and manageable than trying to manage permissions within a single library.
Here’s a breakdown of the key considerations:
- Simplicity vs. security: Directly sharing a folder is the simplest approach but carries significant security risks. The separate document library method is slightly more complex to set up but offers much better security and control.
- Scale and complexity: For more complex scenarios involving many external users or sensitive data, consider the Power Automate solution suggested by amberwombat or even a dedicated site collection as suggested by DarthHader82.
- Best practice: The separate document library method is the recommended best practice for most situations. It provides a good balance of security, simplicity, and maintainability. It also aligns with the principle of least privilege.
- User training: Regardless of the chosen method, user training is crucial to prevent accidental oversharing. Emphasize the importance of sharing only the intended folder or library and avoiding the use of site-level sharing options.
👉 Can SharePoint be used as an external website? SharePoint is not typically used as a public-facing external website. It is designed for secure internal and external collaboration. However, organizations can configure SharePoint Communication Sites or use third-party tools to create externally accessible, branded portals for specific purposes.
An Alternative for Managing External Access—Virto Calendar Web Part for SharePoint On-Premises

Managing external access in SharePoint can be a complex task, especially when balancing user convenience with security. Virto Calendar provides a robust alternative for managing external access while enhancing collaboration and user experience for SharePoint users, whether on-premises or online.
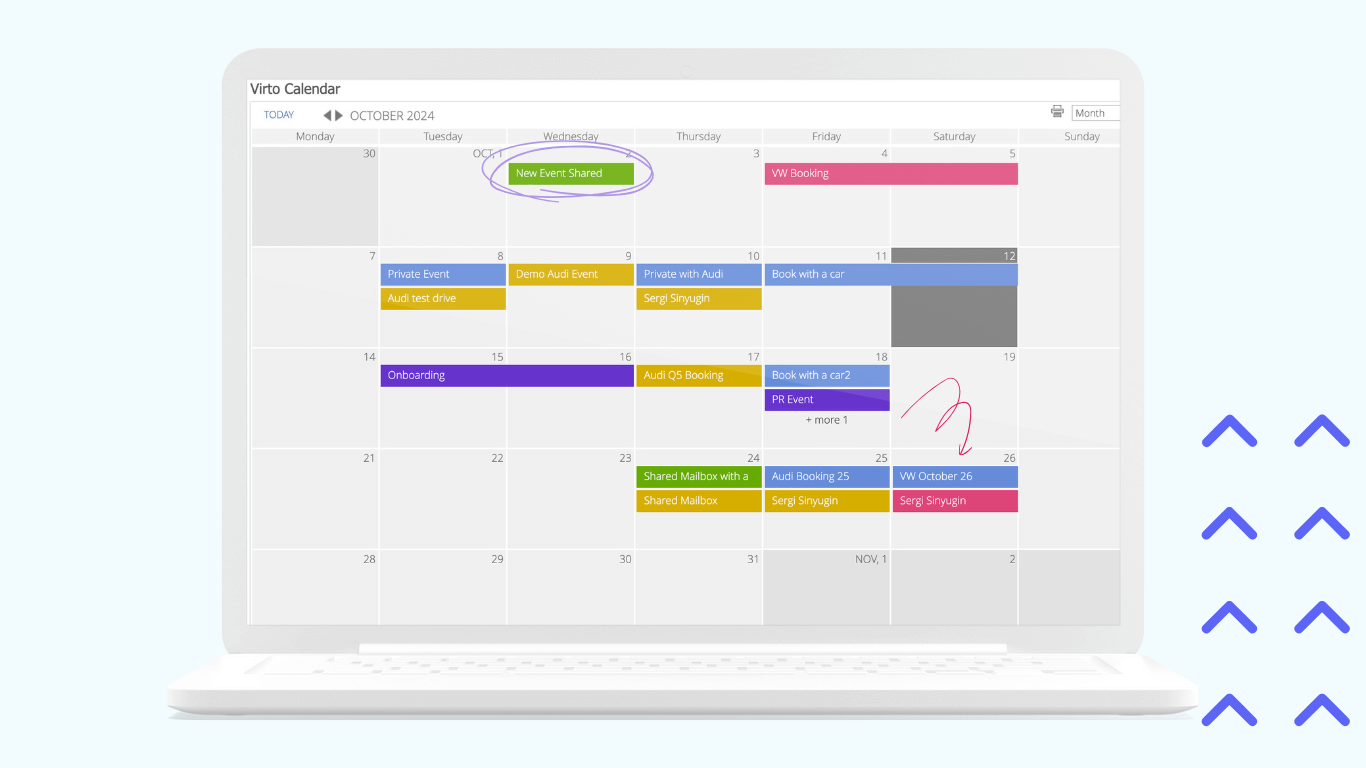
What is Virto Calendar?
Virto Calendar is a powerful web part and app for SharePoint and Microsoft 365 that consolidates events and tasks from multiple data sources into a unified calendar view. It overlays Exchange Online calendars, SharePoint lists, Outlook calendars, meeting rooms, and external calendars (via iCal links) into a single, user-friendly platform.
With its advanced customization, permissions management, and security features, Virto Calendar simplifies event management and external collaboration, making it an ideal solution for organizations that need to manage external access efficiently.
Key benefits of Virto Calendar
Below are the key benefits that make Virto Calendar an essential tool for organizations seeking flexibility, improved security, and an enhanced user experience.
Flexibility of customization
- Combine events from multiple sources, including SharePoint lists, Outlook, and external calendars like Google Calendar.
- Use color-coding for events and categories to create a well-structured and visually intuitive calendar overlay.
- Switch between different views (day, week, month, year, or tasks) and incorporate a mini calendar for a compact overview.
This flexibility allows organizations to create tailored external access experiences, limiting users to specific calendars or event views.
Improved security
- Virto Calendar strictly adheres to Microsoft’s security and compliance standards and holds the Microsoft 365 App Certification.
- Permissions are inherited from SharePoint, ensuring that external users only see items they are authorized to access.
- Advanced rights management allows administrators to assign calendar managers who can configure settings without compromising broader site security.
For example, if an external user only has access to specific SharePoint list items, they will only see those events in the calendar, ensuring data security and compliance.
Enhanced user experience
- A Google-style interface makes navigation intuitive and user-friendly.
- Features like drag-and-drop event management, quick event creation, and resizing provide a seamless experience.
- External users can easily collaborate by viewing, updating, or managing calendar entries, depending on their assigned permissions, without accessing unrelated data.
How Virto Calendar simplifies managing external access
Here’s how Virto Calendar simplifies external access management:
Advanced rights management
Virto Calendar allows for two levels of permission management:
- SharePoint site permissions: Permissions are inherited from SharePoint, ensuring external users only have the access granted to them by the site administrator.
- Calendar permissions: Assign a user as a calendar manager, enabling them to configure or manage the calendar without affecting site-wide permissions.
This layered approach ensures precise control over what external users can see and do within the calendar, reducing the risk of unauthorized access or accidental oversharing.
Cross-platform integration
Virto Calendar integrates seamlessly with Microsoft 365 and SharePoint On-Premises, supporting versions 2013, 2016, and 2019. External users can access the calendar through SharePoint or via iCal links from external services like Google Calendar.
This integration provides a simple and secure way to share calendar data with external partners while ensuring they only have access to relevant information.
Streamlined event management
Virto Calendar allows external users to interact with calendar data in a secure and controlled way:
- They can upload, view, or edit calendar events as permitted by their SharePoint permissions.
- Events can be color-coded and customized for clarity, ensuring external users can quickly understand and interact with shared data.
- External users can only access calendar items for which they have permissions, with no visibility into other site content.
All in all, Virto Calendar offers a powerful and secure alternative for managing external access in SharePoint. Its flexibility, security features, and user-friendly design simplify the process of sharing data with external users while maintaining strict control over permissions and access.
Conclusion on SharePoint Access to External Users
External sharing in SharePoint and OneDrive is a powerful feature that drives seamless collaboration across organizational boundaries. It allows businesses to work efficiently with clients, partners, and vendors while maintaining a centralized platform for communication and data sharing. However, as with any collaborative tool, its effectiveness relies on proper configuration and stringent access control to ensure security and compliance. Administrators should strike a balance between accessibility and security, applying the principle of least privilege and regularly auditing access rights.
For organizations seeking a robust tool to enhance collaboration and manage external access effectively, the Virto Calendar App for SharePoint Online and Virto Calendar Web Part for SharePoint On-Premises are ideal solutions. The tools offer advanced customization, secure calendar sharing, and improved user experience, making them an excellent addition to your SharePoint environment. With features such as color-coded events, cross-platform integration, and detailed permission settings, Virto Calendar empowers teams to collaborate efficiently, even with external stakeholders.
- Schedule a quick demo of both apps now
- Install a free trial version of Virto Calendar App for Microsoft 365 & SharePoint Online or Virto Calendar App for SharePoint On-Premise
To deepen your understanding of SharePoint features and external sharing, we recommend the following resources:
- Official Microsoft Documentation:
For deeper inputs on calendar management and related topics, browse through the VirtoSoftware blog:


