SharePoint Recycle Bin: How to Access and Restore Files
Here's everything you need to know about finding, recovering, and outsmarting surprisingly complex SharePoint's recycle bin.
Deleting the wrong file in SharePoint shouldn’t turn into a fire drill. The recycle bin is your first—and often fastest—line of defense for everyday mistakes, bulk edits that went sideways, or even suspicious activity. Yet many teams still treat it as a mystery: what actually gets kept, who can see what, how it differs from version history or Microsoft Purview retention, and where Teams channel files end up when someone hits delete.
This guide clears that up. We’ll explain the two-stage model in SharePoint Online, how long content is recoverable, and when items move from a user’s view to the site collection’s second stage. You’ll learn where deleted sites live, how “restore this library” works for point-in-time rollbacks, and how retention policies change what you should expect during eDiscovery. We’ll also cover Teams specifics, since private and shared channels store files in their own SharePoint sites.
Our goal is practical recovery, not theory. Expect step-by-step checks, admin and PowerShell options when the UI isn’t enough, and decision points for choosing between the recycle bin, version history, library restore, and retention. By the end, you’ll have a repeatable playbook for getting content back quickly and safely—without guesswork.
SharePoint Recycle Bin: Capabilities, Limitations, and Location
SharePoint’s recycle bin is a safety net, not a vault. It gives users and site owners a self-service way to undo deletions for a limited time, with clear boundaries on what’s kept, who can see it, and where to go for site-level restores.
Does SharePoint have a recycle bin?: Key capabilities and limitations
The SharePoint Recycle Bin functions as a temporary storage system for deleted objects, providing a crucial buffer between deletion and permanent data loss. It stores various types of content including documents and folders in libraries, list items, entire lists and libraries, site pages, and subnodes. This comprehensive coverage means that most accidental deletions can be reversed, giving users and administrators peace of mind when managing content.
It’s important to note that completely deleted sites in SharePoint Online are handled differently—they’re stored in the “Deleted sites” section within the SharePoint admin center rather than in the regular site recycle bin. As of September 2025, subsites go to the second-stage recycle bin, while entire site collections appear under Deleted sites in the SharePoint admin center, providing a clear separation between different levels of site deletions.
Deleted items remain in the recycle bin for a limited time, during which they can be recovered by users or administrators. Once this retention period expires, the items are permanently deleted and cannot be recovered through SharePoint’s built-in tools.
SharePoint Online features a two-level recycle bin system:
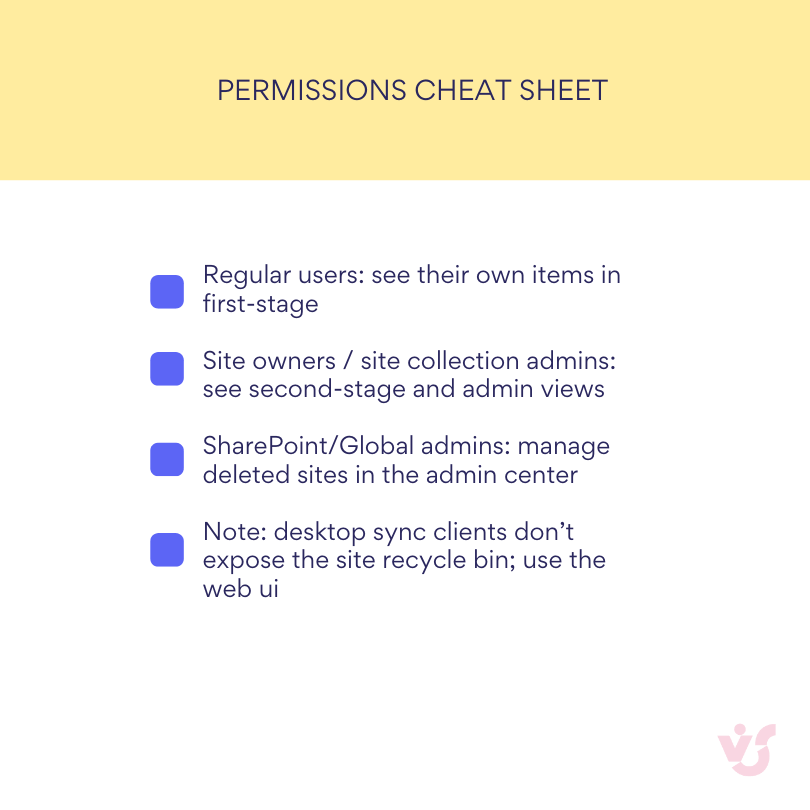
- First-stage (end user) recycle bin. Individual users see the items they deleted from that site.
- Second-stage (site collection) recycle bin. Site owners and site collection administrators can restore items removed from first stage or items users can’t see anymore. Site collection admins can also review all end-user recycle bin items from site collection administration → recycle bin.
| Level | Who can access | Where to find it | Typical actions | Time window |
| First-stage (end user) | the user who deleted the item | site left nav → recycle bin (or site contents → recycle bin) | view, restore, delete | part of the 93-day total |
| Second-stage (site collection) | site owners & site collection admins | site contents → recycle bin → second-stage recycle bin link | restore to original location, purge | remainder of the same 93-day clock |
| Deleted sites (tenant) | SharePoint/Global admin | M365 admin → SharePoint admin center → deleted sites | restore site, permanently delete | admin center retention for sites |
This separation of access limits accidental or unauthorized recovery by regular users while still giving admins a broad recovery surface.
SharePoint On-Premises follows a similar two-tier approach, with items flowing from the user recycle bin to the administrator recycle bin. The key difference lies in the additional control available to local farm administrators, who can manage global retention settings and configure recycle bin storage sizes according to organizational needs.
The role of administrators in recycling bin SharePoint management
Administrators play a crucial role in managing how deleted items are retained and recovered. They control critical parameters including retention duration, storage space allocation, and recovery permissions. These controls allow organizations to balance data protection needs with storage constraints and compliance requirements.
In SharePoint Online, administrators can manage the Site Collection Recycle Bin, which stores items that users have permanently deleted from their personal recycle bins. This second-stage recycle bin acts as a final safety net, catching items before they’re permanently removed from the system.
While the recycle bin automatically empties items when their retention period expires, administrators can manually delete items to free up space when necessary. This is particularly important because the second-stage recycle bin storage equals 200% of the site collection quota—large deletions may trigger the premature purging of older second-stage items if storage limits are reached.
Administrators might need to temporarily restrict access to the recycle bin during security incidents or compliance reviews. However, it’s important to note that as of September 2025, SharePoint Online has no direct switch to lock the recycle bin itself. Access follows site permissions, meaning administrators can hide navigation links or adjust user roles, but cannot disable the bin functionality entirely.
👉Where is SharePoint recycle bin? On any SharePoint site, open the left-hand navigation and select Recycle bin; if you don’t see it, go to Site contents and you’ll find Recycle bin there. In OneDrive on the web, the recycle bin is also in the left navigation. Site owners and site collection admins can open the second-stage recycle bin from a link at the bottom of the recycle bin page. Entire deleted sites aren’t in a site’s recycle bin—they’re in the SharePoint admin center under Sites → Deleted sites.
Retention periods and limits of recycle bin SharePoint Online & On-prem
Think of retention as the timer behind the safety net. The values are fixed in SharePoint Online and configurable on-prem, but the intent is the same: keep deleted content recoverable for a short, predictable window.
How long do things stay in the recycle bin in SharePoint?
In SharePoint Online, all deleted items are stored for a total of 93 days across both stages. This 93-day clock spans both the first-stage and second-stage recycle bins combined. For example, if an item spends 30 days in the first-stage recycle bin before being deleted by the user, it will remain in the second-stage recycle bin for the remaining 63 days of the total 93-day period.
| Area | Default/behavior | Configurable? | Notes |
| Item retention (SPO) | 93 days total across both stages | no | Single clock from deletion |
| Item retention (on-prem) | Org-defined (often ~30 days first stage + admin stage) | yes | Set in Central Admin |
| Second-stage capacity (SPO) | Up to 200% of site quota | no | Large deletions can purge oldest items |
| Library restore window | Last 30 days | no | Point-in-time rollback for a library |
SharePoint On-Premises offers more flexibility, with retention periods and recycle bin sizes configurable by administrators. While configurations vary by organization, a typical setup includes up to 30 days for the user recycle bin with additional storage time in the administrator recycle bin, though the total retention period often mirrors the SharePoint Online standard.
After retention periods expire, items are permanently deleted and cannot be restored using SharePoint’s built-in tools. For organizations with critical data that requires longer retention, third-party backup solutions become essential, providing long-term storage and granular recovery options beyond SharePoint’s native capabilities.
Several limitations affect the recycle bin’s effectiveness as a data protection tool. Items may be deleted prematurely when recycle bin quotas are exceeded, particularly during large deletion events. Shared links aren’t backed up with deleted items and must be reissued after restoration. The recycle bin also doesn’t protect against account compromise or mass attacks—if an attacker gains administrative access, they can permanently delete items and empty both recycle bins.
These limitations underscore an important principle: the recycle bin is not a comprehensive backup solution. It’s designed for quick recovery of accidentally deleted items, not for long-term data protection or disaster recovery scenarios. Organizations should view it as one component of a broader data protection strategy.
👉 Where do SharePoint deleted files live? When a user deletes a file, it first goes to that site’s first-stage recycle bin, visible only to the person who deleted it. If it’s removed from there—or the user empties the bin—it moves to the second-stage recycle bin for site owners/site collection admins for the remainder of the 93-day retention. Files deleted from Teams standard channels land in the team’s connected site recycle bin; private or shared channels use their own separate SharePoint sites and bins. After the retention window (or if quotas force earlier purges), items are permanently removed unless retention policies or holds require preservation.
Managing for compliance
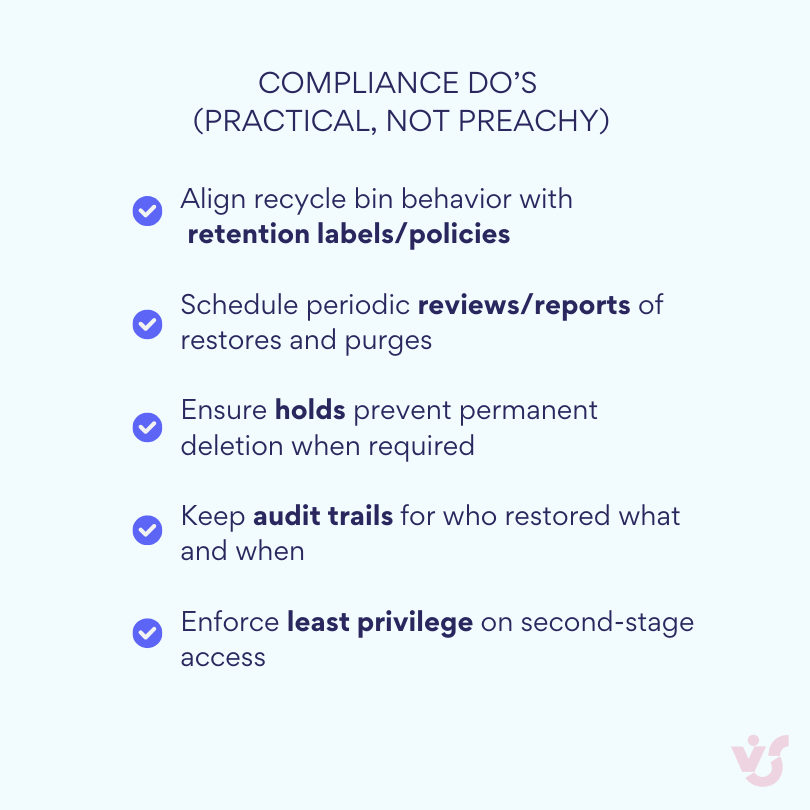
Recycle bin management plays a vital role in maintaining compliance with corporate policies and industry regulations such as GDPR, HIPAA, and other data governance standards. Organizations must control what data is retained and for how long, even after deletion, to meet legal and regulatory requirements.
The interaction between recycle bins and retention policies adds complexity to compliance management. When Microsoft Purview retention policies or labels apply to content, items can be held in the Preservation Hold Library beyond end-user deletion, even though the recycle bin still follows the standard 93-day rule. This dual system ensures that content subject to legal holds or compliance requirements isn’t permanently lost, even if users attempt to delete it.
Properly configuring retention policies alongside recycle bin management helps protect sensitive data while ensuring appropriate audit trails. Organizations should implement regular reviews of recycle bin contents and maintain detailed reports on item recovery and deletion activities. This documentation increases transparency, supports compliance audits, and reduces organizational risk.
For comprehensive compliance, administrators should establish clear policies defining who can recover deleted items, under what circumstances recovery is permitted, and how long different types of content should be retained. These policies should align with broader information governance strategies and be regularly reviewed to ensure they meet evolving regulatory requirements.
How to Access SharePoint Recycle Bin & Restore Files
Now that you understand the capabilities and structure of SharePoint’s recycle bin system, let’s dive into the practical aspects of using it. This section provides detailed, step-by-step instructions for accessing the recycle bin from various entry points, restoring your deleted content, and ensuring everything is properly recovered. We’ll also cover the critical post-restoration checks that many users overlook, ensuring your recovered content is fully functional with proper permissions and sharing settings intact.
Where is the recycle bin in SharePoint?: SharePoint recycle bin location
The location of the recycle bin varies depending on your access level and where you’re working within SharePoint.
For users:
Finding the recycle bin as a regular user is straightforward once you know where to look. On a SharePoint site, navigate to the site homepage and look for the “Recycle bin” link in the left navigation panel or site contents. If you don’t see it immediately, click on “Site contents” in the left navigation, then find the “Recycle bin” link at the top right of the page.
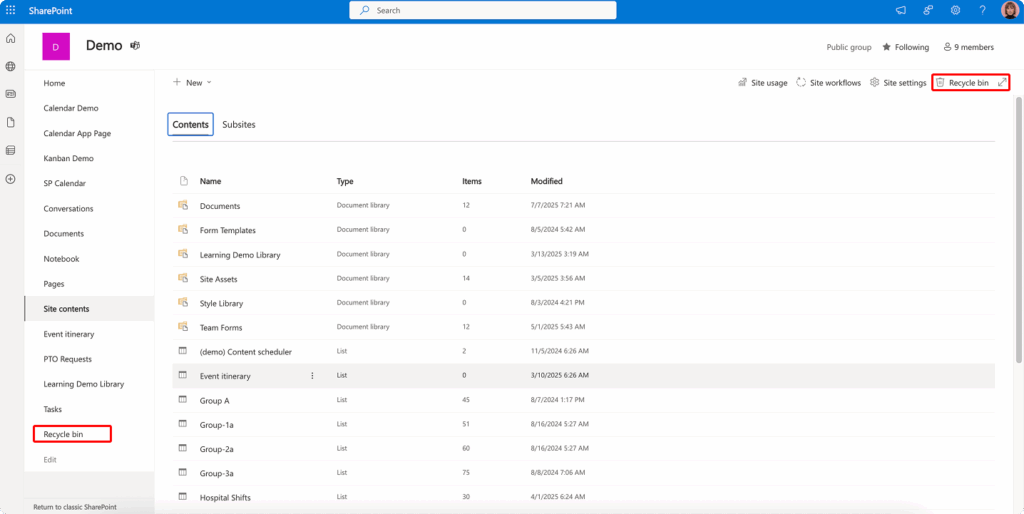
In a document library, the recycle bin can be accessed by clicking the settings gear icon and selecting “Site contents,” then clicking “Recycle bin.” Alternatively, you can often find a direct link at the bottom of the left navigation panel.
For OneDrive, click on the “Recycle bin” option in the left navigation panel of your OneDrive interface. This shows all files you’ve deleted from your personal OneDrive storage.

How do I see deleted files in SharePoint?
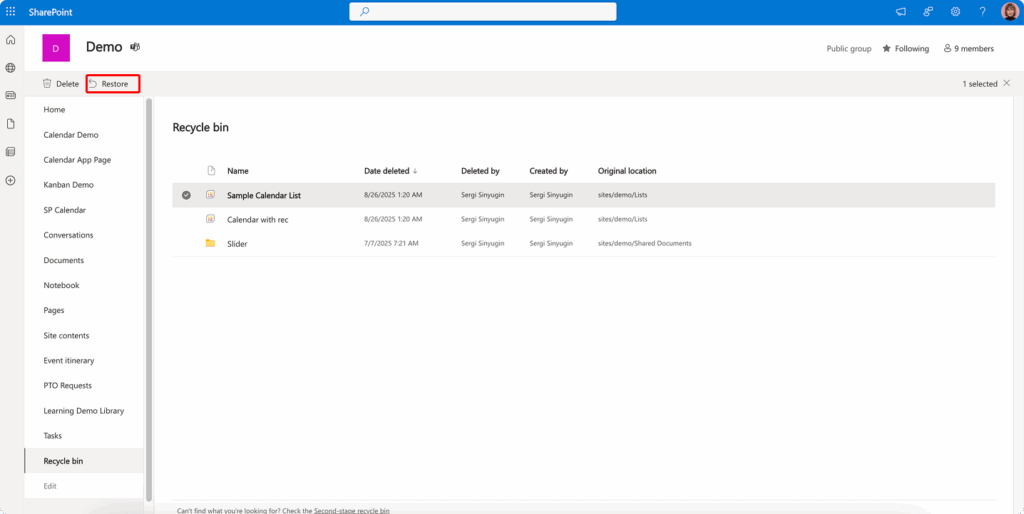
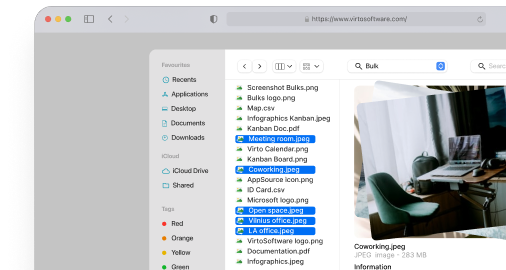
Once you’ve accessed the recycle bin, viewing your deleted items is simple. The recycle bin displays a list view of all deleted items, including the item name, original location, deleted by (user name), and deletion date. You can sort by any of these columns by clicking on the column headers.
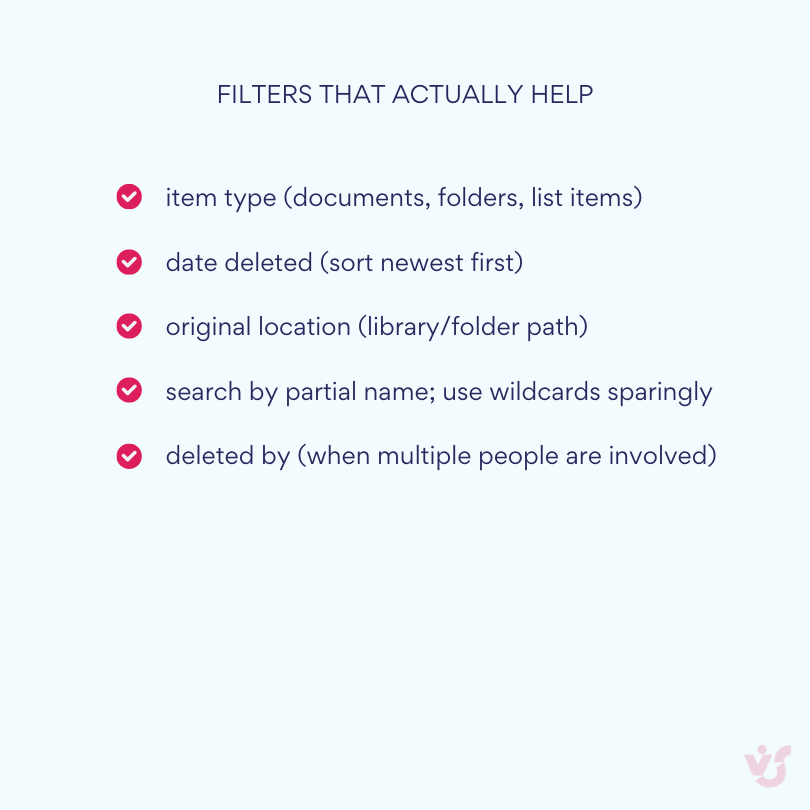
To find specific items more efficiently, use the filter options available at the top of the recycle bin page. You can filter by:
- Date range (deleted within the last week, month, etc.)
- Item type (documents, folders, list items)
- Original location (helpful when you remember where the file was stored)
Rights requirements: As a regular user on a site, you have automatic access to view and restore your own deleted items in the first-stage recycle bin. No special permissions are needed to access items you’ve deleted yourself.
For administrators:
Site owners and administrators have access to additional recycle bin levels. To access the site’s administrative recycle bin (second-stage), navigate to Site settings → Site collection administration → Recycle bin.
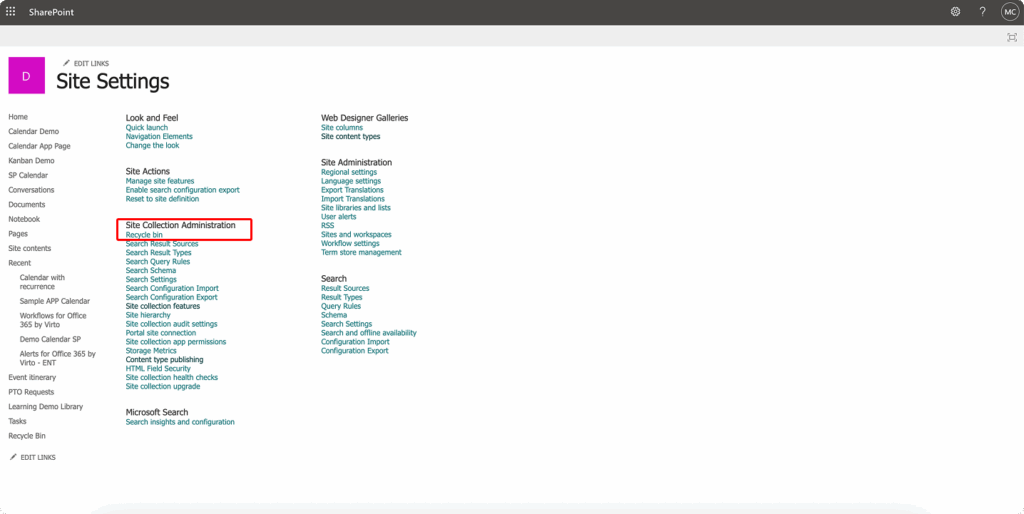
Here you’ll see two options:
- “End user Recycle Bin items” – shows all items currently in users’ recycle bins
- “Deleted from end user Recycle Bin” – the second-stage recycle bin containing items users have permanently deleted
To access “Deleted sites” in SharePoint Online, go to the Microsoft 365 admin center, then navigate to Admin centers → SharePoint → Deleted sites. This section shows all deleted site collections within your tenant.
It’s important to note that the second-stage recycle bin is only visible to site collection administrators and site owners. Regular users cannot see or access this level, ensuring proper security and governance.
Access features in SharePoint Online:
SharePoint Online recycle bins are only accessible through the web interface and Microsoft 365 admin panels. Desktop clients, such as Windows Explorer when using OneDrive sync, do not provide access to the site recycle bin. If you’ve deleted a file through a synced folder on your desktop, you’ll need to access SharePoint or OneDrive through a web browser to restore it.
The mobile app has limited recycle bin functionality and may not provide full access to all restore operations. For comprehensive recycle bin management and complex restore tasks, always use a web browser for the most complete set of features and options.
Restoring files and folders from recycle bin on SharePoint
Restoring items from the recycle bin is a straightforward process, but understanding the nuances helps ensure successful recovery.
Step-by-step restoration process:
- Navigate to the recycle bin using the methods described above
- Locate the items you want to restore using sorting or filtering
- Select the items by checking the boxes next to them (you can select multiple items)
- Click the “Restore” button at the top of the page
- The items will be restored to their original location
It’s crucial to understand the difference between the recycle bin and version history. Version History allows you to restore a previous version of a file without deleting the current version, while the recycle bin is for recovering completely deleted files. Version history is invaluable when you need to undo editing errors or recover from file corruption, as it only affects the selected document without impacting other files in the library.
For Office files, SharePoint provides preview and comparison capabilities within version history, allowing you to see exactly what changed between versions. For other file types, you can restore by date or author information, though preview options may be limited.
If the original location of a file has been deleted or renamed, SharePoint will create the closest available path or restore the item to the document library root. Always verify the restoration location after completing the process.
Bulk restore and delete
When dealing with multiple deleted items or recovering from major incidents like accidental mass deletions or ransomware attacks, SharePoint’s bulk restoration capabilities become essential. Rather than restoring files one by one, these powerful features allow you to recover entire sets of documents, roll back libraries to previous states, or efficiently manage large-scale cleanup operations.
How to restore previous files in SharePoint?
For situations involving multiple deleted files or recovery from incidents like ransomware attacks, SharePoint offers powerful bulk restoration options.
The “Restore this library” function is particularly useful for bulk recovery scenarios. This feature allows you to roll back an entire document library to a previous point in time, undoing all changes made after that point. As of September 2025, “Restore this library” can roll back activity within the last 30 days. For changes beyond 30 days, you’ll need to use version history, the recycle bin, retention policies, or third-party backup solutions.
To use this feature:
- Navigate to the affected document library
- Click the settings gear and select “Restore this library”
- Choose a restore point from the timeline
- Review the changes that will be reversed
- Confirm the restoration
For bulk operations in the recycle bin:
- Access the appropriate recycle bin level
- Use the “Select all” checkbox to select all visible items
- Or manually select multiple items using individual checkboxes
- Click “Restore” to restore all selected items or “Delete” to permanently remove them
Administrators can bulk empty the recycle bin to free up space, though this should be done cautiously as it permanently deletes all items. This is particularly important when approaching storage quotas, as the second-stage recycle bin can consume up to 200% of the site collection quota.
💡 For SharePoint On-Premises environments, tools like Virto Multiple File Operations can enhance bulk deletion and restoration capabilities, providing more granular control over large-scale file operations.
Difference between file, library, and site restore
Understanding the scope and impact of different restoration types helps you choose the right approach for each situation.
| Method | Scope | Best for | Impact | Limits |
| Restore from recycle bin | Single/multiple items | Accidental deletes | Targeted, minimal | Within retention only |
| Version history | One file | Bad edits/corruption | Replaces file version, keeps others | File must still exist |
| Restore this library | Entire library | Ransomware/mass edits | Rolls back everything in library | 30-day window |
| Restore deleted site | Whole site | Site-level removal | Restores structure + content | Admin-only path |
Individual file/item restoration is the most targeted approach. It:
- Affects only the selected item(s)
- Preserves all other content and structure
- Maintains current permissions and metadata
- Is ideal for accidental deletions of specific documents
Library restoration using “Restore this library” is more comprehensive:
- Rolls back ALL content in the library to a selected point in time
- Reverses bulk changes, deletions, and modifications
- Useful for ransomware recovery or major incident response
- Can impact many users if the library is actively used
- Limited to the last 30 days of activity
Where do deleted SharePoint sites go?
Site restoration is the most extensive operation. Deleted sites go to different locations depending on the type:
- Individual subsites go to the second-stage recycle bin
- Site collections appear in the “Deleted sites” section of the SharePoint admin center
Restoring a deleted site is an administrative operation that returns the entire site structure, including:
- All document libraries and lists
- Site pages and web parts
- Permissions and security settings
- Most site configurations and customizations
In SharePoint Online, site restoration is performed through the Admin Center’s “Deleted sites” section. In On-Premises environments, sites go to the Site Collection Recycle Bin and are restored by administrators via Central Administration or PowerShell.
Post-restore checks
After restoring items, several verification steps ensure everything is working correctly:
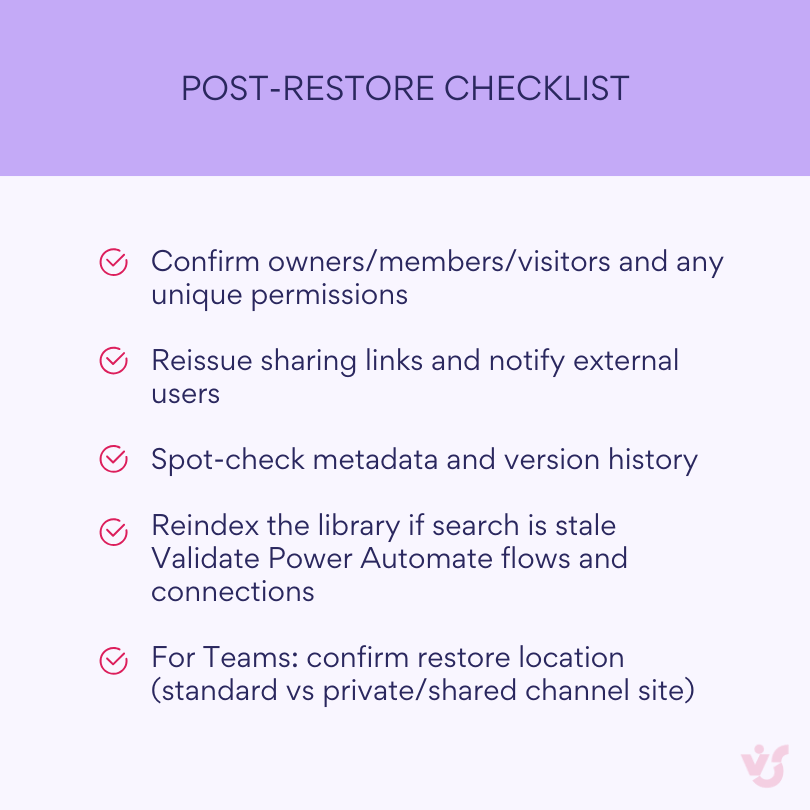
Permissions verification is critical. Check:
- Owner/Member/Visitor groups are intact
- Unique permissions at the item or folder level
- Any broken inheritance has been properly restored
💡 Learn more about SharePoint permissions here: Configuration & Management of SharePoint Permissions: A Complete Guide 2025
Shared links require special attention. Since shared links aren’t preserved during deletion:
- Generate new sharing links for external users
- Update any bookmarks or saved links
- Notify users who had access via shared links
Metadata and version integrity should be verified:
- Confirm custom metadata fields are populated correctly
- Check that version history has been preserved
- Verify any content approval or workflow states
For Microsoft Teams integration:
- Files from Teams channels are restored to the associated SharePoint site
- Private channel files go to their separate SharePoint site collection
- Team members should be notified of the restoration
💡 Learn more about MS Teams here: Microsoft Teams Admin Center Explained; How to Manage Microsoft Teams Permissions; and Microsoft Teams Governance.
If search isn’t finding restored content, reindex the library:
- Go to Library Settings → Advanced settings
- Click “Reindex Document Library”
- Allow time for the search crawler to process
💡 Learn more about library and document management in SharePoint here: Best Practices for SharePoint Document Management, Library, Folder Structure and Security
Power Automate workflows may need attention:
- Check if triggers are still active
- Verify connection credentials are valid
- Test any workflows that depend on the restored content
Practical example: An employee accidentally deletes a project folder containing 50 documents. The site owner accesses the recycle bin, uses the filter to search by the folder name and deletion date, then restores the entire folder with one click. If the folder isn’t in the first recycle bin (the employee emptied their recycle bin), the site owner navigates to the “Second-stage Recycle Bin” and restores it from there. After restoration, they verify permissions, regenerate the shared link for external contractors, and notify the team that the folder has been recovered. If the retention period had expired or the folder was completely purged, the administrator would need to either roll back the library to a point in time or restore from an independent backup solution.
Using PowerShell to Manage the Recycle Bin
PowerShell provides powerful automation capabilities for managing the SharePoint recycling bin, transforming what could be hours of manual clicking into efficient scripted operations. This is especially valuable when dealing with large volumes of deleted data, complex filtering requirements, or repetitive restoration tasks. Administrators can leverage PowerShell to search through thousands of deleted items, restore content based on specific criteria, or perform maintenance operations that would be impractical through the web interface.
Beyond simple automation, PowerShell enables administrators to create detailed reports of deleted items, implement custom recovery workflows, and even schedule regular recycle bin maintenance tasks. Whether you’re recovering from a major incident or implementing proactive governance policies, PowerShell commands give you the precision and scale needed for enterprise-level SharePoint management.
| Task | Sharepoint Online (pnp) | On-prem equivalent |
| List recycle bin items | Get-PnPRecycleBinItem | $site.RecycleBin |
| Restore by id | Restore-PnPRecycleBinItem -Identity <id> | $_ .Restore() on item |
| Clear items | Clear-PnPRecycleBinItem -All -FirstStage/-SecondStage | `$site.RecycleBin |
| List deleted sites | Get-SPODeletedSite | Central Admin / Backup-SPFarm (recovery) |
| Restore deleted site | Restore-SPODeletedSite -Identity <url> | Central Admin / restore from backup |
PowerShell for SharePoint Online
For SharePoint Online environments, PnP PowerShell (Patterns and Practices PowerShell) provides the most comprehensive set of cmdlets for recycle bin management. Here’s how to get started:
Initial connection:
# Install PnP PowerShell module if not already installed
Install-Module -Name PnP.PowerShell
# Connect to your SharePoint site
Connect-PnPOnline -Url https://yourtenant.sharepoint.com/sites/yoursite -Interactive
Viewing deleted items:
# Get all items in the recycle bin
Get-PnPRecycleBinItem
# Filter items by deletion stage (FirstStage or SecondStage)
Get-PnPRecycleBinItem | Where-Object {$_.ItemState -eq "FirstStageRecycleBin"}
# Filter by user who deleted the item
Get-PnPRecycleBinItem | Where-Object {$_.DeletedByEmail -eq "user@company.com"}
# Filter by directory/location
Get-PnPRecycleBinItem | Where-Object {$_.DirName -like "*/Documents/Projects/*"}
# Filter by date range
$startDate = (Get-Date).AddDays(-7)
Get-PnPRecycleBinItem | Where-Object {$_.DeletedDate -gt $startDate}
Restoring items:
# Restore a specific item by ID
Restore-PnPRecycleBinItem -Identity "12345678-1234-1234-1234-123456789012"
# Restore multiple items matching criteria
$itemsToRestore = Get-PnPRecycleBinItem | Where-Object {$_.Title -like "*Q3 Report*"}
foreach ($item in $itemsToRestore) {
Restore-PnPRecycleBinItem -Identity $item.Id -Force
}
# Bulk restore all items from a specific folder
Get-PnPRecycleBinItem | Where-Object {$_.DirName -eq "/sites/project/Shared Documents/Archive"} |
ForEach-Object { Restore-PnPRecycleBinItem -Identity $_.Id }
Permanently deleting items:
# Clear specific items permanently
Clear-PnPRecycleBinItem -Identity "12345678-1234-1234-1234-123456789012" -Force
# Clear all items in the first-stage recycle bin
Clear-PnPRecycleBinItem -All -FirstStage -Force
# Clear all items in the second-stage recycle bin (requires admin rights)
Clear-PnPRecycleBinItem -All -SecondStage -Force
Managing deleted sites with PowerShell
For deleted site collections, you’ll need to use the SharePoint Online Management Shell with administrative privileges:
Connect to the admin center:
# Install SharePoint Online Management Shell if needed
Install-Module -Name Microsoft.Online.SharePoint.PowerShell
# Connect to SharePoint admin center
Connect-SPOService -Url https://yourtenant-admin.sharepoint.com
View deleted sites:
# Get all deleted sites
Get-SPODeletedSite
# Get specific deleted site information
Get-SPODeletedSite -Identity https://yourtenant.sharepoint.com/sites/deletedproject
# Filter deleted sites by deletion date
Get-SPODeletedSite | Where-Object {$_.DeletionTime -gt (Get-Date).AddDays(-30)}
Restore deleted sites:
# Restore a specific site
Restore-SPODeletedSite -Identity https://yourtenant.sharepoint.com/sites/projectsite
# Restore multiple sites matching a pattern
Get-SPODeletedSite | Where-Object {$_.Url -like "*/sites/project*"} |
ForEach-Object { Restore-SPODeletedSite -Identity $_.Url }
PowerShell for SharePoint On-Premises
For On-Premises environments, site discovery and recovery is performed via Central Administration or the SharePoint Management Shell:
# Add SharePoint PowerShell snapin
Add-PSSnapin Microsoft.SharePoint.PowerShell -ErrorAction SilentlyContinue
# Get recycle bin items for a site collection
$site = Get-SPSite "http://sharepoint/sites/yoursite"
$recycleItems = $site.RecycleBin
# Filter and view items
$recycleItems | Where-Object {$_.DeletedBy -like "*john.doe*"} |
Select-Object Title, Web, DeletedBy, DeletedDate
# Restore items
$itemToRestore = $recycleItems | Where-Object {$_.Title -eq "Important Document.docx"}
$itemToRestore.Restore()
# Bulk restore by criteria
$recycleItems | Where-Object {$_.DeletedDate -gt (Get-Date).AddDays(-7)} |
ForEach-Object { $_.Restore() }
Practical PowerShell scenarios
The following scenarios demonstrate how PowerShell can solve common recycle bin challenges that would be difficult to address through the SharePoint interface:
Scenario 1: Generate a recycle bin report
# Export recycle bin contents to CSV for analysis
$recycleBinItems = Get-PnPRecycleBinItem
$report = $recycleBinItems | Select-Object Title, DirName, Size, DeletedByEmail, DeletedDate, ItemState
$report | Export-Csv -Path "C:\Reports\RecycleBin_$(Get-Date -Format 'yyyyMMdd').csv" -NoTypeInformation
# Create summary statistics
$summary = @{
TotalItems = $recycleBinItems.Count
FirstStageItems = ($recycleBinItems | Where-Object {$_.ItemState -eq "FirstStageRecycleBin"}).Count
SecondStageItems = ($recycleBinItems | Where-Object {$_.ItemState -eq "SecondStageRecycleBin"}).Count
TotalSizeMB = [math]::Round(($recycleBinItems | Measure-Object -Property Size -Sum).Sum / 1MB, 2)
}
$summary
Scenario 2: Automated recovery from ransomware
# Identify and restore all files deleted in the last 24 hours
$attackTime = (Get-Date).AddHours(-24)
$suspiciousDeletes = Get-PnPRecycleBinItem | Where-Object {
$_.DeletedDate -gt $attackTime -and
$_.ItemType -eq "File"
}
Write-Host "Found $($suspiciousDeletes.Count) recently deleted files"
$confirmation = Read-Host "Restore all items? (Y/N)"
if ($confirmation -eq 'Y') {
foreach ($item in $suspiciousDeletes) {
try {
Restore-PnPRecycleBinItem -Identity $item.Id -Force
Write-Host "Restored: $($item.Title)" -ForegroundColor Green
} catch {
Write-Host "Failed to restore: $($item.Title) - $_" -ForegroundColor Red
}
}
}
Scenario 3: Recycle bin size management
# Monitor second-stage recycle bin size and alert if approaching limits
$site = Get-PnPSite -Includes RecycleBin, Usage
$secondStageItems = Get-PnPRecycleBinItem | Where-Object {$_.ItemState -eq "SecondStageRecycleBin"}
$secondStageSizeMB = ($secondStageItems | Measure-Object -Property Size -Sum).Sum / 1MB
$quotaGB = $site.Usage.Storage / 1GB
$maxSecondStageMB = $quotaGB * 2 * 1024 # 200% of quota
if ($secondStageSizeMB -gt ($maxSecondStageMB * 0.8)) {
Write-Warning "Second-stage recycle bin is at $([math]::Round($secondStageSizeMB/$maxSecondStageMB*100, 2))% capacity"
# Optionally clean up old items
$oldItems = $secondStageItems | Where-Object {$_.DeletedDate -lt (Get-Date).AddDays(-60)}
Write-Host "Found $($oldItems.Count) items older than 60 days consuming $([math]::Round(($oldItems | Measure-Object -Property Size -Sum).Sum / 1MB, 2)) MB"
}
Best practices for PowerShell management
PowerShell turns ad-hoc cleanups into reliable, repeatable operations. Start with guardrails—least-privilege access, clear scoping, and actionable logging—then move on to scale tactics like paging, server-side filters, and batching.
Below are a few suggestions.
- Performance optimization:
- When dealing with large recycle bins (thousands of items), use pagination to avoid timeouts
- Filter items at the server level when possible rather than client-side filtering
- Use -Batch parameters where available for bulk operations
- Error handling:
# Implement proper error handling for production scripts
function Restore-RecycleBinItems {
param($Items)
$results = @{
Successful = 0
Failed = 0
Errors = @()
}
foreach ($item in $Items) {
try {
Restore-PnPRecycleBinItem -Identity $item.Id -Force -ErrorAction Stop
$results.Successful++
} catch {
$results.Failed++
$results.Errors += @{
Item = $item.Title
Error = $_.Exception.Message
}
}
}
return $results
}
- Scheduling automated tasks: For regular maintenance or monitoring, create scheduled PowerShell scripts using Windows Task Scheduler or Azure Automation:
- Daily reports of recycle bin contents
- Automatic cleanup of items older than specified periods
- Alerts when recycle bin approaches capacity limits
- Regular backup of recycle bin metadata for compliance
Remember that PowerShell operations on the recycle bin are subject to the same permissions as web-based operations. Ensure your account has appropriate rights before attempting bulk operations, and always test scripts in a development environment before running them in production.
Limitations and Best Practices
While the SharePoint recycle bin provides valuable protection against accidental deletions, it’s essential to understand its boundaries and develop strategies to work within them effectively. This section explores the critical limitations that every SharePoint administrator and user should know, from retention constraints to security vulnerabilities. We’ll also examine common mistakes that lead to data loss, provide actionable best practices for building a comprehensive data protection strategy, and share practical tips gained from real-world implementations.
Key limitations of the SharePoint recycle bin
Understanding the SharePoint recycle bin’s limitations is crucial for developing a comprehensive data protection strategy. While it serves as an effective first line of defense against accidental deletions, several constraints prevent it from being a complete backup solution.
Limited retention time is the most fundamental constraint. With a maximum of 93 days for SharePoint Online and configurable but typically similar periods for On-Premises, the recycle bin offers only temporary protection. Once this window closes, data is permanently lost without any possibility of recovery through native SharePoint tools.
The recycle bin provides no independent storage—all deleted items remain within the main SharePoint environment. This architectural decision means that system failures, database corruption, or platform-wide issues could affect both active and deleted content simultaneously. Unlike true backup solutions that maintain separate, isolated copies, the recycle bin offers no protection against infrastructure-level problems.
Users cannot create custom retention rules within the recycle bin itself. Organizations are bound by platform settings and Microsoft’s policies, with no ability to extend retention for specific types of content or implement granular retention strategies within the recycle bin framework. While retention policies can complement the recycle bin, they operate as a separate system with their own limitations.
Once both recycle bin stages are emptied—whether manually by an administrator or automatically after retention expires—data becomes completely unrecoverable. SharePoint provides no “recycle bin for the recycle bin” or emergency recovery options. This finality makes it critical to understand that the recycle bin is a temporary safety net, not a permanent archive.
The recycle bin is vulnerable to account compromise. If an attacker gains access to an account with administrative privileges, they can:
- Delete critical data from document libraries
- Empty the first-stage recycle bin to push items to the second stage
- Permanently purge the second-stage recycle bin, eliminating all recovery options
- Complete this entire process in minutes, before security teams can respond
These vulnerabilities make the recycle bin ineffective against targeted attacks, ransomware, or malicious insiders.
Common mistakes and how to avoid them
Organizations frequently encounter predictable issues with the SharePoint recycle bin. Understanding these common mistakes helps prevent data loss and frustration.
“The recycle bin is not visible” is a frequent complaint with several potential causes:
- Insufficient permissions: Users need site owner rights to see the second-stage recycle bin
- Navigation customization: Custom navigation might hide default recycle bin links—access it through “Site Contents” instead
- Modern vs. Classic experience: The recycle bin location varies between interface versions
- Mobile limitations: The mobile app may not display all recycle bin options
Missing items in the recycle bin typically indicates:
- The 93-day retention period has expired
- Items were permanently deleted by another administrator
- Storage quota exceeded, causing oldest items to be purged automatically
- The item was subject to a retention policy and moved to the Preservation Hold Library
To maximize recovery success:
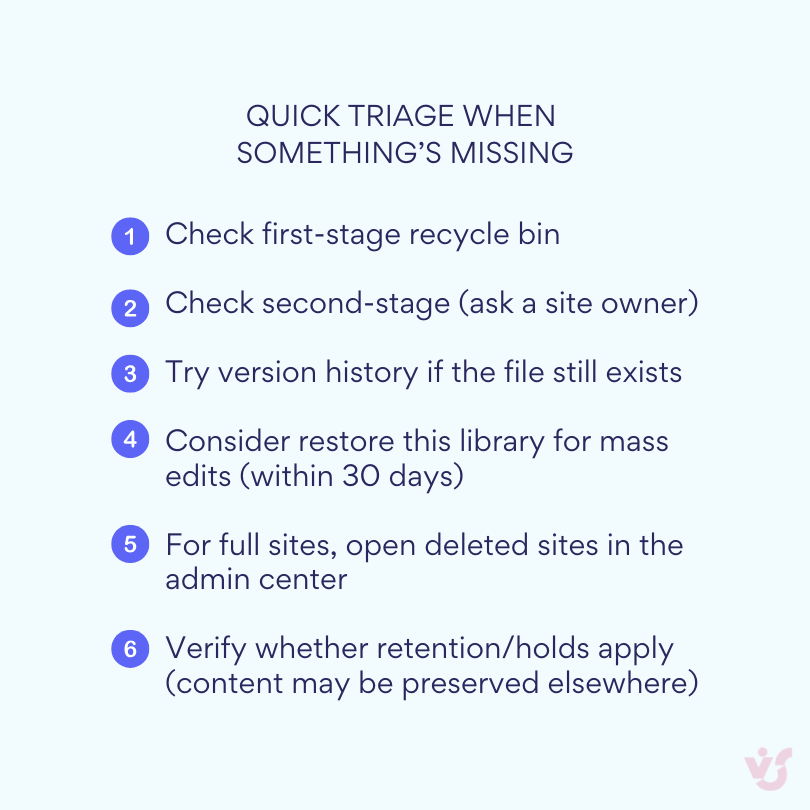
- Record deletion details immediately: timestamp, file URL, and who deleted it
- Check both recycle bin stages before assuming data is lost
- Search using multiple criteria: name variations, date ranges, and user filters
- Verify retention policy conflicts that might affect deleted items
Restore failures and errors often result from:
- Path conflicts: The original location no longer exists or has been renamed
- Permission changes: Current user lacks rights to the restore destination
- Storage limitations: Insufficient space in the site quota
- Character restrictions: Special characters or path length violations
Best practices for data protection
A robust data protection strategy requires three complementary layers, each addressing different risk scenarios:
Layer 1: Recycle bin serves as the first response for accidental deletions:
- Provides immediate recovery for user errors
- Requires no additional infrastructure
- Offers self-service restoration for end users
- Limited to 93-day protection window
Layer 2: Retention policies ensure compliance and extended protection:
- Microsoft Purview retention policies for regulatory compliance
- Preservation Hold Library for legal holds
- Automatic retention based on content classification
- Protection against premature deletion
Layer 3: Third-party backup provides comprehensive disaster recovery:
- Independent storage outside SharePoint infrastructure
- Long-term retention beyond 93 days
- Granular recovery options for specific items or time points
- Protection against ransomware, corruption, and platform failures
This three-layer approach ensures that no single failure point can cause permanent data loss.
Operational recommendations
Regular monitoring and maintenance:
- Review recycle bin contents weekly to identify important deleted items before retention expires
- Monitor storage consumption: Second-stage recycle bin can use up to 200% of site quota
- Document deletion patterns to identify training needs or process improvements
- Set up alerts for mass deletion events that might indicate attacks or errors
Documentation and training:
- Create clear deletion and recovery procedures for your organization
- Train users on the difference between delete and remove, version history vs. recycle bin
- Establish escalation paths for recovery requests requiring administrative intervention
- Maintain recovery logs for compliance and audit purposes
Performance optimization for large-scale operations:
- Avoid recovery during peak hours due to throttling limits
- Batch operations into groups of 100-200 items to prevent timeouts
- Use PowerShell for bulk operations exceeding 50 items
- Stagger restorations across multiple sessions for thousands of items
Pitfalls and practical tips
Before you hit restore, most failures come from edge cases—not the button you click. Start by sanity-checking names and paths, then tune your search and filters, and keep an eye on large-site behavior and version history rules. The quick checks below help you choose the right tactic and avoid rework.
Path and naming issues:
- Long paths exceeding 400 characters can cause restore failures—check and shorten paths before restoration
- Special characters (# % & * : < > ? / { | }) may prevent successful recovery
- Duplicate names at the restore destination require manual resolution
- Solution: Restore to a temporary location first, then move items after cleaning names
Search and filtering optimization:
- The recycle bin search is case-insensitive but exact match—use wildcards sparingly
- Sort by deletion date to quickly find recently deleted items
- Filter by item type when searching for specific content types
- Use PowerShell for complex filtering criteria the web interface doesn’t support
Large site considerations:
- Sites with extensive deletion history may experience slow recycle bin loading
- Download the recycle bin list via PowerShell and analyze offline using Excel
- Use date range filters to reduce the displayed item count
- Consider splitting large sites to improve recycle bin performance
Version history interaction:
- Version history is independent of the recycle bin—deleted versions aren’t in the recycle bin
- Restoring a file doesn’t restore its version history if versions were separately deleted
- Version limits (organization or library-level) may cause old versions to be trimmed
- Best practice: Use “Restore this library” for comprehensive version recovery
Critical reminders for administrators:
Always verify the restore location—SharePoint recreates paths if needed but may place items unexpectedly. After any restoration:
- Check effective permissions for sensitive content
- Regenerate shared links as they don’t persist through deletion
- Update any hardcoded references in connected systems
- Reindex the library if search doesn’t find restored content
For Microsoft Teams integration:
- Teams channel files are in the associated SharePoint site’s recycle bin
- Private channel files have their own site collection and separate recycle bin
- Teams itself has no recycle bin—always check SharePoint
- Deleted Teams go to the Azure AD recycle bin, not SharePoint
Compliance and audit considerations:
- Retention policies override recycle bin deletion for labeled content
- eDiscovery holds prevent permanent deletion even from the recycle bin
- Audit logs capture deletion and restoration events for 90 days (E3) or 365 days (E5)
- Regular compliance reviews should include recycle bin governance
Emergency response procedures:
When facing mass deletion incidents:
- Immediately prevent further damage by temporarily removing user permissions if needed
- Document the incident with timestamps and affected content
- Check both recycle bin stages before escalating
- Use “Restore this library” for ransomware or mass corruption (30-day limit)
- Engage backup recovery if the recycle bin retention has expired
- Review audit logs to understand the root cause
Remember: the recycle bin is not a backup strategy. It’s a convenience feature for quick recovery. Organizations serious about data protection must implement comprehensive backup solutions beyond SharePoint’s native capabilities. The recycle bin should be your first option for recovery, not your only option.
How to Simplify File Management in SharePoint with VirtoSoftware Solutions
While SharePoint’s native features provide essential functionality for file management and recovery, organizations often find that standard capabilities fall short when dealing with large-scale operations. Tasks like bulk uploads, mass file movements, or complex metadata updates can become time-consuming and error-prone when performed through the standard interface. This is where specialized tools can transform your SharePoint experience from adequate to exceptional.
Virto Multiple File Upload for SharePoint Online and Microsoft 365 streamlines the content upload process with advanced bulk capabilities. This tool allows you to upload multiple documents and entire folder structures directly to libraries or as attachments to list items in a single operation. The drag-and-drop interface eliminates the tedious click-by-click approach of standard uploads, while the ability to assign custom metadata during upload means files are properly categorized from the moment they enter your system. The tool also provides overwrite protection options and cross-browser compatibility, ensuring smooth operations across different devices and platforms.
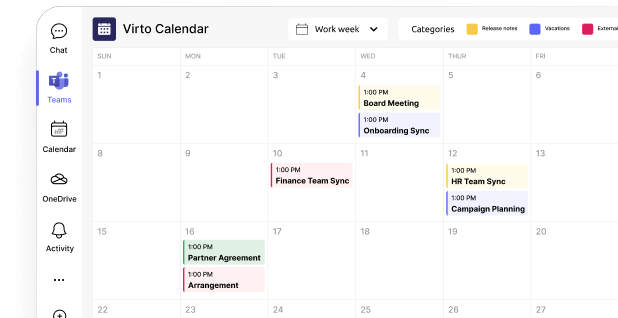
Virto Multiple File Upload
For SharePoint On-Premises environments, Virto Multiple File Operations takes file management even further. This comprehensive solution enables you to execute a wide array of bulk actions including upload, download, delete, copy, move, check-in, approve, and edit operations on multiple files simultaneously. You can edit metadata fields across numerous documents with just a few clicks, and the tool’s customizable configurations let you set file size limits, restrict specific file types, and adjust settings to match your organization’s requirements. The solution integrates seamlessly with SharePoint while maintaining stringent security and compliance protocols.
Virto Multiple File Operations
These tools significantly reduce the risk of human error that comes with repetitive manual operations, accelerate administrative tasks that would otherwise consume hours, and provide granular control over file management processes. They’re particularly valuable in scenarios involving data recovery and large-scale content reorganization.
Example 1: Post-ransomware recovery scenario: An organization recovering from a ransomware attack needs to restore thousands of files from backup storage back into SharePoint. Using standard SharePoint features, an administrator would need to manually navigate through multiple folder structures, uploading files in small batches while manually recreating the metadata for each document. With Virto Multiple File Upload, the entire folder structure can be restored in one operation, with metadata automatically applied based on predefined rules. What would take days of manual work can be completed in hours, with significantly reduced risk of missing files or incorrect placements.
Check out our calendar use cases
Example 2: Department reorganization: A company is restructuring its sales department, requiring the movement of 5,000 documents across different SharePoint libraries, updating metadata to reflect new team assignments, and setting appropriate permissions. Standard SharePoint would require opening each file’s properties individually, updating metadata fields one by one, and manually moving files to new locations. With Virto Multiple File Operations, administrators can:
- Select all affected files using advanced filtering
- Bulk update metadata fields to reflect new department codes and team assignments
- Move entire document sets to their new libraries while preserving version history
- Apply new permission sets across multiple files simultaneously
The operation that might take a week of error-prone manual work can be completed accurately in a single afternoon.
These solutions don’t replace SharePoint’s recycle bin or native recovery features—they complement them by making the restoration and reorganization process far more efficient. When combined with proper backup strategies and retention policies, Virto tools complete the file management ecosystem, ensuring that your organization can handle both routine operations and emergency recovery scenarios with confidence and speed.
By reducing manual intervention, these tools also decrease the likelihood of accidental deletions that would send files to the recycle bin in the first place. Prevention, combined with efficient recovery capabilities, creates a robust file management strategy that protects your organization’s valuable data assets.
Conclusion on Recycle Bin SharePoint
The SharePoint recycle bin serves as an essential first line of defense against accidental data loss, but as we’ve explored throughout this guide, it’s a basic recovery tool with significant time and feature limitations. With its 93-day retention window, vulnerability to malicious actions, and lack of independent storage, the recycle bin alone cannot provide the comprehensive data protection modern organizations require.
Effective management of deleted data demands a sophisticated approach that combines SharePoint’s built-in functions, PowerShell automation scripts, and specialized third-party solutions. No single tool can address all scenarios—from accidental deletions to ransomware attacks to compliance requirements—which is why a multi-layered strategy is critical.
For robust data protection, we recommend implementing a three-tier approach:
- Recycle Bin for immediate, user-driven recovery of recently deleted items
- Retention Policies for compliance and extended protection of critical content
- Third-Party Backup Solutions for comprehensive disaster recovery and long-term data preservation
This layered strategy ensures that no single point of failure can result in permanent data loss, providing your organization with the resilience needed in today’s digital landscape.
To simplify SharePoint administration and make file management more reliable and efficient, consider implementing VirtoSoftware solutions as part of your data management toolkit. Virto Multiple File Upload and Virto Multiple File Operations transform complex bulk operations from error-prone manual tasks into streamlined, automated processes. These tools not only accelerate recovery efforts but also help prevent data loss incidents through more controlled file management operations.
Take the next step:
- Schedule a personalized demo to see how VirtoSoftware solutions can address your specific SharePoint challenges
- Download free trial versions of Virto Multiple File Upload and Virto Multiple File Operations from virtosoftware.com
Additional resources:
For more information about SharePoint’s native recycle bin features, consult these official Microsoft resources:
- Restore items in the Recycle Bin that were deleted from SharePoint or Teams
- Manage the Recycle Bin of a SharePoint site
- Restore deleted items from the site collection Recycle Bin
Otherwise, peruse related material on our blog: