SharePoint Form: Everything You Need to Know About Creating and Using Forms
Are you struggling with SharePoint Forms and unsure how to maximize their potential? Discover how to create, customize, and automate SharePoint Forms like a pro.
At their core, SharePoint forms serve as versatile tools that allow organizations to collect and process data, automate routine processes, and significantly simplify user interactions. Whether you need feedback from team members, require structured data input from clients, or want to standardize internal request procedures, SharePoint forms provide a centralized and efficient approach to managing information.
Organizations typically leverage SharePoint forms for a wide range of applications—from creating comprehensive surveys and handling customer queries to recording essential business data and facilitating any task that demands structured data entry. The beauty of these forms lies in their flexibility and seamless integration with other Microsoft tools, making them an invaluable asset for modern businesses.
In this comprehensive guide, we’ll walk you through everything you need to know about SharePoint forms—from basic creation and configuration to advanced customization techniques. We’ll explore the various methods to tailor forms to your specific business needs and introduce additional tools that can enhance their functionality.
What Are SharePoint Forms?
This section explores the core concepts of SharePoint forms, their primary applications, and the specialized libraries designed to house them—providing you with the foundation needed to leverage these powerful tools effectively.
Understanding and purpose of SharePoint forms
SharePoint forms are customizable interfaces designed specifically for entering, displaying, and editing data within SharePoint lists and libraries. These forms serve as the primary means through which users interact with structured data in the SharePoint environment.
The fundamental purpose of SharePoint forms is to simplify data collection and streamline business processes without requiring programming expertise. They provide an accessible way for organizations to gather information systematically while maintaining data integrity and consistency.
With SharePoint forms, organizations can collect various types of data, including:
- Text responses (short and long-form)
- Numerical values and calculations
- Date and time selections
- Multiple-choice options
- File attachments
- User information
- Location data
What makes SharePoint forms particularly valuable is their seamless integration with business processes. Forms can trigger workflows, send notifications, update related records, and feed data into reporting dashboards—creating a cohesive ecosystem where information flows naturally through your organization’s operational framework.
Where SharePoint forms are used
SharePoint forms serve as the interface between users and data across various components of the SharePoint platform. Understanding where these forms can be implemented helps organizations leverage them effectively for different business scenarios. Let’s explore the primary contexts where SharePoint forms prove most valuable:
- SharePoint lists: Forms are integral to how users interact with SharePoint lists, enabling them to create, edit, and view list items through structured interfaces. Common applications include:
- Vacation request tracking where employees submit time-off details
- Expense report submission and approval systems
- Customer registration and contact management
- IT help desk ticket submission and tracking
- Event registration and management
- Document libraries: When working with document libraries, forms allow users to enter and manage metadata for uploaded files, providing context and improving searchability. Examples include:
- Adding document descriptions, categories, and tags
- Recording author information and contributors
- Documenting publication dates and version information
- Specifying document status (draft, review, final)
- Associating documents with specific projects or departments
- Workflows: SharePoint forms play a crucial role in initiating and facilitating business processes through workflows:
- Approval processes where forms collect initial request details
- Task assignment workflows where forms capture assignment details
- Review cycles where forms gather feedback and comments
- Multi-stage processes where different forms handle different stages
- Decision trees where form responses determine next actions
What is a SharePoint form library?
A SharePoint Form Library is a specialized repository designed for storing and managing XML-based electronic forms. Historically, it was primarily used with InfoPath forms, enabling organizations to collect, process, and store structured data. Unlike standard document libraries, Form Libraries were optimized for handling structured form data rather than general file storage.
However, with the deprecation of InfoPath, modern SharePoint solutions increasingly rely on Power Apps, Microsoft Forms, and SharePoint Lists for form-based data collection. These new tools provide greater flexibility and integration with SharePoint’s evolving cloud-based infrastructure.
The main advantages of utilizing a SharePoint Form Library include:
- Easy form versioning: SharePoint Form Libraries support version tracking, allowing users to maintain a history of form submissions and modifications. This feature ensures that previous versions of a form can be reviewed or restored if needed.
- Workflow integration: Form Libraries integrate with Power Automate (formerly Microsoft Flow) and legacy SharePoint workflows to automate form processing. This allows for approval chains, conditional routing, and notifications based on submitted data.
- Enhanced status tracking: Forms in a Form Library can include metadata fields (e.g., “Pending,” “Approved,” “Rejected”) to track submission progress. Users can customize library views to filter or highlight forms based on status, priority, or other relevant criteria.
- Data validation and integrity: SharePoint Form Libraries support validation rules, ensuring that submitted data meets predefined requirements. While InfoPath provided built-in validation, modern Power Apps or SharePoint List validation rules serve as alternatives for enforcing data integrity.
Example use case: Vacation request system
Imagine an organization managing vacation requests through a SharePoint Form Library. Employees fill out a structured form detailing their requested leave dates, duration, and reason. Once submitted:
- The form is stored in the Form Library (or, in modern implementations, a SharePoint List).
- A workflow (via Power Automate) notifies the manager for approval.
- The request’s status updates automatically (e.g., “Pending,” “Approved,” “Rejected”).
- HR personnel can generate reports on leave trends, while employees can track their request status within SharePoint.
Recent updates to SharePoint forms
SharePoint forms continue to evolve with Microsoft’s commitment to improving user experience and functionality. Based on the Microsoft 365 Roadmap and recent updates, several significant enhancements have been introduced to SharePoint forms. Here’s a look at the most notable recent developments:
Microsoft Lists integration improvements
The integration between SharePoint forms and Microsoft Lists has seen significant enhancements with the rollout of a revamped forms experience (Feature ID: 124865). This update has modernized how users interact with list-based forms in SharePoint:
- A completely redesigned user interface offers a more intuitive form creation process
- New support for branching logic allows forms to adapt based on user responses
- Improved responsive design ensures forms function properly across all devices
- Enhanced submission handling provides immediate availability of responses in linked SharePoint lists
This update represents a substantial improvement for organizations that rely on SharePoint lists for data collection and management, making forms both easier to create and more powerful.
Power Apps integration enhancements
For users requiring more advanced form customization, the integration between SharePoint and Power Apps has been strengthened with several important updates:
- Performance and stability improvements when customizing SharePoint list forms
- Enhanced support for complex conditional logic and validation rules
- Better mobile accessibility for Power Apps-customized forms
- Improved connection between Power Apps forms and SharePoint data sources
These enhancements are particularly valuable for organizations that need to create sophisticated forms with complex business logic, calculations, or integrations with other systems.
SharePoint flexible layouts
A particularly exciting recent development is the introduction of “SharePoint flexible layouts.” While not exclusively focused on forms, this feature has significant implications for how forms can be presented and embedded within SharePoint pages:
- More dynamic positioning options for form elements within SharePoint pages
- Enhanced visual presentation capabilities for forms embedded in modern SharePoint sites
- Better integration with other page elements for a more cohesive user experience
This update aligns with Microsoft’s broader efforts to make SharePoint more versatile as a platform for creating engaging user experiences.
Microsoft Forms web part updates
The Microsoft Forms web part, which allows for easy embedding of forms directly into SharePoint pages, has received several updates that improve its functionality:
- Enhanced rendering of form results directly within SharePoint
- Better visual alignment with modern SharePoint page templates
- Improved mobile responsiveness for embedded forms
These improvements make it easier to create seamless form experiences that blend naturally with your SharePoint environment.
As Microsoft continues to invest in its forms technologies, we can expect to see further enhancements that bridge the gap between SharePoint, Microsoft Lists, Power Apps, and Microsoft Forms—creating an increasingly unified approach to forms within the Microsoft 365 ecosystem.
Microsoft Forms and SharePoint Forms: Differences and Integration
When navigating the Microsoft 365 ecosystem, it’s easy to become confused about the various form solutions available. This section clarifies the distinctions between Microsoft Forms and SharePoint forms, two powerful yet different tools for collecting data. We’ll explore their unique capabilities, ideal use cases, and how they can work together to enhance your organization’s data collection processes.
What is the difference between Microsoft Forms and SharePoint forms?
Microsoft Forms and SharePoint forms serve different purposes within Microsoft 365, each with its own strengths and limitations.
Microsoft Forms: A Simple, Survey-Oriented Tool
Microsoft Forms is a lightweight, user-friendly application designed for quick creation of surveys, quizzes, and simple data collection. It prioritizes ease of use, making it accessible to users with minimal technical expertise.
- Intuitive interface—anyone can create professional-looking forms in minutes.
- Optimized for surveys and feedback collection rather than structured business workflows.
- Data is stored in Microsoft Forms (OneDrive for Business or Group Forms), but not directly in SharePoint unless exported or integrated.
SharePoint forms: A Business Process-Oriented Solution
SharePoint forms are tightly integrated with SharePoint Lists and Libraries. They offer deeper customization and are designed to support complex business processes that require structured data entry and automation.
- Ideal for workflows—approvals, document-based processes, and structured data collection.
- Customization requires Power Apps for advanced logic, conditional formatting, and complex validations.
- Data is stored directly in SharePoint Lists, making it part of the organization’s structured data framework.
Here’s a detailed comparison table of both Microsoft Forms and SharePoint Forms for ease of reference:
| Feature | Microsoft Forms | SharePoint Forms |
| Primary purpose | Surveys, polls, quizzes, simple data collection | Business process forms, structured data collection |
| Ease of use | Very simple, designed for non-technical users | Moderate to complex, requires Power Apps for deep customization |
| Customization depth | Limited to basic themes and question types | Extensive customization possible with Power Apps |
| Integration | Basic SharePoint integration (via embedding, Power Automate) | Native integration with SharePoint lists, libraries, and workflows |
| Data storage | Stored in Microsoft Forms (OneDrive for Business or Group Forms); can export to Excel | Directly stored in SharePoint lists |
| Branching logic | Basic conditional branching available | Advanced conditional logic and validation with Power Apps |
| Mobile experience | Excellent native mobile support | Responsive, but experience varies based on customization |
| Workflow capabilities | Limited (Power Automate required) | Robust workflow automation via Power Automate |
| Analytics | Built-in response statistics and charts | Requires Power BI or custom SharePoint views for advanced analytics |
| User management | Simple sharing options (anyone with a link, organization-wide) | Uses SharePoint’s advanced permission system |
| Version history | No version tracking of responses | SharePoint lists include version history for data changes |
Here’s a few suggestion on when to use either Microsoft Forms or SharePoint forms:
- When to use Microsoft Forms:
✅ Quick surveys or polls
✅ Customer feedback collection
✅ Simple event registrations
✅ Quizzes and assessments
✅ When form creators have limited technical skills
- When to use SharePoint forms:
✅ Complex business processes
✅ Forms requiring integration with document libraries
✅ When data needs to be part of an automated workflow
✅ Forms with advanced validation and conditional logic
✅ When advanced permissions and access control are needed
Microsoft Forms and SharePoint integration: Microsoft Forms to SharePoint list
Despite their differences, Microsoft Forms and SharePoint can work together effectively, combining the simplicity of Microsoft Forms with the powerful data management capabilities of SharePoint.
Microsoft Form to SharePoint list: How to integrate Microsoft Forms with SharePoint Lists:
Here’s how to integrate the two tools:
Step 1: Create a Microsoft Form
- Go to Microsoft Forms.
- Click New Form and design your form with the necessary questions.
- Save and publish your form.
Step 2: Create a SharePoint list with matching columns
- In your SharePoint site, go to Site Contents → New → List.
- Name your list and add columns that match the form questions (e.g., text, choice, date).
- Ensure each column type corresponds correctly to your Microsoft Forms fields.
Step 3: Automate data transfer with Power Automate
- Go to Power Automate.
- Click Create → Automated cloud flow.
- Select “When a new response is submitted” (Microsoft Forms trigger).
- Choose your form from the dropdown.
- Add the action “Get response details” to retrieve responses.
- Add the action “Create item” (SharePoint).
- Select your SharePoint site and list.
- Map form responses to the corresponding SharePoint list columns.
- Save and turn on the flow.
Step 4: Embed the Microsoft Form in SharePoint (Optional)
- Navigate to the SharePoint page where you want the form to appear.
- Click Edit Page → Add a Web Part → Select Microsoft Forms.
- Paste the form link and select whether users can submit or view responses.
- Save and publish the page.
Benefits of Microsoft Forms and SharePoint Integration
By integrating Microsoft Forms with SharePoint, organizations can automate data collection, improve data management, and enhance workflow efficiency. Instead of manually handling form responses, this integration ensures that submitted data is automatically stored, organized, and accessible within SharePoint.
This approach not only saves time but also enhances accuracy, security, and reporting capabilities. Below are the key benefits of using Microsoft Forms and SharePoint together:
- Automatic data processing: Form responses automatically populate your SharePoint list, eliminating manual data entry and reducing errors.
- Enhanced data management: Once in SharePoint, data benefits from robust filtering, sorting, and viewing options not available in Microsoft Forms.
- Workflow automation: SharePoint list data can trigger additional workflows through Power Automate, such as approval processes or notifications.
- Improved reporting: SharePoint lists can connect to Power BI for advanced analytics beyond what Microsoft Forms provides.
- Central data repository: Form responses become part of your organizational data structure rather than existing in isolation.
- Permission control: Leverage SharePoint’s granular permissions to control who can view and manage the submitted data.
- Version history: Benefit from SharePoint’s version tracking for changes to submitted data.
This integration approach gives you the best of both worlds: the user-friendly form creation experience of Microsoft Forms and the powerful data management capabilities of SharePoint.
What’s the Difference between SharePoint Lists and SharePoint Forms?
A SharePoint list and a SharePoint form serve different purposes but are closely related.
A helpful analogy is to think of:
- A SharePoint list as a filing cabinet where information is stored
- SharePoint forms as the standardized paperwork people fill out to add files to the cabinet
Here’s a comparison in greater detail:
- SharePoint lists: The data structure
A SharePoint List is essentially a database table that lives within SharePoint. It’s a structured collection of data organized in rows and columns:
- Purpose: To store, organize, and manage structured data
- Structure: Contains columns (fields) with different data types and rows (items) of information
- Function: Acts as the repository where your information is stored and managed
- Examples: Task lists, contact lists, inventory trackers, issue logs
Think of a SharePoint List as a specialized Excel spreadsheet embedded in SharePoint with additional features like versioning, permissions, and workflow capabilities.
- SharePoint forms: The user interface
SharePoint forms are the interfaces through which users interact with SharePoint Lists:
- Purpose: To provide a user-friendly way to view, enter, and edit data in SharePoint Lists
- Structure: Displays fields from the list in an organized layout optimized for data entry
- Function: Serves as the “front door” to your list data, controlling how users input information
- Examples: New item forms, edit item forms, display forms
Every SharePoint List automatically comes with three basic forms:
- New Form: Used to create new items in the list
- Edit Form: Used to modify existing items
- Display Form: Used to view item details without editing
And here are the key differences summarized:
| Feature | SharePoint List | SharePoint Form |
| Purpose | Stores and organizes structured data | Provides an interface for users to enter, edit, and view data |
| Functionality | Supports sorting, filtering, and automation | Allows users to input or modify data |
| Customization | Columns, views, permissions | Can be customized with Power Apps or JSON |
| Integration | Works with Power Automate and Power BI | Works with Power Apps for advanced UI |
| Examples | Task lists, project tracking, IT requests | Vacation request forms, survey forms, feedback forms |
Here’s how lists and forms work together:
1️⃣ You create a SharePoint list → This acts as a structured database.
2️⃣ Users interact with the SharePoint form → The form allows them to input or edit data in the list.
3️⃣ Automation & workflows → Power Automate can process the submitted form data (e.g., send approval requests, notifications, etc.).
How to Create a Form in SharePoint?: Creating a Form in SharePoint
Creating forms in SharePoint opens up powerful ways to collect, manage, and process information within your organization. This section explores the various methods available for form creation in SharePoint, from simple built-in options to advanced custom solutions. We’ll walk through step-by-step processes for each approach, highlight their key features, and provide practical guidance on choosing the right method for your specific needs.
Methods for creating forms and their features
SharePoint offers multiple ways to create forms that collect information and facilitate user interaction. Each method has distinct features and benefits, making them suitable for different scenarios.
👉 Can you create forms in SharePoint? Yes! SharePoint provides several robust options for creating forms, ranging from simple out-of-the-box solutions to highly customized applications. These form capabilities enable organizations to collect structured data, automate workflows, and integrate seamlessly with other Microsoft 365 services.
Standard Microsoft SharePoint forms
SharePoint automatically generates default forms for every list and library you create. These built-in forms provide immediate functionality without requiring additional configuration.
Types of standard SharePoint forms:
- New Item Form → Used when creating new entries in a list or entering metadata in a document library.
- Edit Item Form → Used when modifying existing list items or document metadata.
- Display Form → Used to view item details without making changes.
Here are key features of standard SharePoint forms:
✔ Automatically generated based on list or library structure.
✔ Basic validation for required fields and data types.
✔ Supports various field types (text, choice, date, lookup, people picker, etc.).
✔ Minimal customization available via list settings.
✔ Can be enhanced with JSON formatting for styling and layout control.
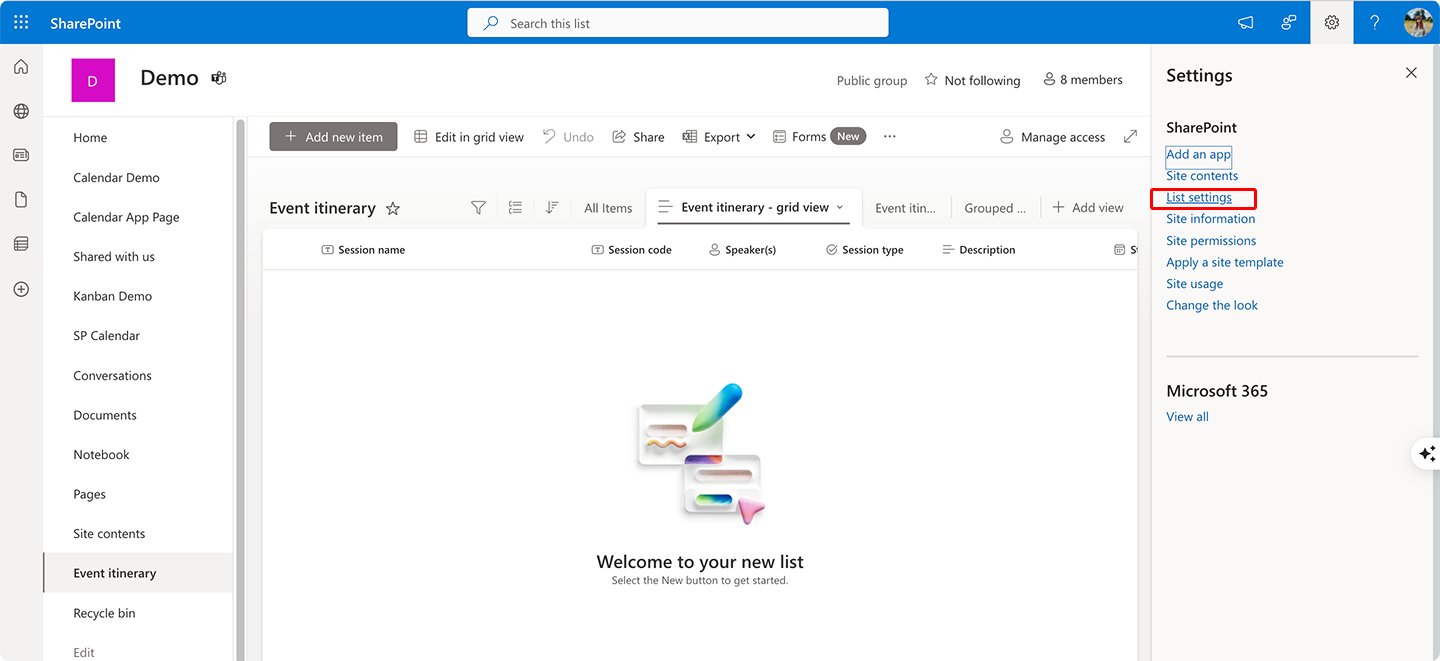
And here’s how to modify standard SharePoint forms:
- Navigate to your SharePoint list.
- Click “Integrate” → “Power Apps” (for deep customization) OR

- Click “List settings” and modify columns to adjust form fields.
- Use JSON formatting in “Format current view” (Settings → Column settings → Format this column) to style fields.
Power apps (Modern customization tool)
Power Apps has replaced InfoPath as Microsoft’s primary tool for customizing SharePoint forms, offering significantly more capabilities.
Here are key features of Power Apps
✔ Drag-and-drop interface for easy form design.
✔ Advanced conditional logic (show/hide fields dynamically).
✔ Rich visual controls (buttons, images, galleries).
✔ Works on desktop, mobile, and tablets.
✔ Integrates with external data sources (Dataverse, SQL, APIs).
And here’s how to customize a SharePoint list form with Power Apps:
- Navigate to your SharePoint list.
- Click “Integrate” → “Power Apps” → “Customize forms”.
- Power Apps Studio opens with a default SharePoint form layout.
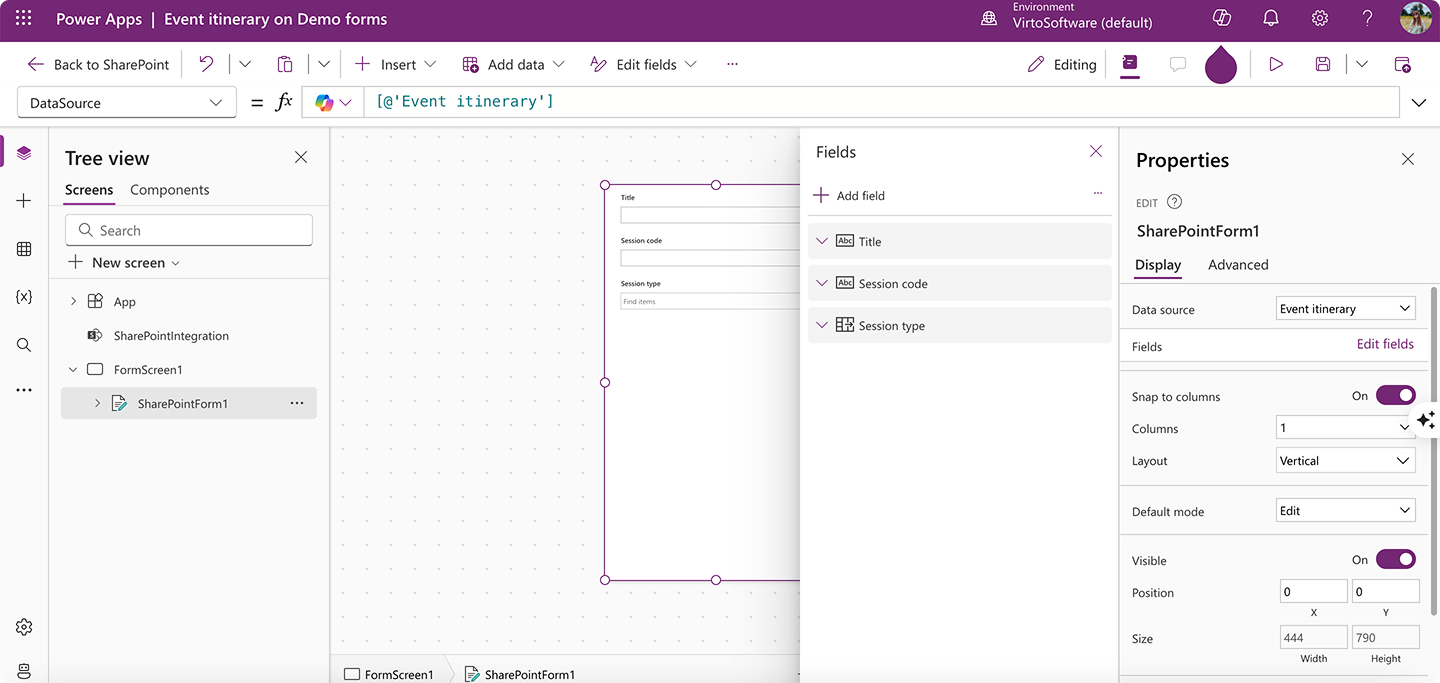
- Modify the form by adding controls, applying conditional logic, and formatting fields.
- Click File → Save → Publish to SharePoint.
With Power Apps, you can create dynamic, user-friendly forms that adapt based on user input, perform calculations, and integrate seamlessly with business processes.
SharePoint Designer (Legacy tool—deprecated)
While SharePoint Designer was previously a popular tool for customizing SharePoint forms, it is now deprecated and not recommended for modern SharePoint environments.
Here’s why you should avoid SharePoint Designer:
❌ No longer actively developed or supported by Microsoft.
❌ Limited compatibility with modern SharePoint Online.
❌ Will be fully deprecated in future Microsoft 365 updates.
📌 Organizations still using SharePoint Designer should migrate to:
- Power Apps (for custom forms).
- Power Automate (for workflows).
- JSON formatting (for basic form styling).
JSON and Power Automate (Advanced Customization)
For organizations needing precise control over form appearance and behavior, JSON formatting and Power Automate offer advanced customization options.
Here’s what JSON for SharePoint Form customization can do:
✔ Allows custom styling and layout changes without Power Apps.
✔ Uses JSON code to modify how fields appear in the form.
✔ No full development skills required, but JSON knowledge is helpful.
And here’s how to Customize SharePoint forms with JSON:
- Navigate to your SharePoint list.
- Click Settings (⚙️) → List settings.
- Under Columns, select the column you want to format.
- Click on the column or “Format this column” to edit→ Enter JSON customization.
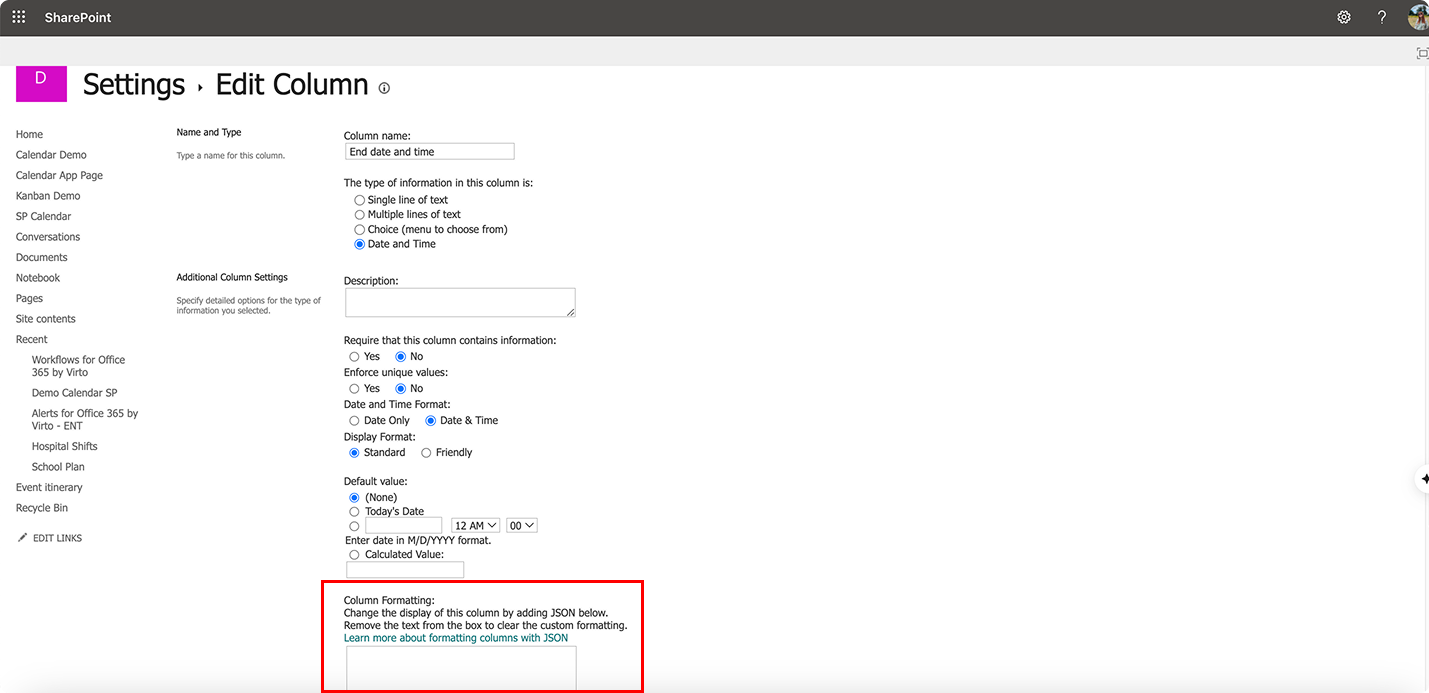
- Save changes.
Power Automate for Form Automation
Power Atomate allows organizations to automate processes triggered by form submissions, reducing manual effort and improving efficiency:
✔ Automates processes triggered by form submissions.
✔ Can send notifications, approvals, update databases, or trigger workflows.
✔ Enables end-to-end business processes without manual intervention.
Here’s an example Power Automate workflow for a form submission:
- Trigger: “When a new item is created in a SharePoint list”.
- Action: “Get response details” (if using Microsoft Forms integration).
- Condition: If “Manager Approval Required” → Send approval request.
- Approval Process:
- If approved → Update list item → Notify submitter.
- If rejected → Update item status → Notify submitter with rejection reason.
Making forms interactive
To create engaging and user-friendly forms, consider adding dynamic functionality:
- Dependent fields (conditional display)
Use Power Apps to show/hide fields dynamically:
If(DropdownChoice.Selected.Value = “Option A”,
true, // Show this field
false) // Hide this field
)
- Custom buttons for actions
Add buttons for specific actions like “Submit for Approval”:
OnSelect = SubmitForm(SharePointForm)
- Data validation (field requirements)
Ensure required fields are not left empty:
If(IsBlank(TextField.Text),
“This field cannot be empty”,
“”
)
👉 So, how to create a SharePoint form? To create a SharePoint Form, start by navigating to your SharePoint List and clicking on “New” to open the default form. You can customize the form using Power Apps by selecting “Customize Forms” in the list settings, allowing you to modify fields, layout, and logic. Another option is to use Microsoft Forms and integrate it with SharePoint via Power Automate for automated data collection.
Overview of methods to create SharePoint forms
SharePoint provides multiple ways to create and customize forms, ranging from built-in list forms to Power Apps and JSON-based solutions.
| Customization method | Best for |
| Standard SharePoint forms | Basic data entry forms with minimal customization |
| Power Apps | Complex, interactive forms with dynamic logic and integration |
| JSON customization | Lightweight styling and formatting without full customization |
| Power Automate | Automating form submissions and approvals |
| SharePoint Designer (Legacy) | 🚨 Deprecated—Migrate to Power Apps or Power Automate |
By choosing the right method based on your needs, you can create efficient, user-friendly, and intelligent forms that streamline data collection and business workflows in SharePoint.
👉What’s the difference between SharePoint standard forms and SharePoint custom forms? A SharePoint standard form is the default form generated automatically when creating a SharePoint List, allowing users to add, edit, or view items with basic customization options like rearranging fields. Custom forms on SharePoint, on the other hand, is a fully tailored form designed using Power Apps or third-party tools like Virto Form Designer, enabling advanced functionalities such as conditional logic, dependent fields, file uploads, and branding adjustments. Custom forms provide a more user-friendly and dynamic experience, allowing organizations to align forms with specific business processes.
Creating different types of forms in SharePoint
Below, we’ll guide you through the process of building various SharePoint form types, with clear instructions for each step.
How to create a request form on SharePoint?
Request forms (such as vacation requests or IT support tickets) typically require:
✅ A SharePoint list with appropriate columns (request details, status, approver, etc.).
✅ A customized form (Power Apps for advanced customization, JSON for basic design).
✅ A workflow automation (Power Automate for approvals, notifications, and updates).
Example: Creating a vacation SharePoint request form
Let’s walk through an example of creating a vacation request form:
Step 1: Create a SharePoint List
- Navigate to your SharePoint site.
- Click New → List.
- Choose either a blank list or one of the available templates
- Name the list “Vacation Requests” and click Create.
- Add the following columns:
- Employee Name (Person field)
- Start Date (Date field)
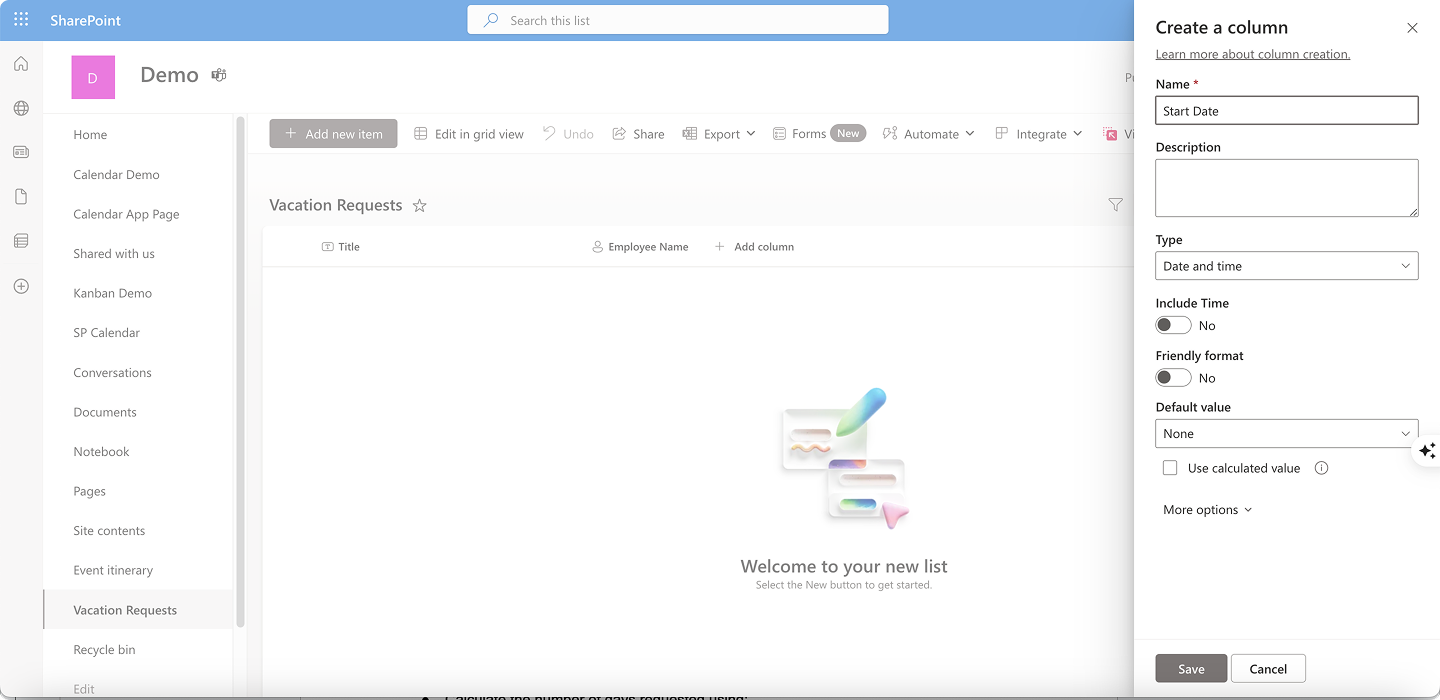
- End Date (Date field)
- Reason (Multiple lines of text)
- Status (Choice: “New,” “Pending Approval,” “Approved,” “Rejected”)
- Manager Comments (Multiple lines of text)
Step 2: Customize the form with Power Apps (Optional but recommended)
- Open the Vacation Requests list.
- Click Integrate → Power Apps → Customize forms.
- In Power Apps Studio, customize the form:
- Automatically capture the current user using User().FullName.
- Calculate the number of days requested using:
DateDiff(StartDate.SelectedDate, EndDate.SelectedDate) & ” days”
- Include validation to prevent invalid date ranges:
If(EndDate.SelectedDate < StartDate.SelectedDate, “End date cannot be before start date”, “”)
- Click Save → Publish to SharePoint.
Step 3: Automate the approval process with Power Automate
- Navigate to Power Automate at https://make.powerautomate.com/
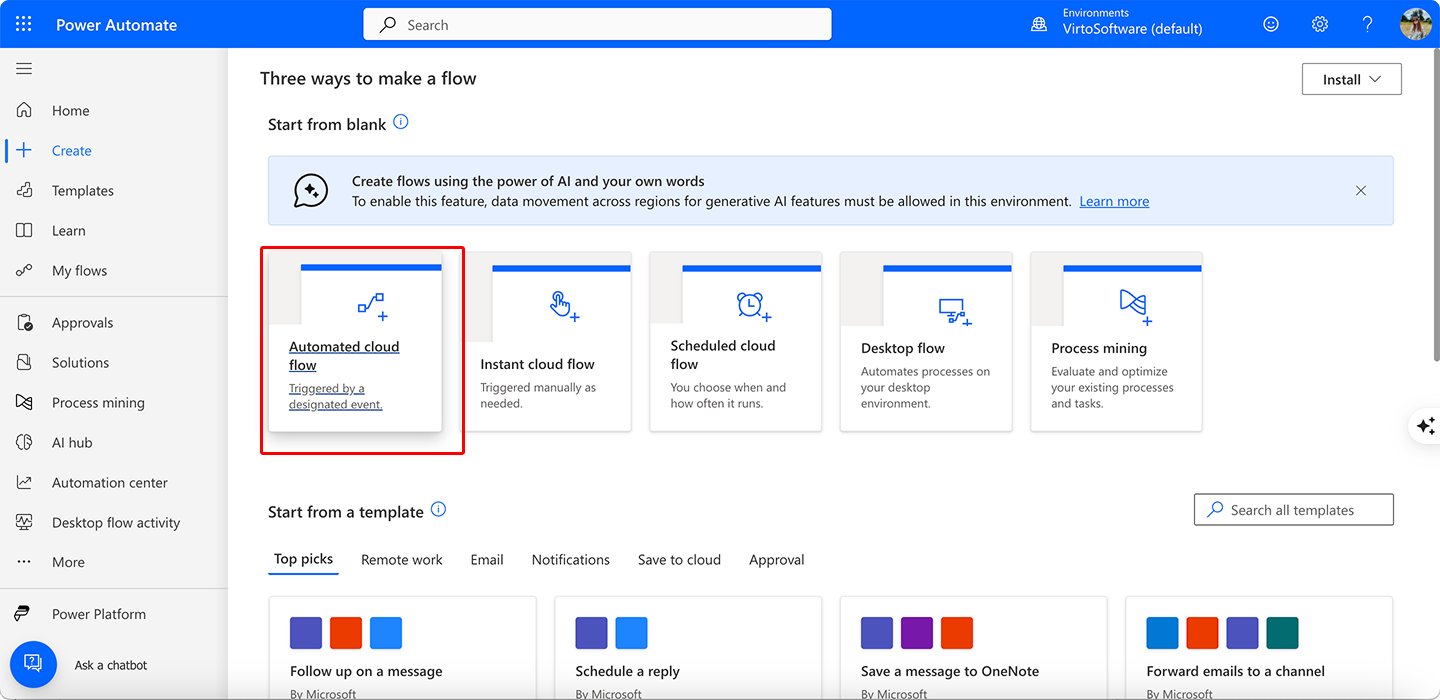
- Click Create → Automated Cloud Flow.
- Select “When an item is created” (SharePoint trigger).
- Choose the Vacation Requests list.
- Add an “Start and wait for an approval” action:
- Assign to: Employee’s manager (use Get Manager (Office 365 Users)).
- Approval type: Approve/Reject – First to respond.
- Add a Condition to check approval outcome:
- If approved → Update the SharePoint list item’s status to Approved, notify the employee.
- If rejected → Update the status to Rejected, notify the employee with the manager’s comments.
👉 How to add a form to SharePoint? To add a form to SharePoint, you can use Microsoft Forms, Power Apps, or third-party tools like Virto Form Designer. With Microsoft Forms, create a form and embed it in a SharePoint page using the Microsoft Forms web part. If using Power Apps, customize a SharePoint List form or design a standalone app that connects to SharePoint for data collection. For a no-code solution, Virto Form Designer lets you build dynamic forms with conditional fields and file uploads, embedding them directly into SharePoint pages. Once added, users can easily submit responses, and data is stored within SharePoint for seamless management.
How do you create a fillable form in SharePoint?
There are multiple approaches to creating fillable forms in SharePoint, depending on complexity and capabilities.
Option 1: Using Microsoft Forms (for simple data collection)
Microsoft Forms offers an excellent solution when you need straightforward data collection capabilities. This approach shines particularly bright for surveys, gathering feedback, or handling basic request forms. The interface is intuitive and user-friendly, allowing you to quickly create forms without specialized knowledge. However, it’s worth noting that if you want to store the collected data in SharePoint, you’ll need to leverage Power Automate to create that connection. This creates a seamless workflow where form responses automatically populate your SharePoint lists.
Here are the steps to create a Microsoft Form and integrate with SharePoint:
- Go to Microsoft Forms.
- Click New Form → Add questions, customize the theme.
- Click Share → Copy the form link.
Embed the form in SharePoint:
- Navigate to your SharePoint page.
- Click Edit Page → Add a Web Part → Select Microsoft Forms.
- Paste the form link and save the page.
Store form responses in SharePoint (Power Automate required):
- Go to Power Automate → Create a new flow.
- Use “When a new response is submitted” trigger (Microsoft Forms).
- Add “Get response details” action.
- Add “Create item” (SharePoint) action to store responses in a SharePoint list.
📌 Ideal for: Simple surveys, event registrations, or basic request forms.
Option 2: Using SharePoint list forms (for structured data tracking)
What makes this option particularly valuable is lists’ built-in support for data validation, ensuring information accuracy, alongside granular permission controls that allow you to manage exactly who can view or edit specific content. Additionally, you can implement workflows to automate processes based on form submissions, creating efficient business processes that reduce manual intervention.
Here are the steps to create a SharePoint list form:
- Navigate to your SharePoint site.
- Click New → List → Blank List.
- Name your list and click Create.
- Click Add Column → Choose field types (text, choice, date, people picker, etc.).
- Modify column settings (required fields, default values, validation rules).
Here’s how to customize the form:
- Use JSON formatting (Settings → Format Column) for improved styling.
- Use Power Automate to trigger workflows.
📌 Ideal for: IT ticketing, HR requests, asset tracking.
Option 3: Using Power Apps (For Advanced Forms with Business Logic)
Power Apps enable you to craft sophisticated, interactive forms that incorporate complex validation rules, conditional fields that appear or disappear based on user input, and dynamic layouts that adapt to different scenarios. The interface gives you tremendous flexibility to design forms that precisely match your business requirements, no matter how intricate. Beyond functionality, Power Apps delivers a polished user experience with mobile-responsive design, ensuring your forms work seamlessly across devices—whether accessed from a desktop computer, tablet, or smartphone. This adaptability makes Power Apps the premier choice when you need forms that combine advanced business logic with accessibility for users on the go.
Here are the steps to create a Power Apps form in SharePoint:
- Navigate to your SharePoint list.
- Click Integrate → Power Apps → Customize forms.
- In Power Apps Studio, modify the form:
- Rearrange fields with drag and drop.
- Add sections, tabs, instructional content.
- Include conditional logic (e.g., show/hide fields dynamically).
- Use formulas for calculations.
- Click Save → Publish to SharePoint.
📌Ideal for: Approval workflows, customer onboarding, internal employee requests.
Creating a list of forms in SharePoint
A SharePoint list serves as the foundation for most form solutions, providing a structured database for form submissions.
So, how to create a list and form in SharePoint? Here are the steps:
Step 1: Create a SharePoint list
- Navigate to your SharePoint site.
- Click New → List → Blank List.
- Name the list and click Create.
Step 2: Add columns to structure your data
- Click Add Column → Choose column type:
- Single line of text → Names, short descriptions.
- Multiple lines of text → Comments, long responses.
- Choice → Dropdown selections.
- Date and Time → Appointments, deadlines.
- Yes/No → Binary choices.
- Person or Group → User selections.
Step 3: Configure list views
- Click List Settings → Create View.
- Add filters, sorting, grouping options.
Step 4: Use the form
- Click New Item to access the form.
- Enter data and submit.
📌 Ideal for: Tracking structured data like project tasks, expense reports, or service requests.
Sharepoint Forms Examples: Examples of Using SharePoint Forms
SharePoint forms transform manual processes into streamlined digital workflows across organizations. These real-world applications showcase how SharePoint Online forms address specific business needs while improving efficiency and data management.
Vacation request process
Traditional vacation requests often involve cumbersome email chains and paper forms. SharePoint forms digitize this entire workflow:
Form components:
- Employee information (auto-populated from user profile)
- Vacation type dropdown (annual leave, sick leave, personal day)
- Date range with calculated total days
- Optional comments field
- Manager approval section
Workflow integration: The employee submits the request form, triggering an automatic notification to their manager. The manager reviews and approves directly from the email or form. Upon approval, the system updates the status, notifies the employee, alerts HR for record-keeping, and updates the team calendar.
Benefits: SharePoint vacation request forms eliminate paperwork, create a searchable repository of all leave requests, ensure consistent policy application, and provide valuable reporting on leave patterns. The integration with team calendars improves resource planning and visibility.
Equipment registration system
IT departments use SharePoint forms to manage company equipment throughout its lifecycle:
Form components:
- Equipment specifications (type, model, serial number)
- Purchase details (date, vendor, cost, warranty)
- Asset tracking information with automatic ID generation
- Status tracking (new, assigned, under repair, decommissioned)
- User assignment with people picker
- Photo upload for visual identification
Workflow integration: When new equipment arrives, IT staff registers it in the system, generating a unique asset ID. When assigned, the responsible employee receives notification. The system triggers maintenance alerts based on equipment type and tracks the full lifecycle through dashboards showing equipment status and distribution.
Benefits: This approach centralizes asset management, creates audit trails for compliance, simplifies inventory tracking, and enables data-driven budget forecasting. The equipment registration system streamlines both procurement and decommissioning processes.
Customer feedback collection
Effective feedback collection drives business improvement. SharePoint forms create structured feedback systems:
Form components:
- Customer information fields
- Product/service selection
- Satisfaction rating scales
- Open-ended comment areas
- Follow-up permission option
Workflow integration: Customers access the form through various channels. Upon submission, feedback is stored in SharePoint, with low satisfaction scores triggering alerts to managers. The system categorizes feedback by product/service for trend analysis, while enabling customer service representatives to document follow-up actions.
Benefits: This system provides structured data for satisfaction analysis, enables quick response to negative experiences, helps identify improvement opportunities, and creates an organized repository of customer sentiments that supports data-driven decision making.
Access request system
Secure information access requires structured approval processes. SharePoint forms provide this framework:
Form components:
- Requestor information (auto-populated)
- Resource selection (document library, site, folder)
- Access level needed
- Business justification
- Access duration
Workflow integration: A user submits their access request, notifying the site owner or security team. After review and approval, permissions are automatically granted through Power Automate, with temporary access set to expire on the specified date. All requests and approvals are logged for compliance.
Benefits: This system standardizes access procedures, creates complete audit trails, reduces IT workload for routine permissions, and ensures proper authorization for all access grants while supporting modern security frameworks.
Event registration form
SharePoint forms simplify event planning and management:
Form components:
- Attendee contact details
- Event selection with relevant information
- Session preferences for multi-track events
- Dietary or accommodation requirements
- Transportation or lodging needs
Workflow integration: Participants register through the form, receiving automatic confirmation emails with calendar invitations. Event coordinators see real-time registration updates, while the system supports name badge generation and automated post-event surveys.
Benefits: Event registration forms simplify attendee management, provide accurate planning information, capture special requirements in advance, and support comprehensive post-event follow-up, making the entire event lifecycle more manageable.
Incident reporting system
Safety, security, and facilities issues benefit from structured reporting through SharePoint forms:
Form components:
- Incident details (date, time, location)
- Classification and severity assessment
- Description with photo upload
- Witness information
- Immediate actions taken
Workflow integration: An employee reports an incident, automatically notifying the appropriate team based on the incident type. Critical incidents trigger urgent alerts. The system documents investigation steps, findings, and corrective actions, while generating reports that identify trends and recurring issues.
Benefits: This approach ensures consistent reporting, speeds response time for critical situations, provides documentation for regulatory compliance, and helps identify systemic issues requiring attention, supporting a culture of continuous improvement.
These examples demonstrate SharePoint forms’ versatility across business functions. Success comes from thoughtful design that balances data collection needs with user experience. When combined with intelligent workflows, SharePoint forms transform simple data collection into comprehensive business solutions that enhance efficiency, compliance, and user satisfaction.
Where Are SharePoint Forms Stored?
Understanding where SharePoint forms and their submitted data are stored is essential for effective form management, data security, and business continuity planning. This section explains:
- The storage structure of SharePoint forms.
- How to access submitted form data.
- Options for data backup and recovery.
Storage structure of SharePoint forms
SharePoint does not store forms as separate files—instead, forms are intrinsically connected to SharePoint lists. The storage structure works as follows:
Form design storage:
| Form Type | Where It Is Stored | Notes |
| Standard SharePoint Forms | Embedded in SharePoint list definition | Uses SharePoint’s default form interface |
| Power Apps Forms | Stored in Power Apps service | Linked to the SharePoint list but not stored in SharePoint |
| JSON-Customized Forms | Stored in SharePoint list settings | Only modifies the form’s appearance, not structure |
Form data storage:
✔ All form submissions are stored as list items in the corresponding SharePoint list.
✔ Each field in the form corresponds to a column in the SharePoint list.
✔ Attachments are stored in a hidden “Attachments” folder linked to the list item.
This integrated storage approach ensures that form data benefits from SharePoint’s built-in capabilities, including:
- Version history (tracking changes to list items).
- Item-level permissions (restrict access to specific form submissions).
- Content approval workflows (for review-based processes).
- Retention policies (for compliance and governance).
- Metadata management (for categorization and filtering).
Accessing SharePoint form data
Administrators and users (with appropriate permissions) can access form submissions through multiple pathways:
- Direct list access
✔ Navigate to the SharePoint list to view all submissions.
✔ Use custom views to filter and sort data.
✔ Export to Excel for offline analysis.
- Power platform access
✔ Power BI → Connects to SharePoint lists for real-time reporting and dashboards.
✔ Power Automate → Automates form processing, approvals, and notifications.
✔ Power Apps → Allows users to create custom applications that interact with SharePoint form data.
- Programmatic access
✔ SharePoint REST API → Retrieves, updates, and manages form data programmatically.
✔ Microsoft Graph API → Provides broader integration with Microsoft 365 services.
✔ SharePoint CSOM (Client-Side Object Model) → Used for advanced custom solutions.
Backup and restore capabilities
SharePoint automatically provides backup and restore options, but the availability of these features depends on whether you are using SharePoint Online or SharePoint On-Premises.
- Native SharePoint backup
✔ SharePoint Online → Microsoft automatically backs up data every 12 hours, retained for 14 days (restorable via a Microsoft support request).
✔ SharePoint On-Premises → Requires administrator-configured backup schedules.
✔ Retention periods depend on your SharePoint plan and organizational settings.
- Granular restoration options
✔ Recycle Bin (First-stage) → Holds deleted list items (form submissions) for 93 days.
✔ Site Collection Recycle Bin (Second-stage) → Stores items even after users delete them.
✔ Power Apps Version History → Allows restoring previous form designs (but not submitted form data).
📌 Note: If a SharePoint list is deleted, it can be restored within 93 days, but data recovery beyond that requires a backup solution.
- Additional protection methods
✔ Export list data to Excel regularly for an additional backup layer.
✔ Use “Save as Template” to back up the list structure (but not data).
✔ Implement Power Automate flows to archive form submissions elsewhere (e.g., another SharePoint site, OneDrive, or SQL database).
✔ Third-party backup solutions provide advanced recovery options beyond what SharePoint offers natively.
Can you store forms in SharePoint?
Yes! SharePoint is an excellent platform for form storage
However, it’s important to understand that:
- SharePoint does not store forms as separate files—all forms are linked to SharePoint lists.
- Submitted form data is stored as list items in the corresponding SharePoint list.
- Attachments are stored in a hidden “Attachments” folder associated with list items.
Below is a summary of SharePoint storage locations:
| Component | Storage Location | Notes |
| Standard SharePoint Form Design | Embedded in SharePoint list definition | Uses SharePoint’s default form UI |
| Power Apps Form Design | Stored in Power Apps service | Linked to SharePoint but not stored within SharePoint |
| JSON-Customized Forms | Stored in SharePoint list settings | Only modifies form appearance, not structure |
| Submitted Form Data | Stored in SharePoint lists as list items | Each field corresponds to a column |
| Attachments | Stored in a hidden “Attachments” folder linked to list items | Separate from the list itself |
SharePoint Forms Issues and Solutions
Even the most robust systems face challenges, and SharePoint forms are no exception. This section addresses common issues users encounter when working with SharePoint forms and provides practical solutions to overcome these limitations.
Limited capabilities of standard forms
SharePoint’s default list forms offer basic functionality, but they often fall short for organizations needing advanced logic, multi-step processes, or enhanced user experiences. While they work well for simple data entry tasks, users frequently encounter limitations that require additional customization or third-party tools.
Issues often include:
❌ Basic layout options with little flexibility.
❌ Limited conditional logic and validation.
❌ No built-in multi-stage form support.
❌ Limited visual feedback for users.
Solutions can include:
✔ Use JSON formatting for basic layout customizations in default SharePoint forms.
✔ Leverage Power Apps for advanced validation, multi-step processes, and conditional logic.
✔ Consider third-party tools (e.g., Nintex Forms, Plumsail Forms, Skybow) for extended functionality.
✔ Use multiple lists with lookup columns to build complex data relationships.
💡 Implementation tip: Start with JSON formatting for simple visual enhancements, then move to Power Apps if more advanced features are needed. Third-party tools should only be considered when SharePoint’s native capabilities are insufficient.
Limited design and customization
While SharePoint forms provide a functional interface for data entry, they often lack flexibility in design and branding. Organizations looking to match corporate themes, improve user experience, or implement custom layouts and UI elements may find the default customization options too restrictive. Without additional tools, achieving a professional and user-friendly design can be challenging.
Issues often include:
❌ Restricted branding and layout options.
❌ Limited control over form elements.
❌ Inability to create fully custom UI elements.
❌ Difficulty matching corporate design standards.
Solutions can include:
✔ Use Power Apps for advanced styling and layout improvements (themes, colors, branding).
✔ Apply JSON formatting to modify list forms without needing Power Apps.
✔ Break large forms into multiple steps (multi-page Power Apps forms).
✔ Consider third-party form design tools (e.g., Plumsail Forms, Skybow Rich Forms).
✔ Create custom SPFx web parts for a fully customized interface.
💡Implementation tip: Power Apps does not support direct CSS injection, but themes and styles can be applied. For simple branding needs, JSON formatting may be sufficient.
Difficulties with integration into business processes
A well-designed form is only as useful as the business processes it supports. SharePoint forms are often used to collect and manage data, but without proper integration into workflows, they can become isolated tools that require manual handling. Automating approvals, notifications, and tracking can significantly improve efficiency and reduce errors.
Issues often include:
❌ Forms exist in isolation from broader business workflows.
❌ Manual handling required for processing form submissions.
❌ No built-in approval mechanisms in standard SharePoint forms.
❌ Difficulty tracking form submission status.
Solutions can include:
✔ Use Power Automate to automate approval workflows, notifications, and integration with other systems.
✔ Leverage SharePoint’s built-in approval workflows for simple approvals.
✔ Add a “Status” column to track progress dynamically.
✔ Use Power BI dashboards to monitor and visualize form submission data.
✔ Integrate with Microsoft Teams to surface forms and approvals directly in team workflows.
💡 Implementation tip: Map your entire business process before implementing integrations. Identify stakeholders, decision points, and required automation for a seamless workflow.
Incompatibility issues
SharePoint forms are used across various devices, browsers, and SharePoint environments (Online vs. On-Premises). However, users may encounter inconsistencies in functionality, display issues, or accessibility challenges depending on their setup. Ensuring compatibility across platforms is essential for providing a seamless user experience and avoiding technical frustrations.
Issues often include:
❌ Inconsistent behavior across different SharePoint versions (Online vs. On-Premises).
❌ Browser compatibility problems.
❌ Mobile responsiveness limitations.
❌ Accessibility compliance challenges.
Solutions can include:
✔ Test forms across all major browsers (Chrome, Edge, Firefox) to ensure compatibility.
✔ Use Power Apps for a mobile-friendly, responsive design.
✔ Ensure JSON-formatted list forms support mobile and tablet views.
✔ Select third-party solutions that guarantee cross-browser compatibility.
✔ Use Power Apps accessibility checker to enhance compliance with accessibility standards.
💡 Implementation tip: Create a testing environment that reflects your organization’s technology landscape. Test forms on different devices and browsers before deployment.
Performance issues
As forms grow in complexity, performance can become a major concern. Slow loading times, laggy interactions, and delays in submitting data can frustrate users and reduce productivity. Performance issues often arise due to large datasets, excessive form controls, or inefficient queries, making optimization an essential step in form design.
Issues often include:
❌ Long form loading times.
❌ Delays in submitting or processing data.
❌ System overload with large numbers of fields.
❌ Slow performance with large lists.
❌ Timeout issues with complex calculations.
Solutions can include:
✔ Reduce the number of fields and controls in Power Apps to improve speed.
✔ Use indexed columns and filtered views for large SharePoint lists.
✔ Break long forms into multiple pages (multi-step Power Apps forms).
✔ Use caching techniques to optimize Power Apps performance.
✔ Plan for SharePoint’s 5000-item list view threshold to avoid performance bottlenecks.
💡 Implementation tip: Optimize forms before deployment to prevent performance issues. Monitor form performance and adjust based on usage patterns.
Security issues
Security is a critical aspect of any form that collects and stores sensitive data. Without proper access controls, encryption, and auditing, SharePoint forms can become vulnerable to unauthorized access, data breaches, or manipulation. Implementing best practices for permissions, validation, and compliance ensures that your organization’s data remains protected.
Issues often include:
❌ Incorrect or overly permissive access rights.
❌ Lack of version control for form submissions.
❌ Inadequate data encryption.
❌ No audit trail for form changes.
❌ Insufficient data validation, leading to security vulnerabilities.
Solutions can include:
✔ Apply SharePoint list permissions carefully to control access.
✔ Turn on version history to track changes to form submissions.
✔ Use Power Apps to enforce field-level security (since SharePoint does not support column-level security natively).
✔ Ensure data encryption (SharePoint encrypts data in transit and at rest, but additional encryption may be needed for compliance).
✔ Enable audit logs to monitor form activity and user access.
✔ Implement Data Loss Prevention (DLP) policies for sensitive data.
✔ Create approval workflows to require manager approval for specific submissions.
💡 Implementation tip: Conduct a security review of your form implementation, considering both the data being collected and the users accessing it. Follow the principle of least privilege, granting users only the permissions they need.
Below is a summary of the discussed issues and proposed solutions:
| Issue Category | Common Problems | Recommended Solutions |
| Limited capabilities | No multi-step forms, restricted validation, basic layouts | Use Power Apps, JSON formatting, third-party solutions |
| Design and customization | Branding limitations, rigid UI | Use Power Apps themes, JSON formatting, SPFx custom components |
| Integration challenges | Manual processes, no built-in approvals | Use Power Automate, status tracking, Power BI dashboards |
| Incompatibility issues | Browser inconsistencies, mobile limitations | Test across browsers, ensure mobile responsiveness in Power Apps |
| Performance issues | Slow loading, large list limits | Optimize fields, use indexed columns, multi-page forms |
| Security risks | Overly permissive access, lack of encryption | Use SharePoint permissions, version history, Power Apps security rules |
How Virtosoftware Products Help Improve the Work with SharePoint Forms
SharePoint forms provide a solid foundation for data collection, but organizations often require more advanced capabilities to fully optimize their business processes. VirtoSoftware offers a comprehensive suite of products designed to enhance SharePoint forms across multiple dimensions—from design and user experience to workflow automation and visualization. These tools can transform basic SharePoint forms into sophisticated business solutions without requiring extensive development resources.
Virto Form Designer for SharePoint Online & M365
The Virto Form Designer dramatically expands what’s possible with SharePoint forms, eliminating many of the limitations that frustrate users of standard forms.
Key capabilities:
- Intuitive drag-and-drop interface for creating custom forms without programming knowledge
- Advanced layout options including tabs, sections, and columns for improved form organization
- Conditional logic to show or hide fields based on user selections
- Dependent dropdown fields that filter options based on previous selections
- Enhanced field validation rules for better data quality
- Customizable form themes that match your brand identity
- Support for various content types in a single list
Real-world application: A multinational company can implement Virto Form Designer to create a standardized employee onboarding process. The HR department can design a multi-section form with conditional logic that adapts based on department, location, and job type. The form can automatically trigger notifications to IT for equipment provisioning, facilities for workspace preparation, and security for access badge creation. The intuitive interface would ensure consistent data collection across all global offices while significantly reducing onboarding processing time.
Virto Alerts & Reminders App

The Alerts & Reminders App addresses one of the most common challenges with form-based processes: ensuring timely responses and keeping stakeholders informed.
Key capabilities:
- Automated email notifications when forms are submitted or modified
- Scheduled reminders based on deadlines or inactivity periods
- Rich HTML templates for professional-looking notifications
- Targeted alerts to specific users or groups based on form conditions
- Integration with SharePoint workflows and Power Automate
- Support for escalation paths when deadlines are missed
Real-world application: A government agency can use Virto Alerts & Reminders to streamline their grant application process. The system can send automatic confirmation emails when applications are received, notify reviewers when new applications require evaluation, and trigger escalation alerts if applications haven’t been processed within the mandated timeframe. For applicants, the system can send status updates and deadline reminders, significantly improving transparency and reducing inquiry calls to the agency.
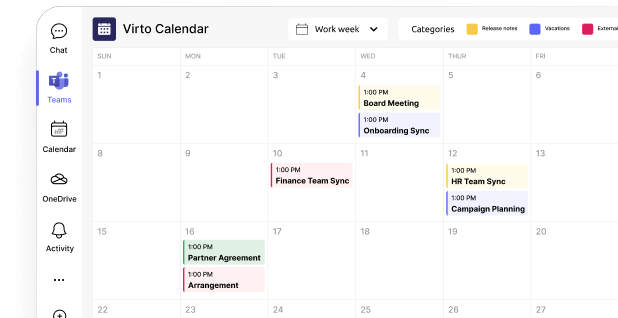
Virto Calendar App
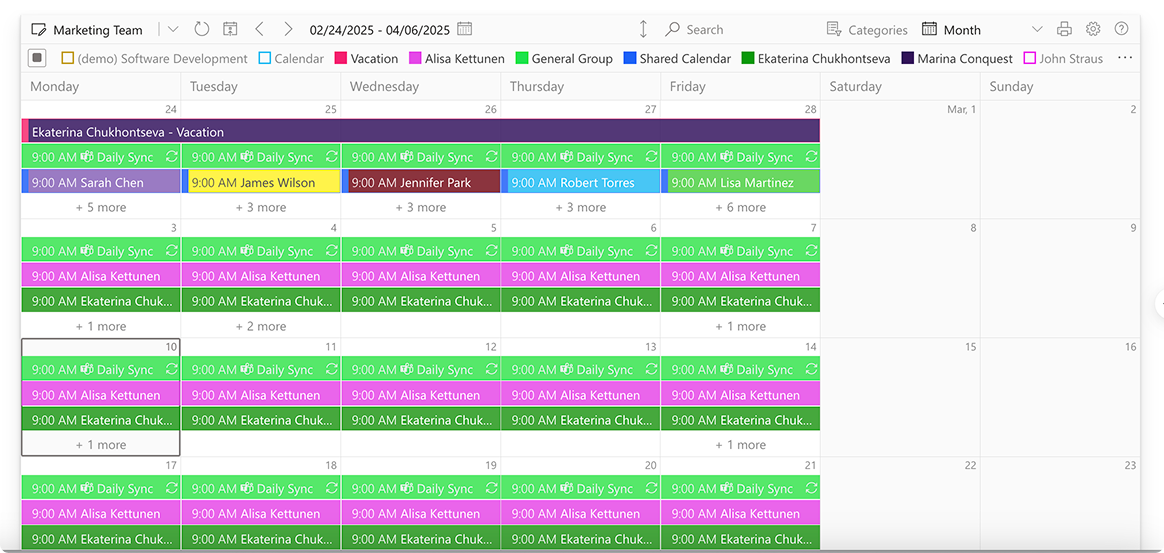
The Virto Calendar App bridges the gap between form submissions and visual scheduling, making time-based data more accessible and actionable.
Key capabilities:
- Displays form data in an intuitive calendar format
- Supports overlay of multiple data sources (SharePoint lists, Outlook, Exchange, Google Calendar)
- Color-coding based on form field values for visual categorization
- Direct interaction with calendar items, including approve/reject functionality
- Integration with workflows for automated event management
- Versatile views (day, week, month, agenda, timeline)
Real-world application: A university’s facilities department can implement Virto Calendar to manage room reservation requests. Staff can submit room requests through a customized SharePoint form, which then appears as pending events on the facilities calendar. Managers can review the details directly from the calendar view and approve or reject with a single click. Approved reservations can be automatically color-coded by department and visible to all staff, creating a transparent, efficient room booking system that eliminates scheduling conflicts.
Merge all calendars in one place
Try Virto Calendar to Sync all data
Virto Kanban Board App
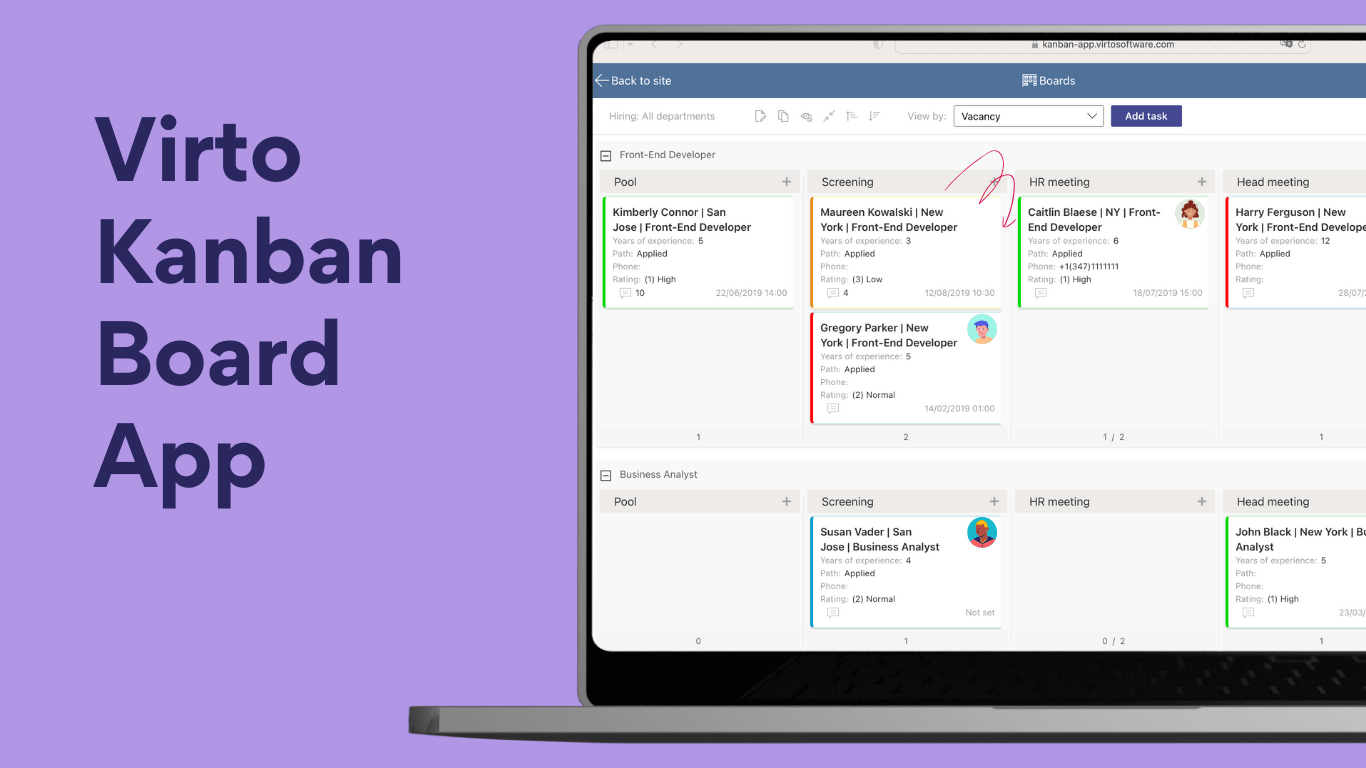
The Kanban Board App transforms SharePoint form data into visual workflow management, making process status visible and approvals intuitive.
Key capabilities:
- Presents form submissions as cards on customizable Kanban boards
- Visual process flows with drag-and-drop status updates
- Customizable swim lanes to organize tasks by category, priority, or assignee
- WIP (Work In Progress) limits to prevent process bottlenecks
- Integration with Power Automate for automated workflow actions
- Advanced filtering and search capabilities
Real-world application: An IT department implemented Virto Kanban Board to manage hardware and software requests. Each request submitted through SharePoint forms appears as a card in the “New Requests” column. IT staff drag cards through the workflow stages (Under Review, Approved, On Order, Ready for Pickup, Completed), with automatic notifications at each stage. The visual board gives managers an instant overview of all requests in process, identifies bottlenecks, and provides metrics on fulfillment times – all without requiring users to learn a new system.
Integrated Business Solutions
While each VirtoSoftware product offers significant standalone value, their true power emerges when combined to create comprehensive business solutions. Consider this integrated approach:
Capital expenditure request process:
- Department managers submit purchase requests using a Virto Form Designer custom form with conditional sections based on purchase type and amount
- The request appears on the finance department’s Virto Kanban Board in the “New Requests” column
- Virto Alerts & Reminders notifies appropriate approvers based on amount thresholds
- Finance team moves the request through approval stages on the Kanban board
- Delivery dates automatically appear on the department’s Virto Calendar
- Virto Alerts & Reminders sends notifications for upcoming deliveries
This integrated approach creates a seamless experience from request submission through delivery, with appropriate visualizations for each stakeholder and automated notifications throughout the process.
Check out our calendar use cases
Business Impact
Organizations implementing VirtoSoftware solutions to enhance their SharePoint forms typically report significant benefits:
- Reduced development costs: Creating custom solutions without coding
- Faster implementation: Deploying forms and workflows in days rather than weeks
- Improved user adoption: Intuitive interfaces reduce training needs
- Better data quality: Advanced validation and conditional logic prevent errors
- Process acceleration: Automated notifications and approvals eliminate delays
- Enhanced visibility: Visual tools provide clear process status to all stakeholders
- Continuous improvement: Analytics help identify and eliminate bottlenecks
By extending SharePoint forms with VirtoSoftware products, organizations can create sophisticated business applications that precisely match their processes without the cost and complexity of custom development. The result is streamlined operations, improved visibility, and better user experiences across the organization. We invite you to browse through the VirtoSoftware site to install free versions of the apps or schedule a quick demo call to see the apps in action or ask any questions.
Conclusion on forms SharePoint
SharePoint Forms provides a robust foundation for data collection and management within Microsoft 365 environments, but its true potential is unlocked through thoughtful customization and integration. While the standard SharePoint forms meet basic needs, organizations looking to optimize business processes, improve user experience, and create more sophisticated workflows can benefit significantly from enhanced forms solutions.
As we’ve explored throughout this guide, organizations can extend SharePoint forms functionality through multiple approaches:
- Leveraging Power Apps to create custom form experiences with conditional logic and advanced validation
- Utilizing Microsoft Forms for simpler surveys and data collection scenarios
- Implementing JSON formatting for light customization without full custom development
- Integrating SharePoint lists with Power Automate for workflow automation
- Adopting third-party solutions for specialized functionality
VirtoSoftware offers a comprehensive suite of ready-made solutions specifically designed to enhance and expand SharePoint form capabilities. These tools bridge the gap between out-of-box SharePoint functionality and custom development, providing enterprise-grade solutions without the complexity and cost of building from scratch.
We encourage you to test VirtoSoftware applications for your SharePoint forms and workflow needs. Many customers find that these solutions provide the perfect balance between customization and simplicity, allowing them to implement sophisticated business processes without extensive development resources.
We also invite you to learn more about SharePoint and SharePoint forms by browsing through the following relevant resources:
Official Microsoft resources:
Our blog resources: