SharePoint thrives on collaboration, often leading to vast libraries of files and folders. Managing this content efficiently requires the ability to perform actions like deleting, moving, or copying, multiple items at once—commonly known as “bulk operations.” Although SharePoint’s native tools provide some solutions, they frequently fall short when handling hundreds or thousands of files. While workarounds involving complex scripting, PowerShell commands, or third-party tools exist, they often present a barrier for everyday users due to their technical nature.
This article, Part 2 in our series on SharePoint bulk file operations, focuses on:
- The challenges of deleting, copying, and moving multiple files in SharePoint.
- Exploring potential solutions and workarounds.
- Showcasing how VirtoSoftware’s tools simplify these tasks in both On-Premise and SharePoint Online environments.
For a comprehensive understanding of bulk file and folder operations in SharePoint, be sure to explore the other articles in this series:
- Part 1: Multiple Files Upload & Download
- Part 3: Multiple Data Edits, Multiple Files Sharing & Multiple Check In and Approve
Multiple Files Delete
While SharePoint offers some standard options for deleting files, there are more efficient methods available, including third-party solutions and PowerShell scripts. In this section, we’ll go over these options and best practices for bulk file deletion in SharePoint. For a more comprehensive guide, please check out another article on the topic: How to Delete Multiple Files from SharePoint.
Can you delete multiple files at once in SharePoint?: Standard options for working with bulk file delete
Yes, in SharePoint, you can delete multiple files at once by selecting them and then choosing the delete option from the toolbar. Here’s a basic overview of the standard method:
- Navigate to the Document Library: Go to the document library that contains the files you want to delete.
- Select files: Use the checkboxes next to each file to select multiple files.
- Delete files: Click on the “Delete” button in the toolbar to move the selected files to the recycle bin.
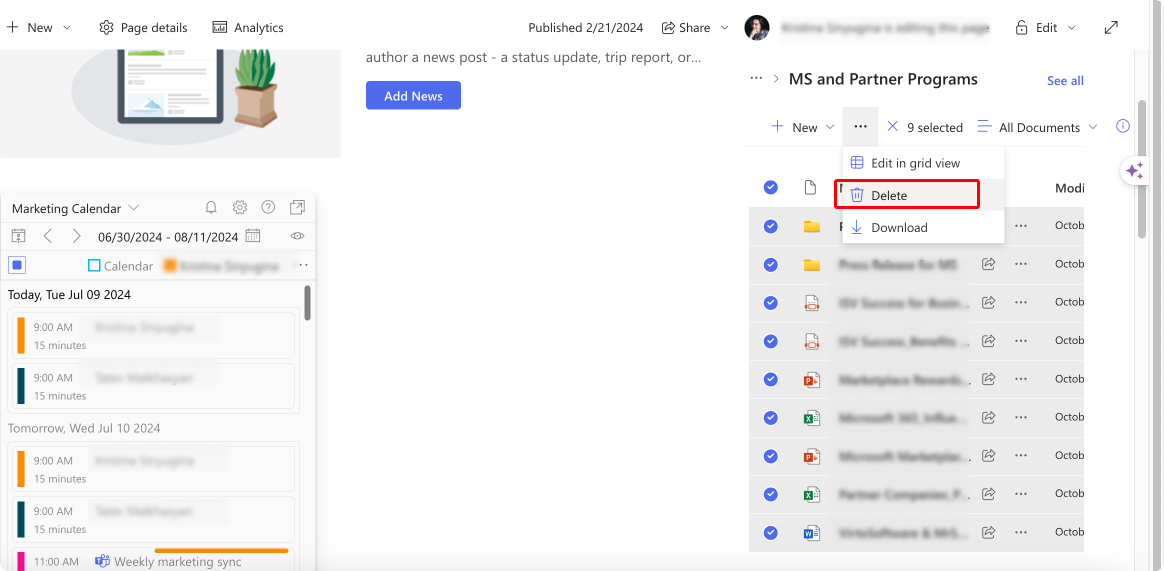
Pic. 1. Using the “Delete” button.
While this method works for a small number of files, it becomes cumbersome when dealing with large volumes of documents.
Alternative Methods for Bulk File Delete in SharePoint
To efficiently handle bulk deletions, you can use third-party solutions, PowerShell scripts, and some best practices with workarounds:
- Third-party solutions
While numerous decent apps exist, some of which we’ve already mentioned previously, we genuinely recommend you use the Virto Multiple File Operations App because it greatly simplifies bulk file operations in SharePoint On Prem, allowing you to delete multiple files quickly and efficiently. The app also offers filters and conditions for precise deletions, saving time and reducing manual effort. Still exploring other options? Check out Nintex or HarePoint Workflow Extensions. Alternatively, consider the Virto Multiple Operations for SharePoint Online & Microsoft 365.
- PowerShell scripts
For SharePoint administrators, PowerShell provides a powerful way to automate bulk deletions. Here’s a basic example of how to use PowerShell for deleting multiple files:
# Load SharePoint module
Import-Module SharePointPnPPowerShellOnline

# Connect to SharePoint site
Connect-PnPOnline -Url "https://yoursite.sharepoint.com" -Credentials (Get-Credential)

# Get all files in the document library
$files = Get-PnPListItem -List "Documents"

# Delete each file
foreach ($file in $files) {
    Remove-PnPFile -ServerRelativeUrl $file["FileRef"] -Recycle
}
Best practices and workarounds
Finally, here are some best practices and workarounds for bulk file deletion in SharePoint:
- Backup important data: Before performing bulk deletions, ensure that important data is backed up. This step helps prevent data loss in case of accidental deletions or errors during the deletion process.
- Regular backups: Schedule regular backups of your SharePoint data. This can be done using built-in SharePoint tools, PowerShell scripts, or third-party backup solutions.
- Verify backups: Regularly check your backups to ensure they are complete and restorable. Perform periodic test restorations to verify the integrity of your backup data.
- Backup critical data: Identify and prioritize critical documents and libraries that need to be backed up more frequently. Ensure these backups are stored securely and can be easily accessed if needed.
- Use filters and conditions: Apply filters to narrow down the files you want to delete, reducing the risk of accidental deletions:
- Metadata filters: Use metadata properties (e.g., creation date, modified date, file type) to filter files. For example, you can delete files older than a certain date or files of a specific type.
- Conditional deletion: Set conditions to refine your deletion criteria. For instance, delete files only if they haven’t been accessed or modified in the last year.
- Preview before deletion: If possible, preview the list of files that meet your deletion criteria before proceeding. This allows you to double-check and confirm that only the intended files will be deleted.
- Test in a sandbox: Perform deletions in a test environment first to ensure that your scripts or third-party tools work as expected:
- Metadata filters: Use metadata properties (e.g., creation date, modified date, file type) to filter files. For example, you can delete files older than a certain date or files of a specific type.
- Conditional deletion: Set conditions to refine your deletion criteria. For instance, delete files only if they haven’t been accessed or modified in the last year.
- Preview before deletion: If possible, preview the list of files that meet your deletion criteria before proceeding. This allows you to double-check and confirm that only the intended files will be deleted.
Implementing bulk file deletes using Virto Multiple File Operations App for SharePoint On-Premises
For on-premises SharePoint environments, the Virto Multiple File Operations app is an excellent choice for managing bulk deletions. Here’s how to use it:
- Install the App: Download and install the Virto Multiple File Operations app.
Pic. 2. Installing the Virto Multiple File Operations app.
- Access the document library: Open the document library from which you want to delete files.
- Select Bulk Delete options: Click on the “Bulk Delete” option in the app’s toolbar.
- Choose deletion criteria: Select the files or set conditions for deletion (e.g., delete all files created before a certain date).
- Confirm deletion: Confirm the deletion to remove the files from the library.
Now, before we move to the next section, let’s briefly review some more prevalent use cases and situations you may encounter with bulk deletions in SharePoint.
How do I bulk delete items from a SharePoint list?
To bulk delete items from a SharePoint list:
- Navigate to the list: Go to the list that contains the items you want to delete.
- Select items: Use the checkboxes to select multiple items.
- Delete items: Click the “Delete” button in the toolbar to remove the selected items.
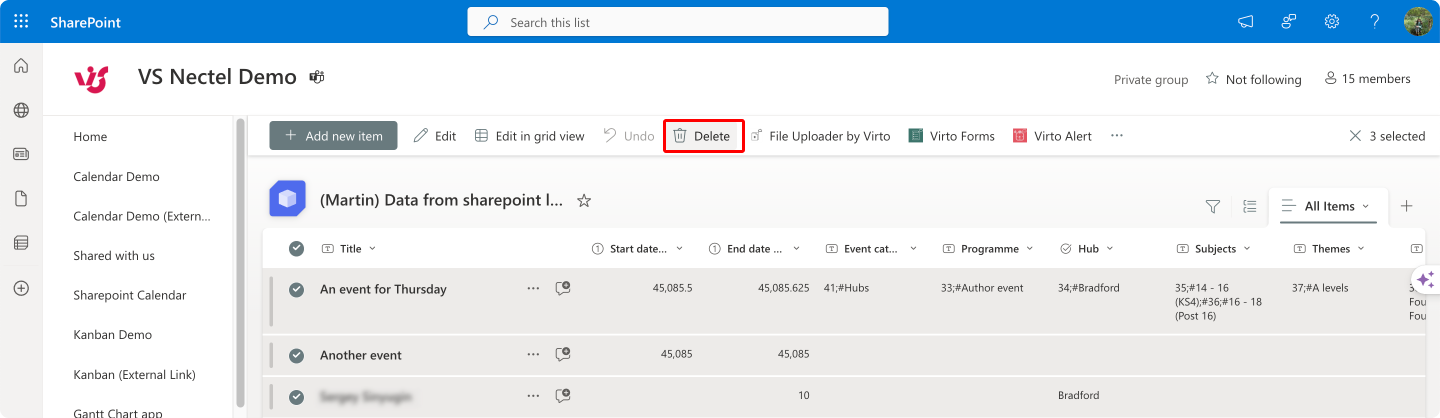
Pic. 3. Deleting multiple items in a SharePoint list.
How do I delete multiple versions of documents in SharePoint?
SharePoint’s versioning feature can accumulate multiple versions of documents. To delete these versions:
- Go to the document library: Open the library containing the documents.
- Select a document: Click on the document and choose “Version History.”
- Delete versions: Select the versions you want to delete and click “Delete.”
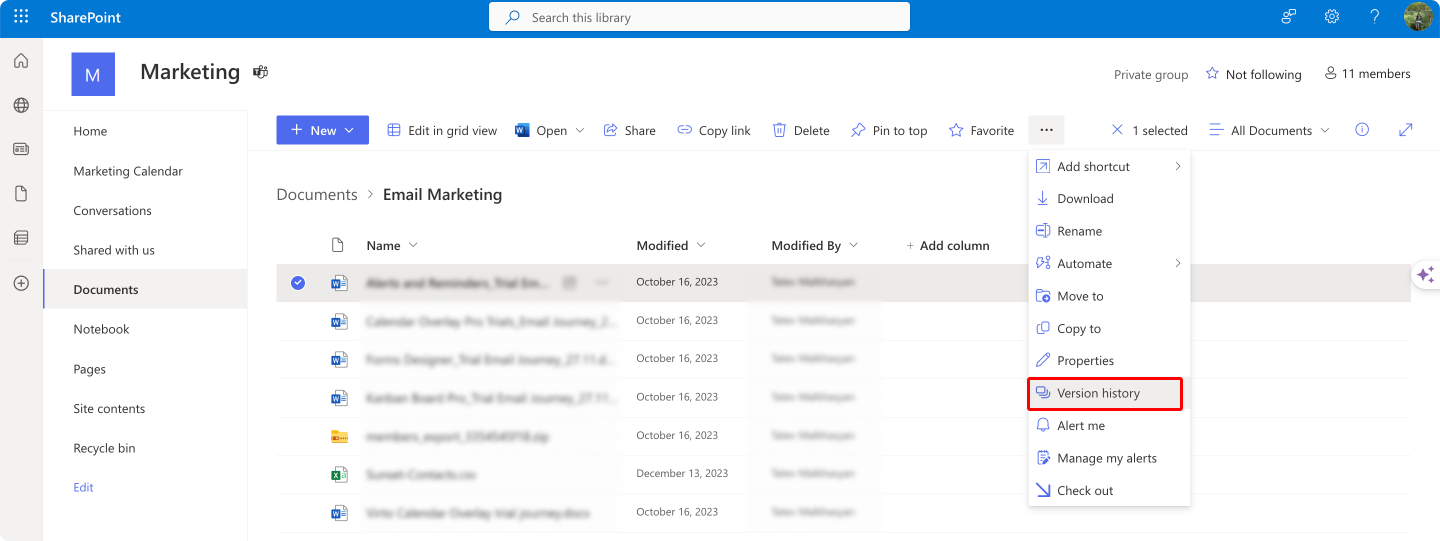
Pic. 4. Navigating to “Version history” to delete multiple versions of docs.
How do I delete multiple SharePoint sites?
To delete multiple SharePoint sites, you can use PowerShell for efficiency:
# Connect to SharePoint Online
Connect-SPOService -Url "https://yoursite-admin.sharepoint.com" -Credential (Get-Credential)

# List of sites to delete
$sites = @("https://yoursite.sharepoint.com/sites/site1", "https://yoursite.sharepoint.com/sites/site2")

# Delete each site
foreach ($site in $sites) {
    Remove-SPOSite -Identity $site -NoWait -Confirm:$false
}
With the right techniques, staff can systematically clean up document libraries, multiple files, versions, and sites in SharePoint, ensuring a streamlined and organized document management system.
Seeing is believing — here’s a quick video walkthrough of bulk delete, copy, and move operations in SharePoint. Take a look before moving on to the details.
Multiple Copy and Move Files
Efficient content management in SharePoint often demands copying or moving files between libraries, sites, or even different SharePoint environments. This is crucial for organization, archiving, and collaboration. Hence, in this section, we’ll tackle typical scenarios for multiple file copy and move tasks in SharePoint, including the standard options available and alternative methods.
The task and purpose of multiple file copy and move
Before we get to instructions, let’s quickly review the basics like typical tasks and scenarios where multiple file copy and move operations are most required. So, typical tasks would often include:
- Organizing content: Reorganize files into different folders or libraries to maintain a structured and accessible document management system.
- Archiving documents: Move older documents to an archive library to keep active libraries uncluttered and improve performance.
- Facilitating collaboration: Copy files to a shared workspace or team site to enable easy access for multiple users.
- Migrating data: Transfer documents between different SharePoint sites or environments during migrations or upgrades.
Typical scenarios include bulk moving project files to a new project site, copying policy documents to a compliance library, or archiving outdated content.
👉 How do I select multiple files in SharePoint? To select multiple files, first navigate to the library where your files are stored. Once you’re in the library, hover over a file and check the box that appears next to it. Repeat this process for each file you want to select. If you need to select all files in the current view, you can use the “Select All” checkbox at the top of the list.
How do I bulk move files in SharePoint?: Standard options for working with multiple file copy and move
SharePoint offers built-in features for copying and moving multiple files:
- Using the modern experience library:
- Select files: Navigate to the document library and select the files you want to copy or move by checking the boxes next to them.
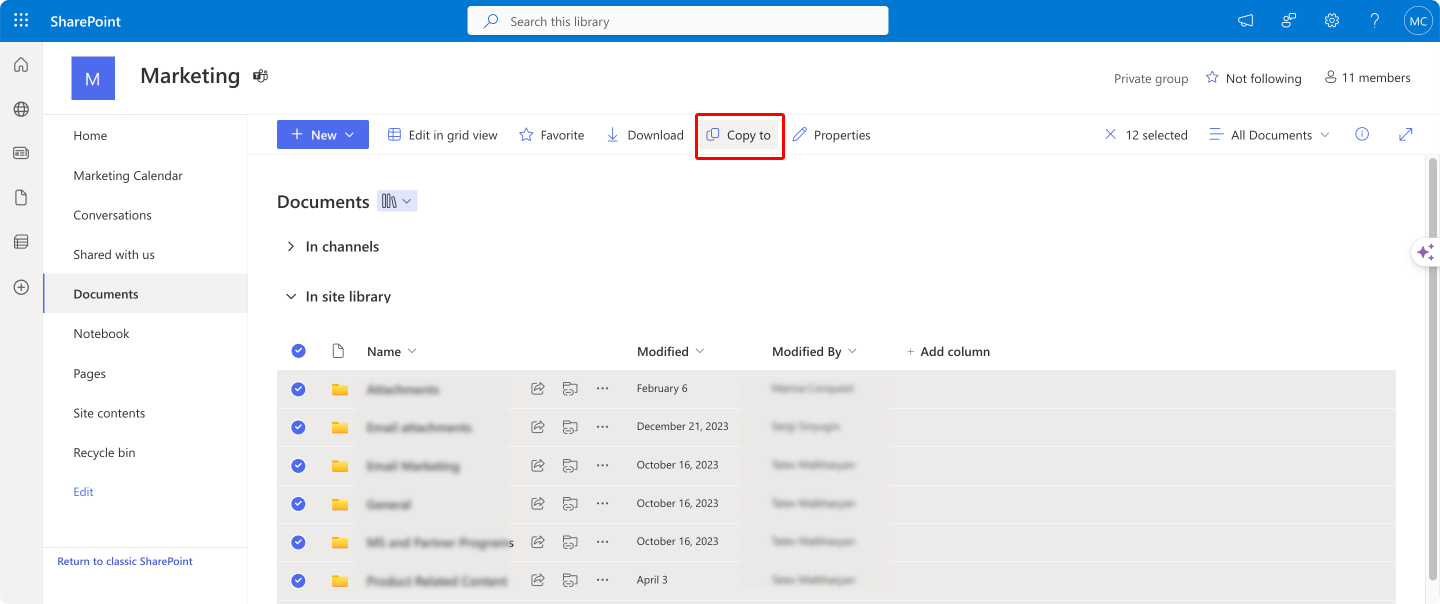
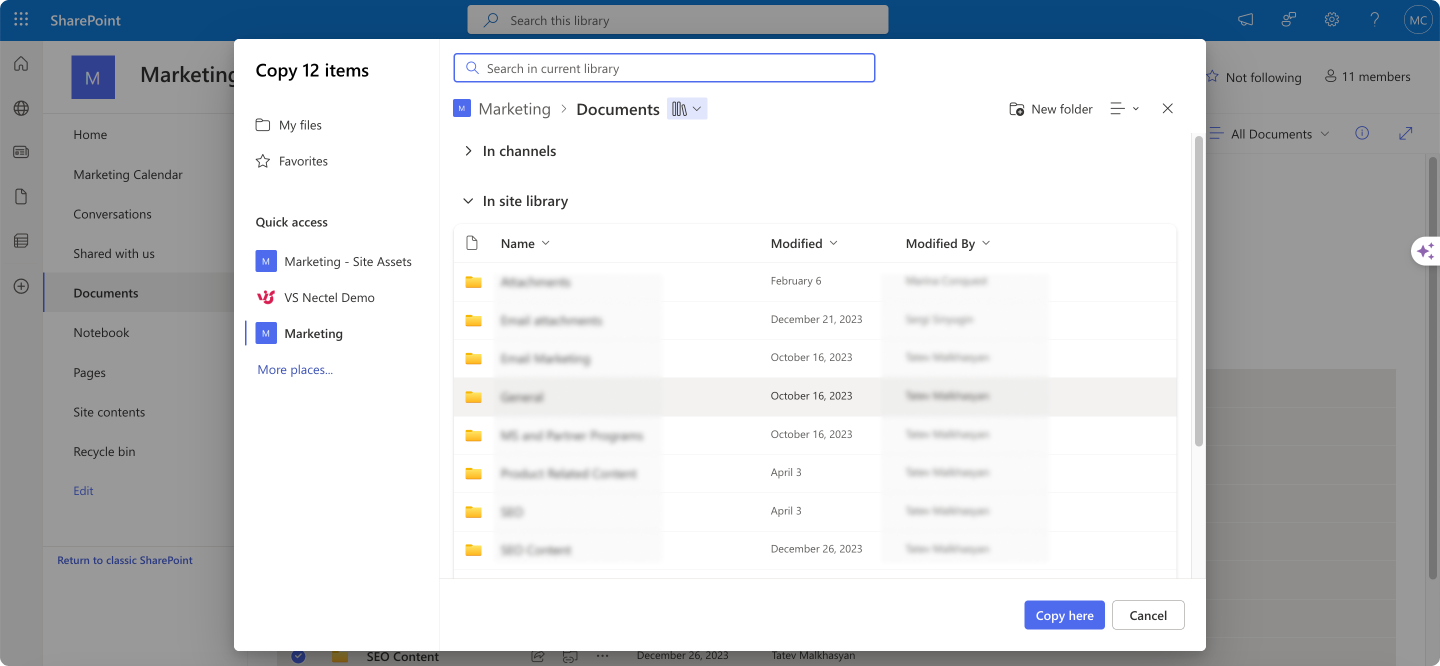
- Copy or move: Click on the “Copy to” or “Move to” button in the command bar.
- Destination selection: Choose the destination library or folder. For copy operations, you can choose libraries within the same site or across different sites (if configured).
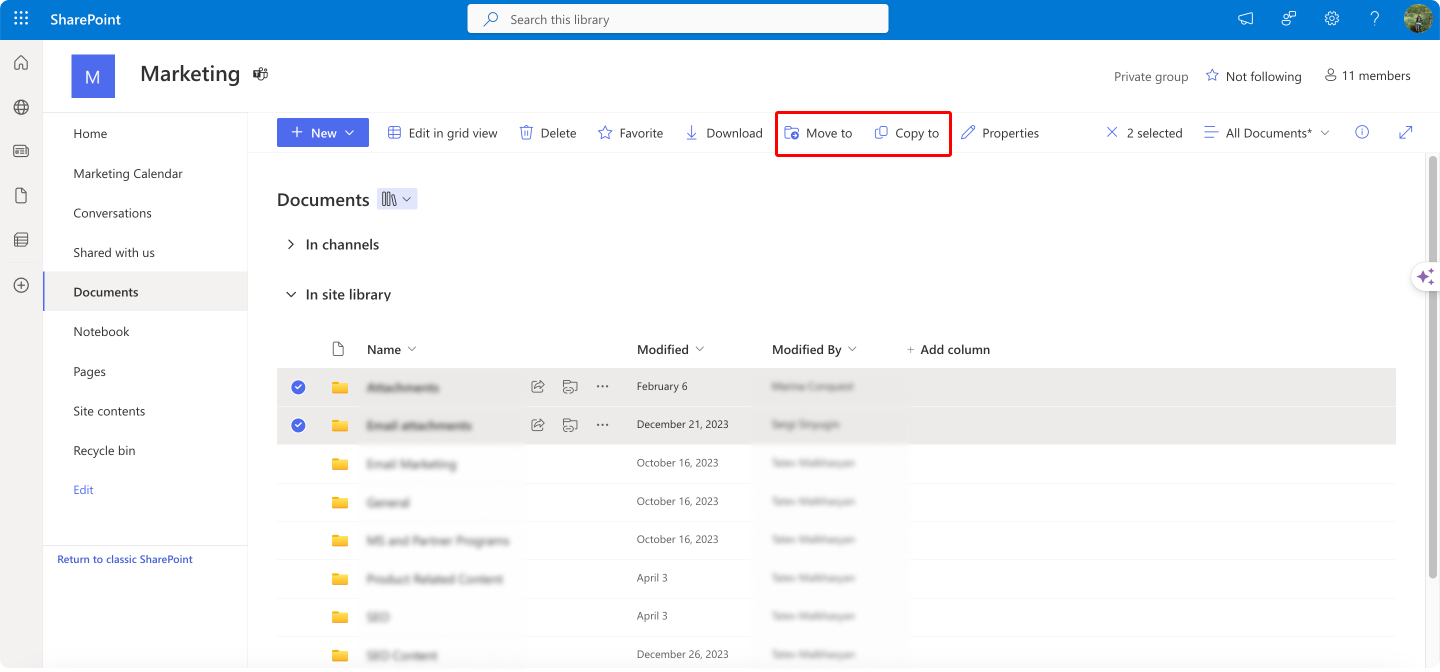
Pic. 5. Copying and moving your chosen files or folders.
👉 How do I move multiple items in SharePoint? As discussed, navigate to the list or library containing the items you want to move. Once there, in the modern SharePoint experience, you can select the items by clicking the checkbox next to each one you wish to move, which is typically a row selection for list items. After selecting the items, look for the “Move to” button in the command bar and click it. This action will open a pane on the right side of the screen where you can choose the destination library, folder, or list. Once you’ve selected the desired destination, simply click “Move here” to initiate and confirm the move operation.
- Using File Explorer:
- Open with Explorer: From the library’s ribbon, select “Library” > “Open with Explorer” (available in the classic experience).
- Drag and drop: Use Windows File Explorer to drag and drop files between SharePoint libraries or folders.
These methods are straightforward but can be limited by the number of files and the complexity of the operation.
How do I move multiple items in SharePoint?: Alternative methods for multiple file copy and move
For more advanced or large-scale operations, alternative methods include third-party solutions and PowerShell scripts:
- Third-party solutions
As mentioned previously, third-party solutions remain a viable choice for organizations looking to streamline their bulk operations in SharePoint environment. Among those already mentioned, consider Virto Multiple File Operations App, ShareGate, Metalogix, and AvePoint. Plus, check out Mover as another alternative for copying and moving files to SharePoint.
It’s essential to emphasize the importance of security. If security is a major concern, it’s advisable to use Microsoft-authorized applications or native apps. These apps have been thoroughly vetted and approved by Microsoft and adhere to all recommended security practices. VirtoSoftware apps are considered native Microsoft apps, meaning that any necessary data storage occurs on Microsoft servers, unlike many other apps that store data externally.
- PowerShell scripts
PowerShell scripts can automate the process of copying and moving files, making it ideal for large-scale operations or custom requirements. Here’s an example script for copying files:
# Load SharePoint module
Import-Module SharePointPnPPowerShellOnline

# Connect to SharePoint site
Connect-PnPOnline -Url "https://yoursite.sharepoint.com" -Credentials (Get-Credential)

# Source and destination libraries
$sourceLibrary = "SourceLibrary"
$destinationLibrary = "DestinationLibrary"

# Get all files in the source library
$files = Get-PnPListItem -List $sourceLibrary

# Copy each file to the destination library
foreach ($file in $files) {
    $fileUrl = $file.FieldValues["FileRef"]
    $fileName = $file.FieldValues["FileLeafRef"]
    Copy-PnPFile -SourceUrl $fileUrl -TargetUrl "$destinationLibrary/$fileName" -OverwriteIfAlreadyExists
Best practices and workarounds
Finally, here are some common sense best practices to follow while copying and moving data in SharePoint:
- Backup important data: Always backup important files before performing bulk copy or move operations to prevent data loss.
- Use filters and conditions: Apply filters to select specific files for copying or moving, ensuring that only the intended files are processed.
- Test in a sandbox: Perform operations in a test environment first to ensure scripts or tools work as expected without affecting production data.
- Monitor and log: Keep logs of operations to track what files were moved or copied, and monitor the process to catch any issues early.
- Communicate with stakeholders: Notify relevant team members or departments about the planned operations. Provide details on the timing and scope of the operations to minimize disruptions.
- Validate data post-migration: Perform spot checks or use automated tools to verify that the copied or moved files are complete and accessible in the new location.
While SharePoint offers basic functionality, third-party solutions like the Virto Multiple File Operations app and PowerShell scripts provide enhanced control and automation. By following best practices and leveraging these tools, you can streamline your file management tasks and ensure data integrity.
How to duplicate a SharePoint document library?
Duplicating a SharePoint document library involves creating a new library and copying the contents of the original library to the new one. Here’s how:
- Create a new document library:
- Go to the SharePoint site where you want the duplicate library.
- Click the “Settings” (gear) icon, then select “Site contents.”
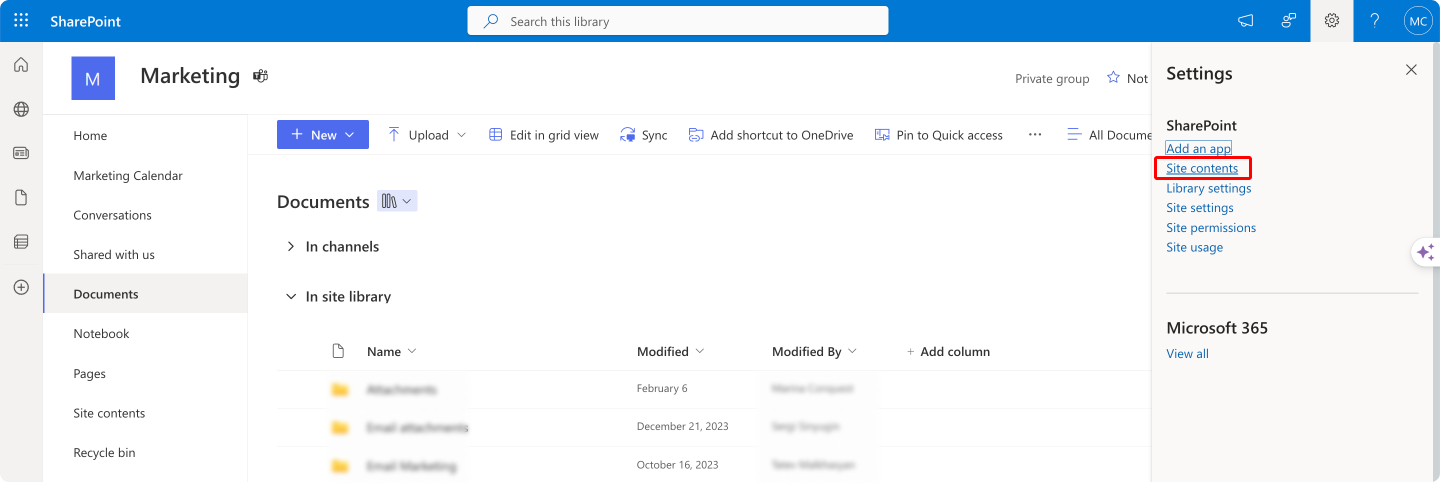
Pic. 6. Navigating to “Site contents”.
- Click “New” > “Document Library” and enter a name for the new library.
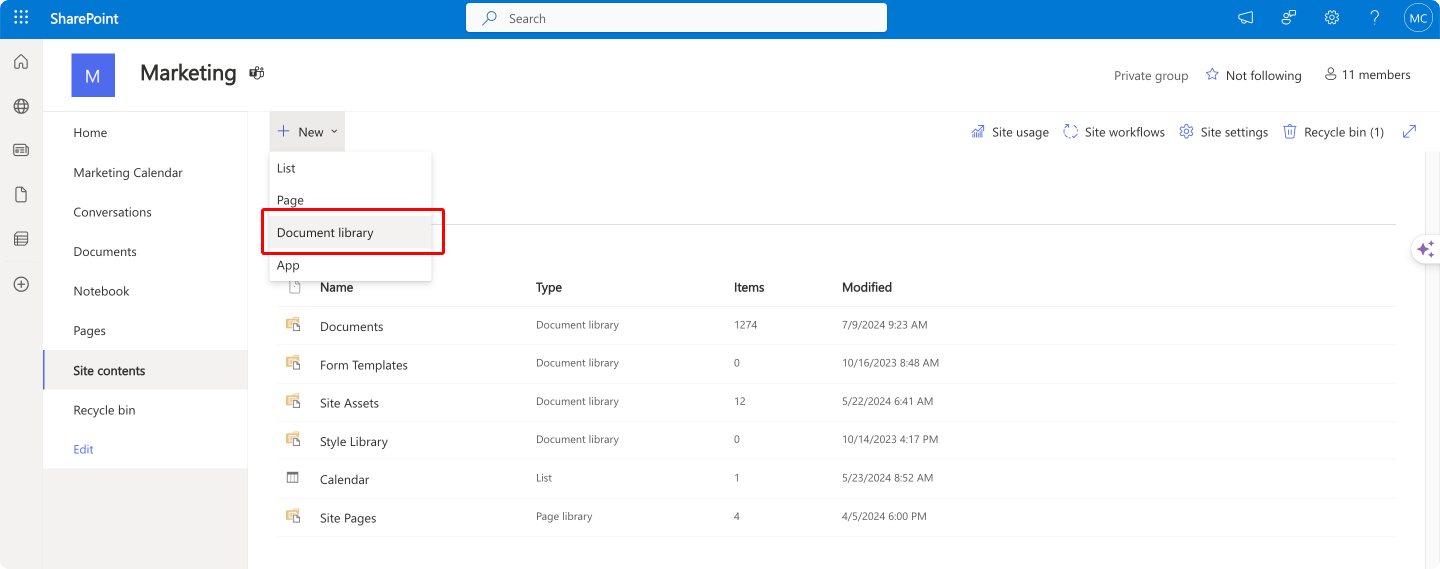
Pic. 7. Clicking “Document library”.
- Copy files to the new library:
- Navigate to the original document library.
- Select all files you want to duplicate (use the “Select All” checkbox or manually select files).
- Click the “Copy to” button in the command bar.
Pic. 8. Selecting your files and clicking on “Copying to”.
- In the pane that appears, select the new document library as the destination.
- Click “Copy here” to start the copy process.
Pic. 9. Choosing a destination for your files.
- Verify the copy: After the copy operation completes, navigate to the new document library and verify that all files have been duplicated.
For more advanced or large-scale operations, consider using third-party tools or PowerShell scripts. For example, to duplicate a document library using PowerShell:
# Load SharePoint module
Import-Module SharePointPnPPowerShellOnline

# Connect to SharePoint site
Connect-PnPOnline -Url "https://yoursite.sharepoint.com" -Credentials (Get-Credential)

# Source and destination libraries
$sourceLibrary = "SourceLibrary"
$destinationLibrary = "DestinationLibrary"

# Get all files in the source library
$files = Get-PnPListItem -List $sourceLibrary

# Copy each file to the destination library
foreach ($file in $files) {
    $fileUrl = $file.FieldValues["FileRef"]
    $fileName = $file.FieldValues["FileLeafRef"]
    Copy-PnPFile -SourceUrl $fileUrl -TargetUrl "$destinationLibrary/$fileName" -OverwriteIfAlreadyExists
Conclusion
While SharePoint’s built-in tools are adequate for basic tasks, they often fall short for large-scale document management. Thankfully, there are solutions to streamline these bulk operations. VirtoSoftware offers two robust tools:
- Virto Multiple File Operations for SharePoint On-Premises
- Virto Multiple Operation App for SharePoint Online & Microsoft 365
These tools offer significant improvements over standard SharePoint options, making bulk file management much easier. We invite you to discover more by scheduling a demo call.
This article is part of a detailed series on bulk file and folder operations in SharePoint. Don’t miss the other articles in this series:
- Part 1: Multiple Files Upload & Download
- Part 3: Multiple Data Edits, Multiple Files Sharing & Multiple Check In and Approve
For other relevant pieces, visit our blog: