Master SharePoint Notifications: A Guide to Customizing Alerts
Discover how to harness the full power of SharePoint alerts and notifications to keep your entire organization informed, engaged, and aligned—even when native capabilities fall short.
Staying informed about important updates in SharePoint is crucial for productivity and collaboration. SharePoint alerts and notifications are built-in features that keep you updated on changes to files, folders, lists, and libraries. Whether you’re tracking document edits, approvals, or task assignments, these alerts ensure you never miss critical updates.
This guide will walk you through the process of setting up and managing SharePoint notifications. By customizing alerts to fit your workflow, you can enhance communication, streamline collaboration, and stay on top of essential changes without constantly checking for updates manually.
General Overview of SharePoint Alerts and Notifications
SharePoint alerts and notifications function as an automated monitoring system that keeps you informed about changes made to content within your SharePoint environment. These alerts eliminate the need for manual checking and ensure you stay updated on important modifications as they happen.
What are SharePoint alerts and notifications?
SharePoint alerts are automated messages that notify you when changes occur to content you care about. These changes might include document modifications, new items added to lists, updates to existing list items, or deletions. Instead of repeatedly checking for updates, SharePoint’s notification system proactively informs you when something changes, allowing you to focus on your work while staying informed about collaborative activities.
👉 What are SharePoint list notifications? SharePoint list alerts and notifications are automated messages that inform users about changes to items within SharePoint lists, such as when items are added, modified, or deleted. These notifications help team members stay updated on content changes without constantly checking the list manually.
Notification delivery methods
SharePoint offers multiple ways to receive notifications:
- Email notifications: The most common method, sending detailed alerts directly to your inbox with information about what changed, who made the change, and when it occurred.
- On-screen notifications: SharePoint itself does not provide real-time in-app alerts, but notifications can appear in integrated Microsoft 365 apps like Microsoft Teams (when connected to SharePoint), Microsoft Viva Connections dashboards, or Power Automate-driven notifications.
- Push notifications: Can be received on mobile devices through the SharePoint mobile app, keeping you informed even when you’re away from your desk.
Notification scope and granularity
SharePoint provides flexibility in how broadly or narrowly you set up your alerts:
- Item-level notifications: Monitor changes to specific documents or list items that are particularly important to your work.
- Library/list-level notifications: Receive alerts about any changes within an entire document library or list, giving you broader oversight of collaborative activities.
Integration with Microsoft 365 ecosystem
SharePoint notifications seamlessly integrate with other Microsoft 365 services to create a comprehensive awareness system:
- Alerts can appear in Microsoft Teams channels when linked SharePoint content changes.
- Outlook integrates SharePoint notifications into your email workflow.
- Microsoft Viva Connections can surface important SharePoint alerts in your dashboard.
- Power Automate can extend SharePoint alerts into custom workflows and applications.
This interconnected notification system ensures that regardless of which Microsoft 365 tool you’re using, you’ll stay informed about important changes to your SharePoint content.
Recent updates to SharePoint alert system
The SharePoint notification system has evolved significantly in recent years, with several notable enhancements that provide users with more flexibility and control over their alerts. Here’s a summary of the most recent updates:
Introduction of rules in Microsoft Lists
One of the most significant updates to SharePoint notifications in recent years was the introduction of Rules in Microsoft Lists (2020-2021). This feature provides a simplified way to create notification rules through an intuitive interface:
- User-friendly rule creation: The Rules feature allows users to create notifications using simple “if/then” conditions without requiring technical knowledge.
- Column-level granularity: Unlike traditional SharePoint alerts, which notify users about any change in a file or list item, Rules in Microsoft Lists allow notifications to be triggered only when specific column values change. This provides more precise control over what events generate alerts.
- Specific value conditions: Users can set rules to trigger notifications when a column changes to a specific value (such as when a status field changes to “Completed”).
- Multiple trigger types: Rules can be configured for various events including when a column changes, when a column value changes to something specific, when a new item is created, or when an item is deleted.
Microsoft Lists forms updates
As of March 2025, Microsoft has enhanced Microsoft Lists forms with features that complement the notification system:
- Form notifications: Microsoft Lists forms now support notifications tied to form submissions and updates. While this does not change the SharePoint alert system directly, it enhances how users receive updates about list changes.
- Conditional branching: This feature enables more sophisticated logic in how forms collect information, which indirectly affects what can trigger notifications.
- Form scheduling: Users can now schedule when forms are available, which coordinates with notification timing.
Enhanced integration with Microsoft 365 Copilot
Microsoft 365 Copilot Chat has received security enhancements such as SafeLinks Integration and URL reputation checks, which enhance security when interacting with links in Microsoft 365. While these do not directly impact SharePoint alerts, they improve security when accessing links shared through Microsoft 365 notifications.
- SafeLinks integration: All URLs in Copilot Chat responses are now protected with SafeLinks technology, extending to notification content.
- URL reputation checks: Even for users without SafeLinks, basic URL reputation checks are performed at the time of clicking links in notifications.
Technical limitations and considerations
When using the SharePoint alert system, be aware of these current limitations:
- There is a limit of up to 50 immediate alert emails per subscribed email address per minute across all lists and libraries.
- Daily alert emails will include up to 25 activities on a maximum of 50 items per list or library.
- When using Rules in Microsoft Lists, users can create a maximum of 15 rules per list.
- Not all column types are supported for Rules, notably multi-line text columns, currency, lookup columns, and calculated columns.
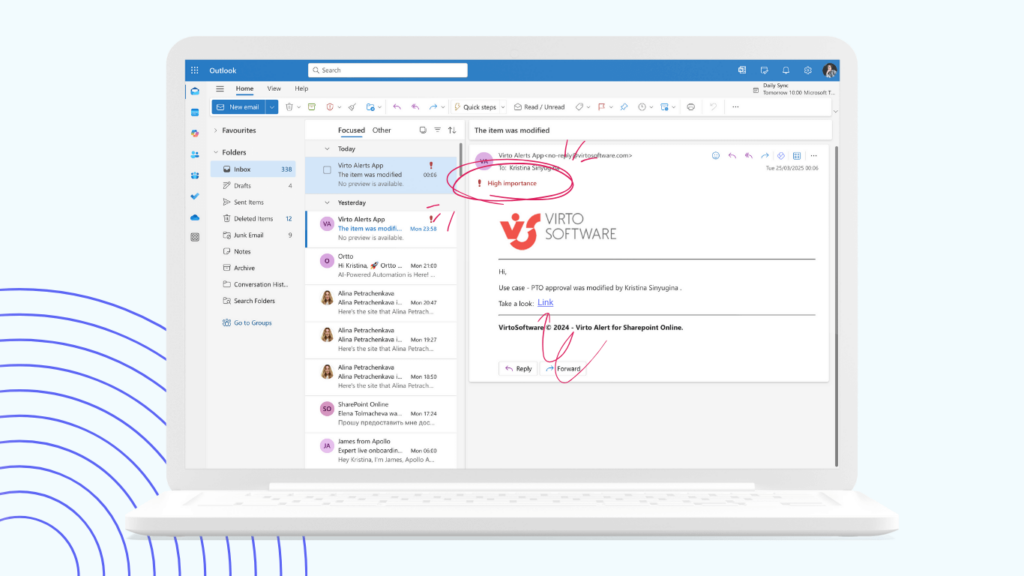
- Notification emails from SharePoint workflows and alerts are sent from no-reply@sharepointonline.com with a display name of “SharePoint Online.”
The evolution of SharePoint’s notification system reflects Microsoft’s commitment to enhancing collaboration and information awareness across the Microsoft 365 ecosystem.
How Do I Set Up Notifications in SharePoint?
In this section, we’ll walk through the process of setting up basic alerts, configuring notifications for other users, customizing alerts for lists and libraries, and exploring various notification delivery methods. By the end of this section, you’ll understand how to create a tailored notification strategy that keeps your team informed of important changes while avoiding alert fatigue.
👉Where to find SharePoint notification settings? SharePoint notification settings can be found by navigating to the list or library you want to monitor, clicking the ellipsis (…) in the command bar, and selecting “Alert me” to configure notification preferences.
Setting up alerts and notifications
SharePoint offers several ways to configure notifications that keep you and your team informed about changes to your content. Here’s how to set up different types of alerts:
Setting up basic alerts
- Navigate to the list or library where you want to set up alerts
- Select the specific item or folder for which you want notifications (or leave all items unselected for library-wide alerts)
- Click the ellipsis (…) at the top of the page and select Alert Me
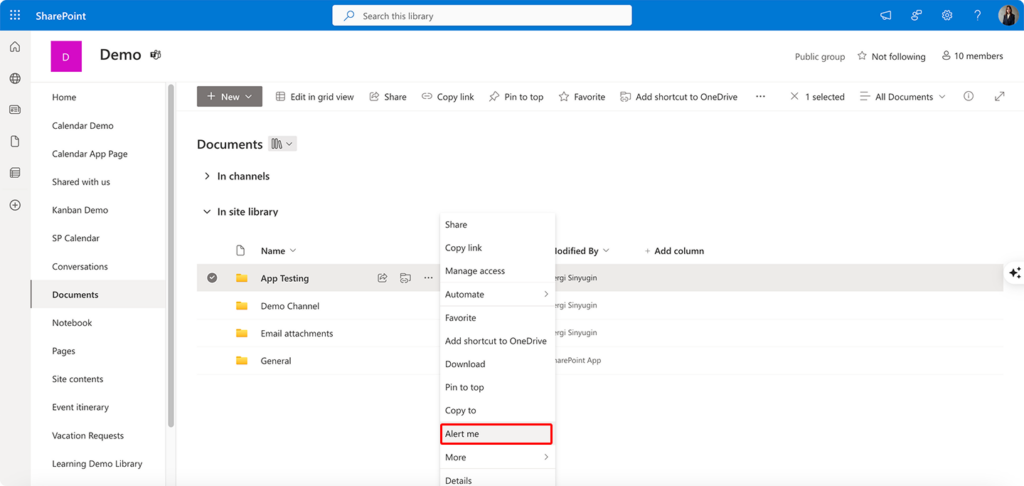
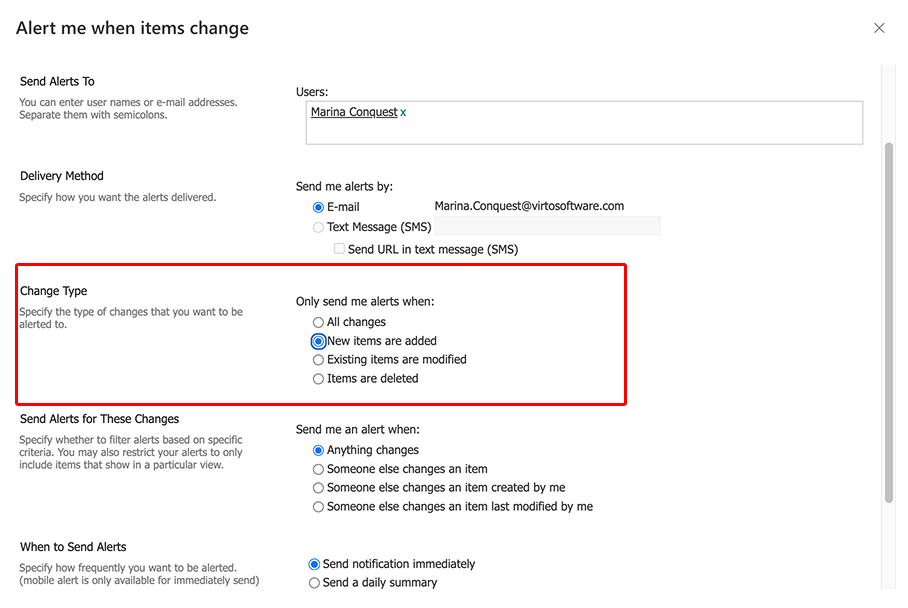
- Configure your alert settings:
- Alert Title: Enter a descriptive name for this alert
- Send Alerts To: Verify your email address or add others (if you have permissions)
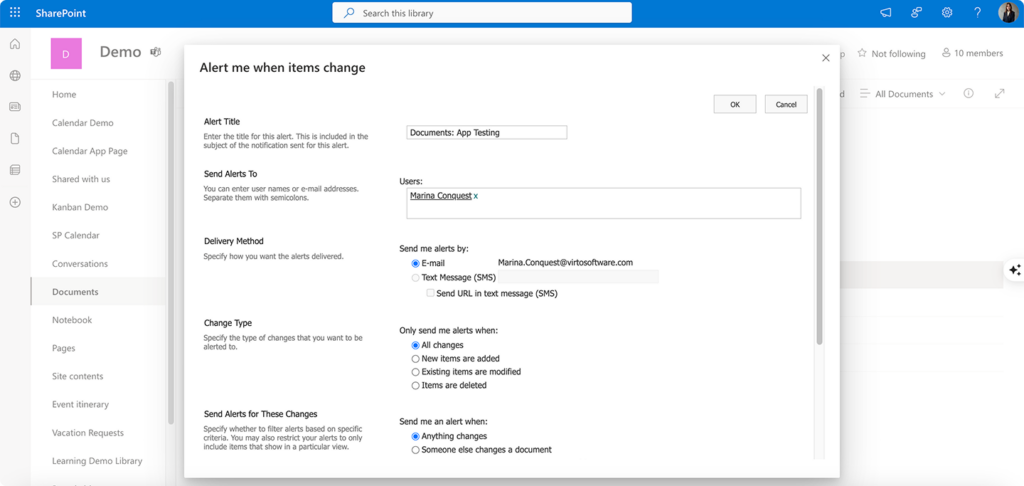
- Delivery Method: Choose Email (default option)
- Change Type: Select which changes trigger the alert (New items, All changes, etc.)
- Alert Frequency: Choose when to receive alerts (Immediately, Daily summary, Weekly summary)
- Additional Options: Filter for specific conditions if needed
- Click OK to save your alert settings
For document libraries, you can also select a specific document before clicking “Alert Me” to get notifications only for that document.
👉What is SharePoint Alert Me? Alert Me SharePoint is a built-in feature that allows users to subscribe to notifications about changes in SharePoint content, with options to customize alert frequency, delivery method, and which specific changes trigger alerts. It serves as the primary notification mechanism in SharePoint, enabling users to stay informed about document updates, list modifications, or other site changes.
Setting up notifications for different scenarios
For changes to an entire list or library:
- Navigate to the list or library
- Ensure no items are selected
- Click the ellipsis (…) menu
- Select “Alert Me” → “Set alert on this list/library”
- Configure settings to receive alerts for all items
For new files added to a document library:
- Navigate to the document library
- Click the ellipsis (…) menu
- Select “Alert Me” → “Set alert on this library”
- Under “Change Type,” select “New items are added”
- Choose your preferred alert frequency
For changes to a specific folder:
- Navigate to the document library
- Select the folder by clicking its checkbox
- Click the ellipsis (…) menu
- Select “Alert Me” → “Set alert on this folder”
- Configure your preferred settings
Can you set up alerts on SharePoint?
Yes, SharePoint provides robust alert functionality built into the platform. Users with at least Read permissions can set up alerts for themselves, while those with higher permissions can set up alerts for others. Alerts can be configured for entire lists/libraries, specific folders, or individual items.
How to set alerts in SharePoint for other users?
To set up alerts for other users (requires appropriate permissions):
- Navigate to the list or library where you want to set up the alert
- Click the ellipsis (…) menu and select “Alert Me”
- In the “Send Alerts To” field, enter the email addresses of users who should receive alerts
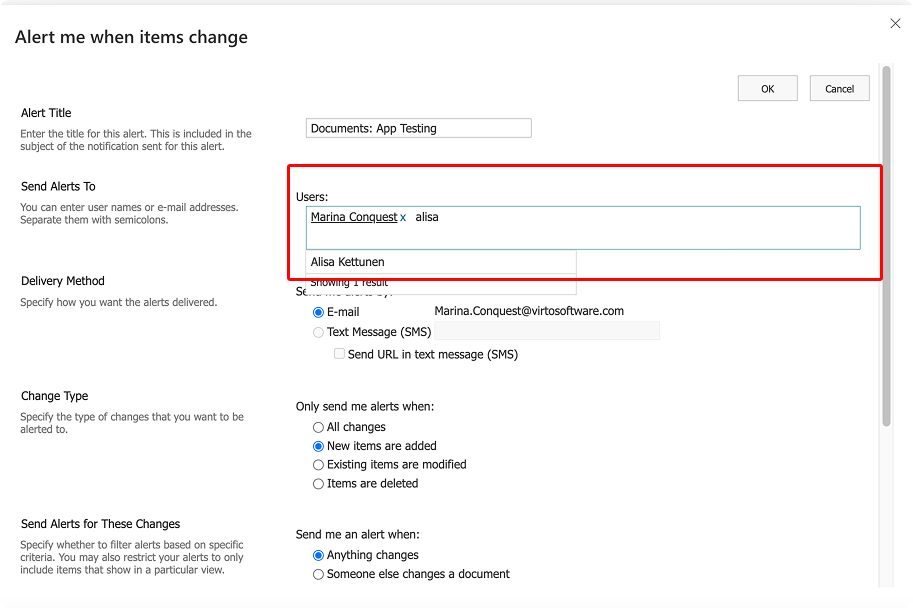
- Separate multiple email addresses with semicolons
- For distribution lists, enter the email address of the list
- Configure the alert settings as desired
- Click OK to save
Note that you need at least Edit permissions to set up alerts for other users. For site-wide management of alerts, site owners can use the following method (available in Classic SharePoint):
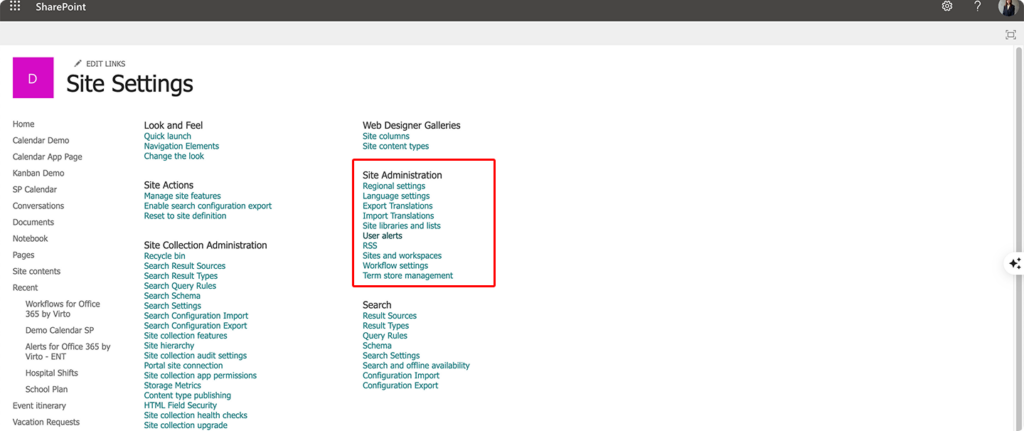
- Go to Site Settings
- Under “Site Administration,” select “User Alerts”
- Choose the user from the dropdown and click “Update”
- You can view, manage, or delete that user’s existing alerts
For site-wide alert management on modern sites, SharePoint does not provide direct access to User Alerts. However, site owners can SharePoint manage alerts using Power Automate or Microsoft 365 Admin Center in certain cases:
- Power Automate:
- Use Power Automate (formerly Flow) to create custom notifications and manage alerts dynamically.
- This is useful when you need more control over who receives notifications and under what conditions.
- Microsoft 365 Admin Center (for global admins)
- Admins can review and manage email alerts sent from SharePoint via Microsoft 365 Security & Compliance Center.
- This is useful for troubleshooting when users report missing alerts.
Alerts can be delivered via email or, for SharePoint Server with proper configuration, as SMS text messages.
How do I send alerts to users in SharePoint?
SharePoint sends alerts automatically once they’re configured. The system handles the delivery based on the trigger conditions and frequency you’ve set up. To ensure users receive alerts:
- Make sure users have appropriate permissions to the content
- Verify that email addresses are correct when setting up alerts
- Check that your organization’s email system isn’t blocking messages from SharePoint
- For immediate alerts, be aware that delivery might take up to 5 minutes
- For daily or weekly summaries, alerts are sent at the scheduled time if changes have occurred
How do I set up notifications for changes in a SharePoint list?
To set up notifications for a SharePoint list:
- Navigate to the list
- Click the ellipsis (…) menu and select “Alert Me”
- Configure your alert settings:
- For all changes: Under “Change Type,” select “All changes”
- For new items only: Select “New items are added”
- For item modifications: Select “Existing items are modified”
- For item deletions: Select “Items are deleted”
- Choose your preferred frequency
- Click OK to save
👉Where to find SharePoint notification emails? SharePoint notification emails typically arrive in your organization email inbox, with the default sender being “SharePoint Online” (from no-reply@sharepointonline.com). Check your junk or spam folders if you’re expecting notifications but not receiving them, as email filters sometimes incorrectly flag these system-generated messages.
Example: Setting up notifications for status changes in a project tasks list
- Navigate to your Project Tasks list
- Click the ellipsis (…) menu and select “Alert Me”
- Title the alert “Task Status Changes”
- Under “Change Type,” select “Existing items are modified”
- Select “Immediately” for time-sensitive alerts
- Under “Send me an alert when,” you can further refine to only alert for specific columns
- Click OK to save the alert
Alternatively, you can use the newer Rules feature in Microsoft Lists:
- Navigate to your list
- Click “Automate” in the command bar
- Select “Rules” → “Create a rule”
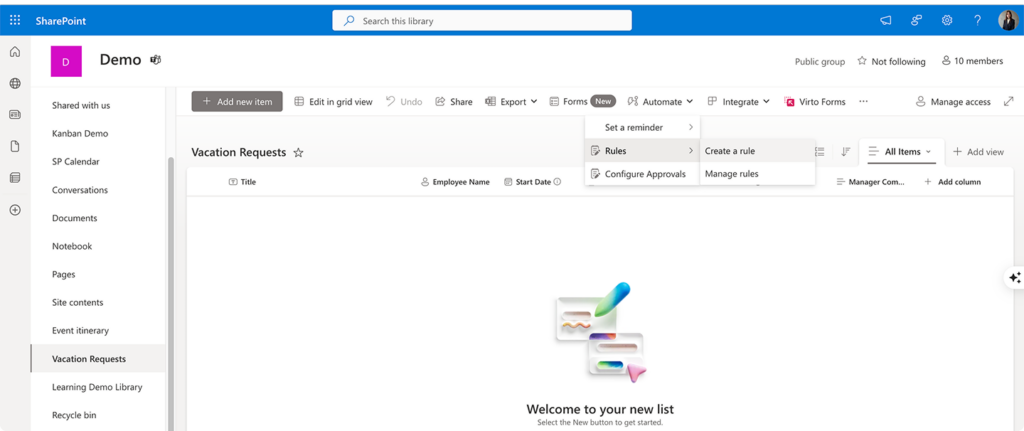
- Under “Notify someone when,” select “A column value changes”
- Select each underlined portion of the rule statement to customize it:
- Choose the specific column (e.g., “Status”)
- Set the condition (e.g., “is equal to” → “Completed”)
- For “Enter a name or email address,” select who should be notified (you can specify individual users but not group email addresses)
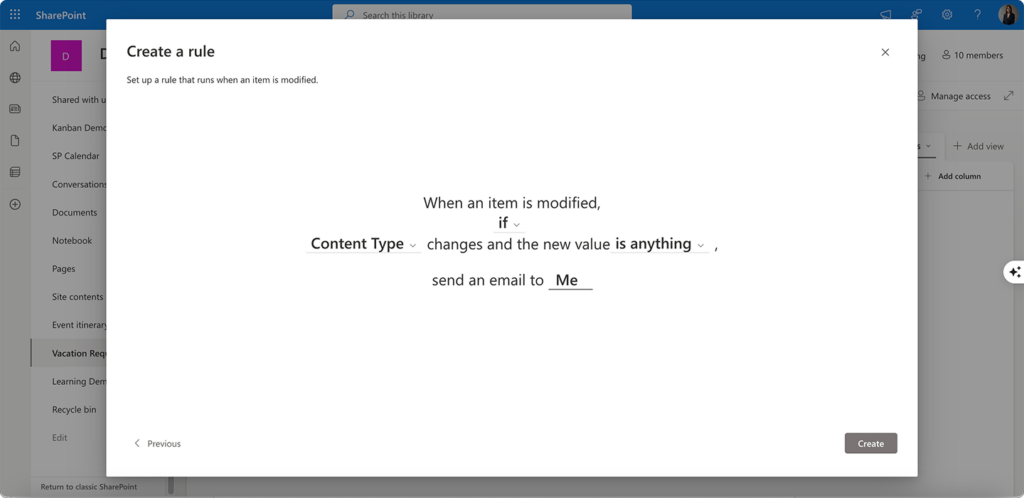
- When you’ve finished customizing the statement, select “Create”
Your rule will appear on the Manage rules page and will be automatically turned on. Notification emails will be sent from no-reply@sharepointonline.com. You can return to the Manage rules page anytime to edit, delete, or otherwise manage your rules.
How do I change the notification settings in SharePoint?
To modify existing notification settings:
- Navigate to the list or library where you set up the alert
- Click the ellipsis (…) menu
- Select “Alert Me” → “Manage My Alerts”
- Find the alert you want to change
- Click on its name to edit the settings
- Make your changes and click OK to save
Alternatively, to manage all your alerts:
- Go to the SharePoint site where you set up alerts.
- Click the gear icon (⚙) in the top-right corner and select “Site information” → “View all site settings”.
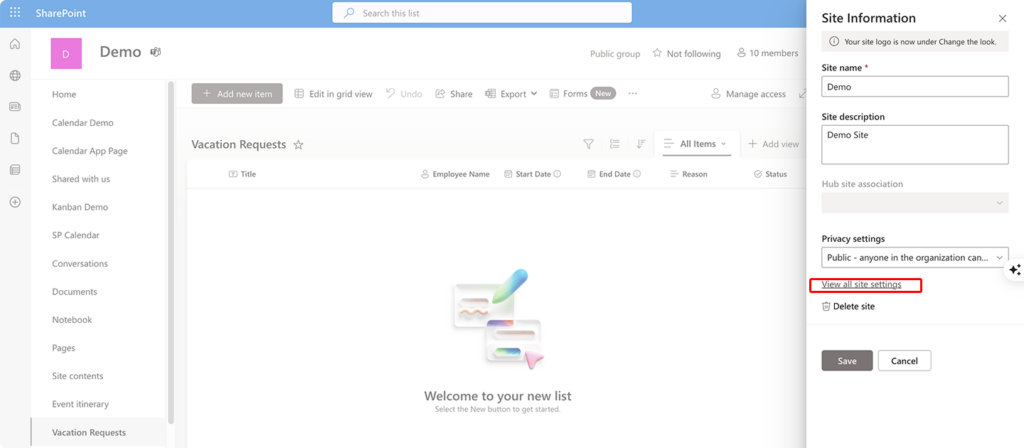
- Under “Site Administration,” click “My Alerts”.
- You’ll see a list of alerts you’ve set up for this site.
- Click on any alert to edit or delete it.
How do I set up SharePoint email notifications?
Email is the primary notification method in SharePoint Online:
- Navigate to the content you want to monitor
- Click the ellipsis (…) menu and select “Alert Me”
- Enter email recipients in the “Send Alerts To” field
- Configure other settings as needed
- Click OK to save
SharePoint Online sends email notifications from no-reply@sharepointonline.com with a display name of “SharePoint Online.” These emails contain:
- The title of the alert
- A link to the changed content
- Details about what changed
- Who made the change
- When the change occurred
For SharePoint Server on-premises, administrators need to configure outgoing email settings in Central Administration before email alerts will work properly.
Can SharePoint do push notifications?
Yes, SharePoint can send push notifications, but this functionality works differently than email alerts:
- Mobile app notifications: The SharePoint mobile app can send push notifications to your device when content changes. Users need to install the SharePoint mobile app and enable notifications in their device settings.
- Browser notifications: SharePoint does not natively support web push notifications. However, you can enable notifications via Microsoft Teams integration or Power Automate-based workflows.
- Microsoft Teams integration: When SharePoint content is connected to a Teams channel, changes can trigger notifications in Teams.
- Power Automate integration: For more advanced push notification scenarios, you can use Power Automate to create flows that send custom push notifications through mobile apps or other channels.
To enable push notifications in the SharePoint mobile app:
- Download and install the SharePoint mobile app
- Sign in with your organizational account
- Follow sites or specific content
- Ensure notifications are enabled in your device settings
👉 Can SharePoint send notifications? SharePoint can indeed send notifications through its built-in Alert Me feature, which delivers updates about content changes via email and, in some configurations, SMS messages. The system supports notifications for various events including document uploads, edits, deletions, and approval status changes, allowing team members to stay informed about relevant content modifications without constantly checking SharePoint sites.
Customizing notifications in SharePoint
How do I change the style and content of notifications?
The standard SharePoint alert emails have a fixed format that cannot be changed within SharePoint. However, Power Automate allows you to create fully customized email templates, including HTML formatting and branding.
- Using Power Automate (recommended):
- Create a flow triggered by changes to SharePoint content
- Design a custom email template with your branding and specific content
- Configure conditional logic for sending different notifications based on data
- Steps to implement:
- Go to flow.microsoft.com and sign in
- Create a new automated flow
- Choose the SharePoint trigger “When an item is created or modified”
- Add an action “Send an email (V2)”
- Design your email with HTML formatting if desired
- Use dynamic content to include information about the changed item
- Using event receivers (for SharePoint Server):
- Develop custom event receivers to intercept changes
- Create and send customized notifications
- Requires developer skills and possible farm-level changes
- Using third-party notification apps:
- Several third-party solutions are available in the Microsoft AppSource (such as Virto Alerts & Reminder App)
- These often provide more customization options without coding
Example of customizing notifications for a business:
Scenario: A marketing department needs differentiated notifications for their campaign assets library
For managers (approval notifications):
- Create a Power Automate flow triggered when a document status changes to “Awaiting Approval”
- Design a custom email with:
- Company branding and logo
- Document title and link
- Requestor’s name and submission date
- A direct “Approve” button that links to the document
- Priority indicators based on campaign deadlines
- Send only to team managers
For content creators (feedback notifications):
- Create a separate flow triggered when comments are added to documents
- Include in the email:
- Document name and location
- The specific comment text
- Who provided the feedback
- A section showing all previous comments
- A direct link to open and edit the document
- Send to the document creator or assigned owner
For external stakeholders (limited information):
- Create a flow for when final assets are published
- Design a simplified email that includes:
- Final asset preview image
- Download link (with appropriate permissions)
- Campaign information
- Contact person details
- No internal workflow information or history
- Send to the external stakeholder distribution list
By leveraging Power Automate’s conditional logic, you can create different notification templates for different users based on their roles, the type of content that changed, or other business conditions. This approach gives you complete control over notification design and delivery while maintaining the benefits of SharePoint’s content management capabilities.
Managing Notifications and Alerts in SharePoint
Establishing your notification system is only the first step—maintaining it effectively is equally important. This section focuses on how to manage existing SharePoint Online alerts and modify your notification settings as your needs change. We’ll explore how to view all current alerts, edit their parameters, remove unnecessary notifications, and adjust delivery methods and frequencies.
While some of the following issues have already been covered in previous sections, reiterating them here is beneficial as they directly pertain to effective notification management.
How do I manage SharePoint alerts?
SharePoint provides several ways to view and manage your existing alerts. Here’s how to effectively maintain your notification system:
Viewing and managing your alerts
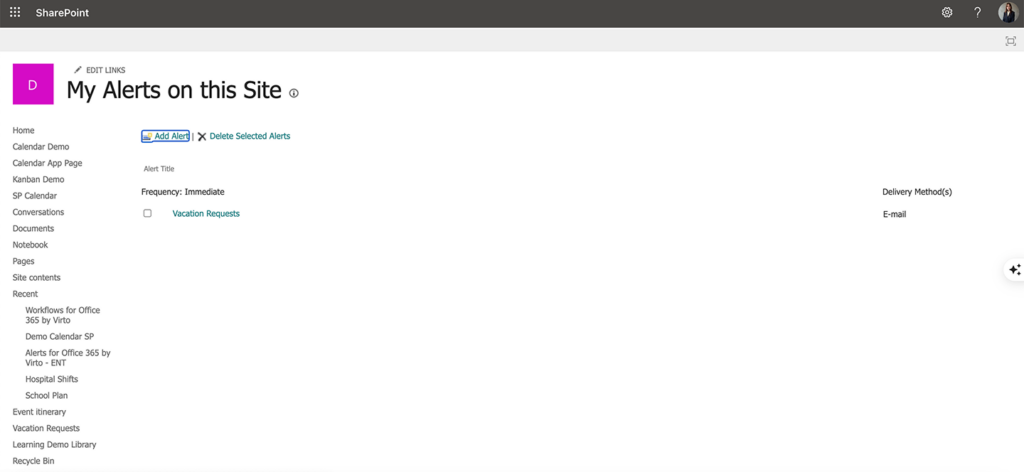
Method 1: From the list or library
- Navigate to the list or document library where you’ve set up alerts.
- Click the ellipsis (…) in the command bar.
- Select “Alert Me” → “Manage My Alerts”.
- You’ll see a page titled “My Alerts on this Site”, displaying all your alerts for that site.
Method 2: Through site settings (for site owners)
- Click the gear icon (⚙) in the top-right corner.
- Select “Site Settings”.
- Under “Site Administration,” click “User Alerts”.
- If you’re managing alerts for others:
- Select the user from the “Display alerts for” dropdown.
- Click “Update” to view that user’s alerts.
Both of these methods were discussed in earlier sections, so you can refer back to them for screenshots and additional details.
Editing existing alerts
To modify an existing alert:
- Navigate to the “My Alerts on this Site” page using any method above.
- Click on the alert title you want to modify.
- Make your desired changes to:
- Alert title
- Delivery method
- Alert frequency (Immediate, Daily, or Weekly)
- Types of changes that trigger the alert
- Filter conditions
- Click “OK” to save your changes.
Deleting unnecessary alerts
To remove alerts you no longer need:
- Navigate to the “My Alerts on this Site” page.
- Select the checkbox next to the alert(s) you want to delete.
- Click “Delete Selected Alerts”.
- Confirm by clicking “OK”.
For site owners managing others’ alerts:
- Go to “Site Settings” → “User Alerts”.
- Select the user whose alerts you want to manage.
- Check the boxes next to alerts to be deleted.
- Click “Delete Selected Alerts”.
- Confirm the deletion.
How do I change notification settings in SharePoint?
As your information needs evolve, you may need to adjust how you receive notifications. Here’s how to change various notification settings in SharePoint:
Changing alert frequency
To adjust how often you receive notifications:
- Navigate to the “My Alerts on this Site” page.
- Click on the alert you want to modify.
- Under “Send Alerts for These Changes,” set your preferred frequency:
- Immediately: Receive a separate email for each change as it happens.
- Daily summary: Receive one email per day summarizing all changes.
- Weekly summary: Receive one email per week summarizing all changes.
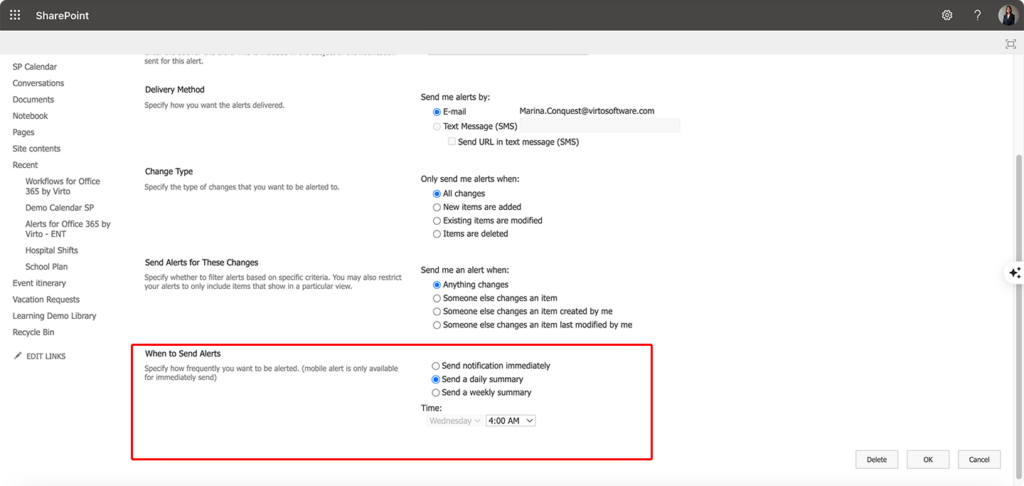
- For daily and weekly summaries, you can specify the day and time when you want to receive them.
Filtering which changes trigger notifications
You can refine which changes trigger alerts:
- Edit the alert as described above.
- Under “Send Alerts for These Changes,” select:
- All changes: Any modification triggers the alert.
- New items are added: Only notifies when new content is created.
- Existing items are modified: Only notifies when content is edited.
- Items are deleted: Only notifies when content is removed.
Enhancing notifications with Power Automate
For more customized notification options:
- Navigate to your list or library.
- Click “Integrate” → “Power Automate” → “Create a Flow”.
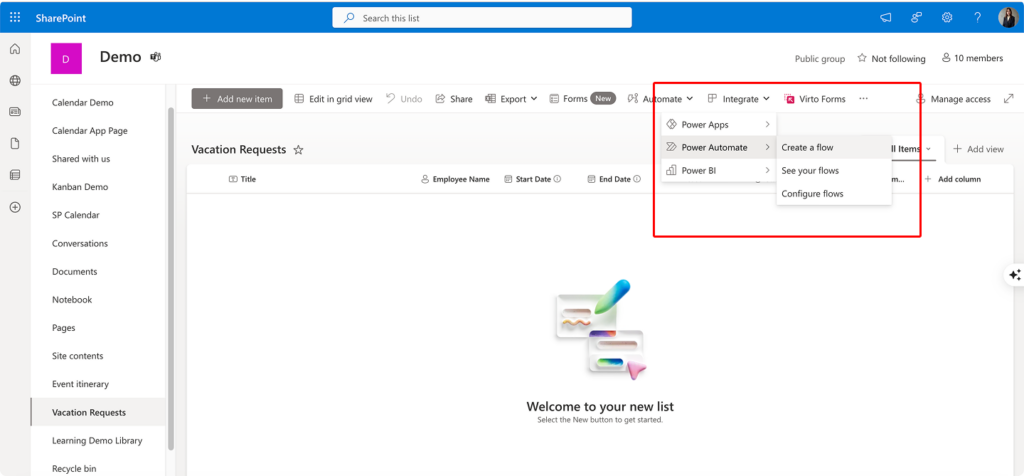
- Select a template or create a custom flow.
- Configure advanced delivery options such as:
- Push notifications to mobile devices.
- Microsoft Teams messages.
- Custom-formatted emails.
- Notifications to group email addresses.
- Integrations with third-party apps (e.g., Slack, Trello, etc.).
Best Practices for Alert Management
Effective management of SharePoint alerts can make the difference between a productive notification system and one that overwhelms users with unnecessary information. The following best practices will help you maintain an optimal alert environment that keeps users informed without causing notification fatigue.
Regular audit of your alerts
Just like cleaning out your email inbox or organizing your files, maintaining your alert system requires periodic review:
- Schedule a quarterly review of all alerts
Set aside time every three months to comprehensively review your notification system. During these audits, examine each alert’s purpose, frequency, and continued relevance. Create calendar reminders to ensure these reviews become a regular practice. For team environments, consider appointing an “alert administrator” who oversees this process and maintains documentation of the alert ecosystem.
- Remove redundant notifications that cover the same content
Duplicate alerts are a common source of notification overload. Look for situations where you receive multiple notifications for the same content—for example, an alert for a specific document plus an alert for the folder containing it, plus an alert for the entire library. Identify these overlapping notifications and keep only the most appropriate one. Pay special attention to alerts that may have been created by different team members on the same content.
- Update alert frequencies based on actual needs rather than perceived urgency
When first creating alerts, we often set them to “immediate” due to a perceived sense of urgency. During your audit, honestly assess how quickly you actually need each notification. Review your email records to see how quickly you typically act on different alerts. If you consistently don’t address certain “immediate” alerts until the next day, consider changing them to daily summaries instead. This realistic approach reduces interruptions while still meeting your actual workflow needs.
Consolidating alerts
Alert proliferation can quickly lead to notification overload. Rather than creating a separate alert for every item or scenario, strategic consolidation helps maintain awareness while reducing the volume of notifications.
- Consider consolidating multiple item-level alerts into a single library-level alert with a daily or weekly summary
Instead of creating separate alerts for dozens of individual documents, consider setting up a single alert for the entire library or folder. Configure it as a daily or weekly summary to receive one comprehensive email rather than multiple notifications. This approach is particularly effective for monitoring general activity across a workspace without needing to track each item individually. For example, rather than setting up alerts on each document in a project folder, create one alert for the project folder with a daily summary.
- Use more specific filter conditions rather than creating multiple similar alerts
SharePoint allows you to use filters to define very specific alert conditions. Instead of creating several separate alerts with slight variations, create a single alert with precise filter conditions. For example, rather than having three different alerts for documents modified by different departments, create one alert with conditions that filter for exactly the combination of changes and content types you need to monitor. This approach simplifies management while maintaining the same level of awareness.
Balancing urgency with productivity
Finding the right equilibrium between staying informed and maintaining focus is critical for productivity. Not all content changes deserve the same level of interruption in your workflow.
- Reserve “immediate” notifications for truly time-sensitive changes
Be selective about which alerts deserve real-time delivery. Reserve immediate notifications for situations where delayed awareness would cause significant problems—such as final approval documents, critical deadline updates, or security-sensitive content. For most other content, immediate alerts create unnecessary interruptions that fragment attention and reduce productivity. A good rule of thumb: if you wouldn’t interrupt a meeting for it, it probably doesn’t need an immediate alert.
- Use daily summaries for important but non-urgent updates
For content that requires regular attention but not instant awareness, configure daily summary alerts. These consolidate all relevant changes into a single email, typically delivered at the end of the workday or first thing in the morning. This approach allows you to process updates in batches at a convenient time rather than responding to scattered interruptions throughout the day. Daily summaries work particularly well for status updates, routine document edits, and ongoing project activities.
- Use weekly summaries for general awareness of less critical areas
For peripheral content or areas where you only need general awareness, configure weekly summary alerts. These provide a broad overview of activity without cluttering your inbox daily. Weekly summaries are ideal for reference libraries, archived projects, and cross-departmental resources that you monitor but don’t actively manage. This approach keeps you informed of major developments while minimizing low-priority notifications.
Documenting alert strategy
In collaborative environments, a systematic approach to alert management prevents confusion and duplication.
- For teams, document which alerts are set up and why
In team environments, create a shared document that catalogs all alerts set up on important content. Include details such as:
- Which content has alerts configured
- Who receives the notifications
- The frequency and trigger conditions
- The business purpose of each alert
- When it was last reviewed
This documentation helps prevent unnecessary duplication, ensures critical notifications aren’t accidentally deleted, and provides continuity when team members change roles. Store this document in a location accessible to the team, and review it during your quarterly alert audits.
- Create a shared understanding of notification protocols to prevent alert overload
Establish team guidelines for which types of content changes warrant different notification frequencies. For example:
- Contract documents: Immediate alerts to designated approvers
- Project timelines: Daily summaries to the project team
- Reference materials: Weekly summaries to stakeholders
By creating these shared protocols, you prevent alert sprawl and ensure consistent application of notification practices across your teams. Document these protocols in your team’s SharePoint governance plan or communication guidelines. Consider creating alert templates that team members can use as starting points for common scenarios.
Seasonal adjustments
Business activities naturally fluctuate throughout the year, and your alert strategy should adapt accordingly. Rather than maintaining a static notification system, consider the cyclical nature of your work and adjust your alerts to match changing priorities and activity levels.
- Temporarily increase alert frequency during critical project phases
During high-stakes periods—such as product launches, financial close periods, or major deadlines—temporarily adjust alert frequencies to provide more immediate awareness. For example, change a weekly summary to a daily one, or upgrade a daily summary to immediate notifications for the duration of the critical phase. Create a reminder to reset these frequencies once the intensive period concludes, preventing temporary urgency from becoming permanent notification overload.
- Reduce alert frequency during vacation periods or low-activity times
Conversely, during predictable low-activity periods like holidays or organizational downtime, consider reducing alert frequencies. This prevents your inbox from filling with non-urgent notifications during your absence, making it easier to identify truly important items upon your return. For planned vacations, consider temporarily redirecting critical alerts to a delegate, while pausing or reducing the frequency of less crucial notifications.
Summary of best practices: Implementing an adaptive alert system
The most effective alert management strategy is one that evolves with your changing needs. By applying these best practices and regularly refining your approach, you can create a notification system that provides valuable awareness without overwhelming users with unnecessary interruptions. Remember that the goal of alerts is to enhance productivity—when they begin to hinder it instead, it’s time to adjust your strategy.
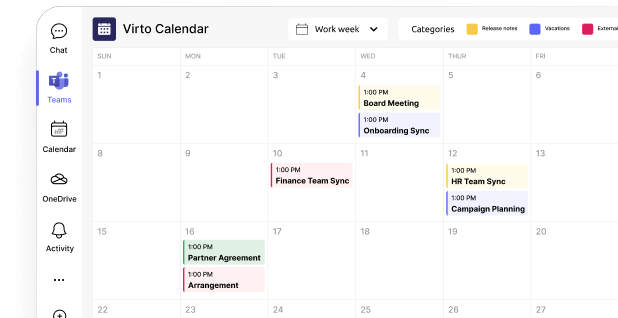
Check out our calendar use cases
Why Am I Not Getting SharePoint Notifications?: Common Issues with Notifications in SharePoint
Even well-configured alert systems can encounter obstacles that prevent notifications from reaching their intended recipients. Understanding these common pitfalls and their solutions helps troubleshoot notification failures quickly, ensuring your information flow remains uninterrupted. Below are the most frequent notification issues SharePoint users encounter and practical approaches to resolve them:
Why am I not receiving notifications in SharePoint?
- Email filtering: Your organization’s spam filters or email rules may be redirecting SharePoint notifications to junk folders or automatically deleting them.
- Incorrect email address: Your user profile may contain an outdated or mistyped email address, preventing notifications from reaching you.
- Permission limitations:
- You lack sufficient permissions to receive alerts for certain content.
- If the content permissions were changed after the alert was set up, notifications may no longer be sent.
- Alert threshold exceeded:
- SharePoint Online does not impose strict user alert limits, but excessive alerts may be subject to tenant policies or throttling.
- SharePoint Server (on-premises) administrators can configure alert limits to optimize system performance.
- Mail server configuration issues:
- The outgoing mail server settings in SharePoint Server might be incorrectly configured, causing email delivery failures.
- Exchange Online users may need additional connector configurations for external notifications.
- Notification service not running (SharePoint Server Only):
- In SharePoint Server (on-premises), the SharePoint Timer Service is responsible for processing alerts.
- If the service is paused or stopped, alerts will not be sent.
- SharePoint Online does not use the SharePoint Timer Service; notifications are handled by Microsoft 365’s email infrastructure.
- Alert frequency mismatch: Your expectations don’t match the configured alert frequency (e.g., expecting immediate alerts when the alert is set to daily digest).
How to fix SharePoint notifications?
- Verify email delivery settings: Check your junk/spam folders and create rules to whitelist SharePoint notification addresses
- Update profile information: Ensure your email address is correct in your SharePoint and Microsoft 365 profiles
- Confirm permissions: Request appropriate access levels for content you need to monitor. If permissions were changed after setting up an alert, recreate the alert.
- Review alert limits: Work with SharePoint administrators to understand or adjust alert quotas if necessary
- Check server configurations:
- Ask your IT team to verify SMTP server settings and Exchange Online connector configurations.
- Ensure that external notifications are properly configured in Exchange Online.
- Restart notification services (On-Premises only): Administrators can restart the SharePoint Timer Service in SharePoint Server to clear processing backlogs.
- Recreate problematic alerts: Delete and recreate alerts that consistently fail to deliver notifications
- Test mail flow: Have administrators send test emails through the SharePoint mail configuration
📌 Special attention should be paid to mail server configuration and user permissions, as these are the two most common root causes of notification failures. If your organization uses Exchange Online, specific connector configurations may be required to ensure reliable delivery of SharePoint notifications to both internal and external recipients.
Enabling and Configuring Notifications in SharePoint Online
SharePoint Online brings distinct notification capabilities that leverage Microsoft’s cloud infrastructure. This section explores the key differences between notification systems in cloud and on-premises environments, followed by detailed configuration steps to help you implement effective alerts in SharePoint Online. Understanding these platform-specific features will enable you to maximize the notification potential within your specific SharePoint deployment.
Notifications in SharePoint Online vs. SharePoint On-Premise
SharePoint Online’s notification system offers several advantages over its on-premises counterpart:
- Delivery reliability: Uses Microsoft’s cloud infrastructure, eliminating the need for manual mail server setup.
- Mobile integration: Works with the SharePoint mobile app and Microsoft Teams for real-time notifications.
- Service-level guarantees: Microsoft maintains uptime and reliability, reducing IT overhead.
- Modern experience enhancements: Includes News post notifications and Microsoft 365 Group alerts.
- Microsoft Graph integration: Enables advanced cross-application notifications.
- Automation potential: Integrates with Power Automate for custom workflows.
On-premises SharePoint still offers core notification functionality but requires more administrative overhead, including:
- Manual SMTP server configuration and maintenance
- More complex external delivery setups
- No integration with Power Automate or Microsoft Graph
- Limited mobile notification options without custom development
How to configure notifications in SharePoint Online?
Setting up notifications in SharePoint Online follows these steps:
As already discussed above, for list or library alerts:
- Navigate to the SharePoint list or library you want to monitor
- Click the ellipsis (⋯) in the command bar, then select “Alert me”
- In the “New Alert” dialog:
- Enter a descriptive alert name
- Specify which users should receive the alert
- Select the event types that should trigger the alert (additions, modifications, deletions)
- Choose your preferred delivery method (email)
- Set the notification frequency (immediate, daily, or weekly)
- Add any filtering criteria to limit notifications to specific items
- Click “OK” to save and activate the alert
For News post notifications:
- Navigate to the SharePoint site where news is published
- Click “Following” (⭐) to receive site-wide updates.
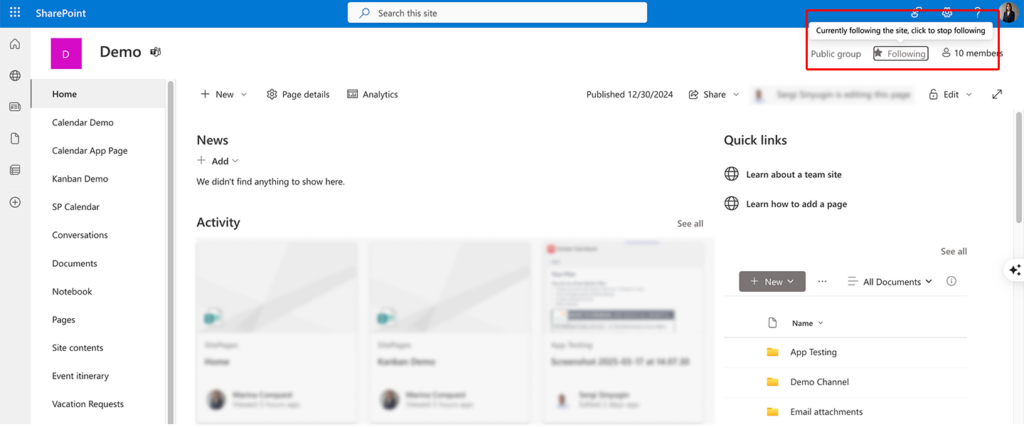
- Enable notifications in the SharePoint mobile app for news alerts.
- Use Power Automate to create a workflow that sends custom notifications when a new news post is published.
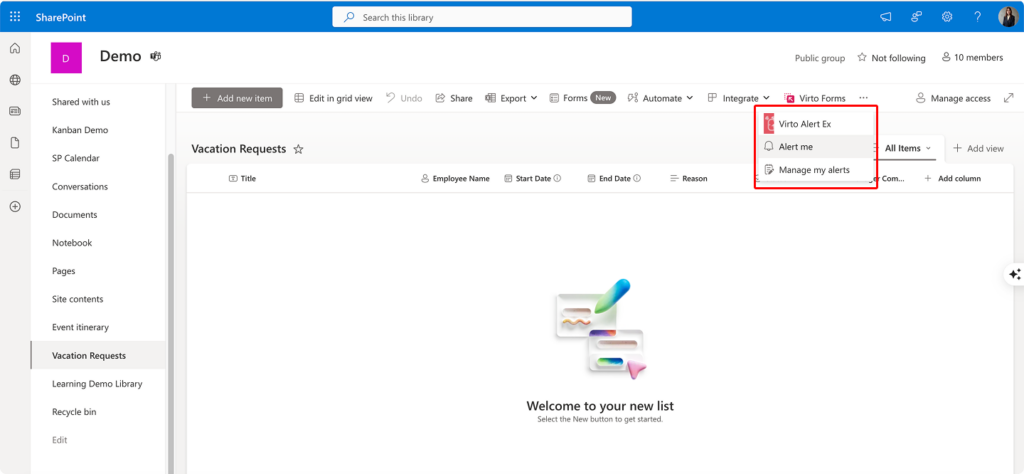
How to Enhance Notifications with Virto Alerts & Reminder App for SharePoint Online and Virto Notifications & Alerts Web Part for SharePoint On-Premise
While native SharePoint notification capabilities provide basic alerting functions, organizations with complex information management needs often require more sophisticated and customizable communication tools. This section explores how third-party solutions from VirtoSoftware can significantly enhance your SharePoint notification strategy, whether you’re using SharePoint Online in the cloud or maintaining an on-premises SharePoint environment. We’ll examine the expanded functionality these specialized tools offer and how they address common limitations in the standard SharePoint notification system.
Understanding VirtoSoftware notification solutions
Virto Alerts & Reminder App for SharePoint Online is a Microsoft 365-compatible application designed to enhance notification capabilities within cloud-based SharePoint environments. This solution integrates directly with SharePoint Online, Microsoft Teams, and Outlook to create a comprehensive notification ecosystem that reaches users where they work. The app supports up to unlimited alerts (depending on licensing tier) and offers sophisticated scheduling and templating options for organizations requiring precise control over their notification strategy.
Virto Notifications & Alerts Web Part for SharePoint On-Premise delivers similar functionality for organizations running SharePoint Server 2016, 2019, or SharePoint Server Subscription Edition. This solution is deployed as a SharePoint web part directly into on-premises environments, offering enhanced notification capabilities without migrating to the cloud. The web part provides flexible alert creation, reminder customization, and notification merging capabilities specifically optimized for on-premises SharePoint infrastructure.
Overcoming native SharePoint notification limitations
Standard SharePoint notifications, while useful for basic alerting, present several limitations for organizations with mature information management requirements:
- Limited customization options: Native alerts provide minimal control over message content, formatting, and delivery timing
- Rigid scheduling: Out-of-the-box alerts offer only immediate, daily, or weekly delivery options without support for custom schedules
- Minimal filtering capabilities: Standard alerts lack sophisticated conditional logic to determine when notifications should be triggered
- No aggregation functionality: Native alerts can’t consolidate multiple notifications into streamlined digests
- Channel restrictions: Default alerts rely primarily on email, with minimal integration into other communication channels
- No template support: Standard alerts can’t use reusable templates for consistent branding and messaging
Both Virto solutions address these limitations by providing an expanded notification framework that allows precise control over alert content, timing, delivery channels, and recipient targeting.
Key benefits of VirtoSoftware notification solutions
- Enhanced customization capabilities:
- HTML-based message templates with support for formatting, images, and dynamic content
- Conditional alert triggering based on specific field values or changes
- Variable delivery schedules including custom intervals and date-based timing
- Personalized content tailored to individual recipients
- Multi-channel communication:
- Email notifications with rich formatting and attachment support
- Microsoft Teams integration for in-channel alerts (Online version)
- SMS notification capabilities (On-Premise version)
- Clickatell integration for additional notification options (On-Premise version)
- Advanced management features:
- Notification consolidation to reduce alert fatigue
- Centralized alert management interface
- User-specific notification preferences
- Detailed alert history and tracking
- Business process enhancement:
- Automated reminders for approaching deadlines
- Scheduled notifications for recurring business events
- Escalation alerts for overdue items
- Integration with existing SharePoint workflows
By implementing VirtoSoftware notification solutions, organizations can transform SharePoint alerts from basic information delivery to sophisticated communication tools that enhance collaboration, ensure timely awareness, and support complex business processes, regardless of whether they’re operating in the cloud or on-premises.
Conclusion
Effective notification management forms the backbone of successful SharePoint collaboration. Throughout this article, we’ve explored both the native SharePoint notification capabilities and enhanced third-party solutions that address the platform’s inherent limitations. Properly configured alerts ensure that team members remain informed of critical changes, deadlines are met, and no important updates fall through the cracks.
While SharePoint’s built-in notification system provides foundational alerting functionality, organizations with sophisticated information management needs often require more advanced capabilities. The VirtoSoftware solutions—Alerts & Reminder App for SharePoint Online and Notifications & Alerts Web Part for SharePoint On-Premise—significantly extend these capabilities by offering enhanced customization, multi-channel delivery, conditional logic, and visual enhancements that transform simple notifications into powerful communication tools.
We encourage you to experience the enhanced notification capabilities firsthand by downloading our free trial versions or scheduling a personalized demonstration:
- Schedule a quick demo
- Install a free trial version of the Virto Alerts & Reminder App for SharePoint Online
- Install a free trial version of the Virto Notifications & Alerts Web Part for SharePoint On-Premise
For organizations considering how to optimize their SharePoint notification strategy, we recommend:
- First understanding your notification requirements by documenting which processes require alerts and why
- Implementing seasonal adjustments to alert frequency based on project phases and business cycles
- Addressing common notification issues through proper configuration and troubleshooting
- Considering enhanced solutions like VirtoSoftware when native capabilities prove insufficient for your needs
By thoughtfully implementing a comprehensive notification strategy, organizations can ensure that the right information reaches the right people at the right time—ultimately improving collaboration, reducing response times, and enhancing overall productivity within your SharePoint environment.
We also encourage you to browse through additional resources to learn more about SharePoint and SharePoint notification system in particular:
Official Microsoft documentation:
- Create an alert to get notified when a file or folder changes in SharePoint
- Manage, view, or delete SharePoint alerts
- Turn notifications on for list and list item changes
- Manage all data alerts on a SharePoint site in Data Alert Manager
VirtoSoftware resources: