How to Upload Multiple Files with SharePoint Uploader from VirtoSoftware?
Multiple file upload to SharePoint is a common issue that puzzles either SharePoint version users. We come across lots of claims on SharePoint upload for multiple documents is not working.
Bulk upload to SharePoint is a frequently encountered issue for users across different SharePoint versions. This article will discuss common challenges in using SharePoint Uploader and potential solutions to ensure seamless bulk upload SharePoint experiences.
Using SharePoint Uploader Requires Administrator Support
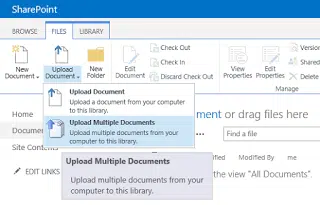
You can use a Windows Explorer view to upload multiple files and copy-paste items. Alternatively, the ‘Upload Multiple Documents’ button on the ribbon can be used. However, administrator permissions are necessary for bulk upload to SharePoint. Library restrictions may limit the number of files uploaded or block certain file types for security reasons.


In some instances, even with full permissions, the option for SharePoint multiple file upload might be unavailable under the files tab, and the ‘Upload Multiple Documents’ button may appear disabled and grayed out. In such cases, several factors need to be examined to troubleshoot the SharePoint Uploader.
Compatibility Issues with SharePoint Uploader
Although the multiple documents upload option works well on Internet Explorer 11 for many systems, it may not be consistently supported on the 64-bit version. This feature primarily functions on Internet Explorer (32-bit) and only on Windows. To ensure proper operation of the SharePoint uploader using Windows Explorer, the SharePoint site must be added to the trusted zone of Internet Explorer. Reinstalling the browser and switching back to the 32-bit version may resolve the issue and enable bulk upload SharePoint functionality.
Drag-and-Drop Functionality in SharePoint Uploader
Drag-and-drop functionality can be employed for bulk upload to SharePoint, but metadata may be lost during the process. Manually moving folders can be time-consuming, particularly when performing a SharePoint bulk upload while preserving metadata. In such cases, manual metadata enrichment for all documents is necessary.
Single File Upload in SharePoint
Three methods for uploading a single file to SharePoint using the basic SharePoint uploader are provided below:
Method one
The first one is through the “Upload” button: after logging in to your team site in SharePoint and going to the “Documents” field on the left side of the screen, you’ll see a number of buttons, like “New”, “Upload”, “Quick edit”, “Sync”, etc.
You need to click the “Upload” button, after that you’ll be presented with a pop-up window that lets you choose what file you want to upload. After selecting the file you can start the upload process with the “Open” button within that same pop-up window.
Method two
The second way to upload single files is a bit more complex. First, you’ll need to go to your Windows Explorer and find the file you want to upload there. The next step is to drag this file down to your internet browser’s icon so that the browser window comes to the front of your screen, and then you’ll need to drag that file you’re still holding to the part of your browser window titled “Documents”.
Keep in mind that a grey border would appear around that “Documents” area, and only dropping files within this border would begin the upload, the rest of the screen shouldn’t work that way. After dropping your file in that “grey area” you’ll see that the uploading process has begun.
Method three
Third way of uploading single files in SharePoint uploader is a bit more complex and begins with you copying your SharePoint Documents tab’s URL from your internet browser. Next you’ll have to open the file you want to upload from your Windows Explorer, be it an Excel, Word, PowerPoint or other file type.
Microsoft applications have a specific “Save As” tab that you’ll have to click to continue the process. To save the file directly to your SharePoint server through uploading you have to click “Browse” button and then paste the URL you copied earlier instead of a usual Windows file path (clicking on your file’s path in the upper part of the screen allows you to replace the traditional folder-based file path with your URL).
You’ll sometimes have to enter your credentials like login and password after pasting your URL and hitting “Enter”. The last step of this complicated process is to click the “Save” button in that same pop-up window and the upload will begin. You’ll see the file of your choosing in the process of uploading or already uploaded after you switch back to your SharePoint interface in your browser and refresh the “Documents” page.
That’s three different ways of uploading a single file in SharePoint Online/Office 365 using the basic SharePoint uploader.
VirtoSoftware designed two professional and supported solutions, which allowing you to do SharePoint multiple file upload in just a few clicks with setting metadata.

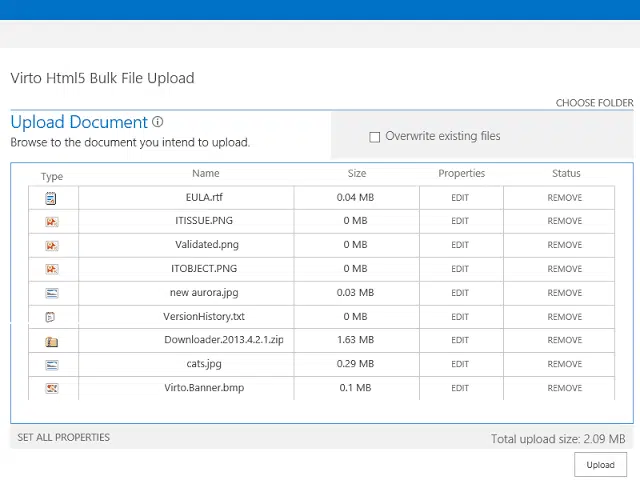
Virto SharePoint Bulk Upload web part based on Silverlight and works in SharePoint 2013, 2010 or 2007 and HTML 5 version of SharePoint Bulk Upload for SharePoint 2013 (this solution is completely written in HTML 5) allow you to perform SharePoint multiple file upload in a few seconds.
Key Features of Virto SharePoint Uploader:
- Add field descriptions.
- Overwrite option.
- Support for custom metadata.
- Display of file upload progress bar.
- Maximum file size and allowed file type settings.
- Upload of large files.
- Resize jpeg images during upload.
- The possibility to redirect all requests from the standard upload page to the Virto Bulk Upload.
- Support for Content Organizer rules.
- Current user defaults for property values.
- Partial uploading if operation is cancelled.
- Cross browser support for IE, Firefox, Chrome and Opera.
Both Virto SharePoint uploader tools offer a wide range of settings to help manage files during the upload process to SharePoint, facilitating bulk upload to SharePoint with ease.
With Virto SharePoint Bulk Upload, there is no need for troubleshooting or manually moving bulk files one by one. Users can now enjoy a quick and convenient bulk upload SharePoint experience with an intuitive user interface and without any issues.


