Microsoft Teams and Outlook calendars are deeply integrated into the workflow of many organizations, providing a centralized hub for scheduling meetings, managing tasks, and facilitating effective team collaboration. The smooth and reliable synchronization between these two platforms is essential for maintaining an up-to-date, unified view of one’s schedule across different applications.
However, many users encounter sync issues between their Microsoft Teams and Outlook calendars, leading to missed appointments, scheduling conflicts, and overall workflow disruptions. These problems can cascade throughout an organization, affecting not just individual productivity but team coordination and project timelines as well.
This article aims to shed light on the primary reasons why Microsoft Teams calendars may fail to sync with Outlook. We’ll explore common causes of these sync issues and provide step-by-step solutions to resolve them, ensuring your calendars remain in perfect harmony. Additionally, we’ll introduce Virto Calendar as an alternative solution that can help circumvent these synchronization challenges altogether, offering a more robust and reliable calendar management experience for your organization.
Root Causes of Teams Not Syncing with Outlook
Understanding the underlying reasons for sync problems between Microsoft Teams and Outlook calendars is the first step toward resolving them.
While users with a Microsoft 365 account should theoretically have their personal calendars in Outlook and Teams perfectly synchronized by default, the reality often falls short of expectations. Many users notice that syncing is not as smooth as it should be. This leads to common questions like ‘Why aren’t my meetings showing up in Teams?’ or ‘Why are my Outlook calendar events missing from my Teams schedule?’
The desire for seamless integration across these calendars makes resolving sync problems crucial for maintaining productivity and avoiding scheduling conflicts.
In this section, we’ll explore the main culprits behind these synchronization issues, shedding light on why your calendars might not be playing nicely together and setting the stage for effective troubleshooting.
Account and authorization issues
One of the most common reasons for sync failures stems from account-related problems. These can include:
- Incorrect account credentials: Using different Microsoft accounts in Outlook and Teams.
- Insufficient permissions: Lack of necessary access rights to shared calendars or resources.
- Organizational policies: Restrictions set by IT administrators that limit sync capabilities.
- Multiple accounts: Confusion when users have personal and work accounts on the same device.
👉 Why is Teams calendar not syncing with Outlook? As mentioned above, account and authorization issues are often the culprits behind syncing issues. Double-check that you’re logged in with the correct account and have the necessary permissions in both Microsoft Teams and Outlook.
Incorrect sync settings
Sometimes, the sync settings themselves may be the culprit. Here’s how to check and adjust these settings:
On PC:
- Open Outlook and go to File > Options > Calendar.
- Look for the “Microsoft Teams” section and ensure “Add online meeting to all meetings” is checked.
On Mobile:
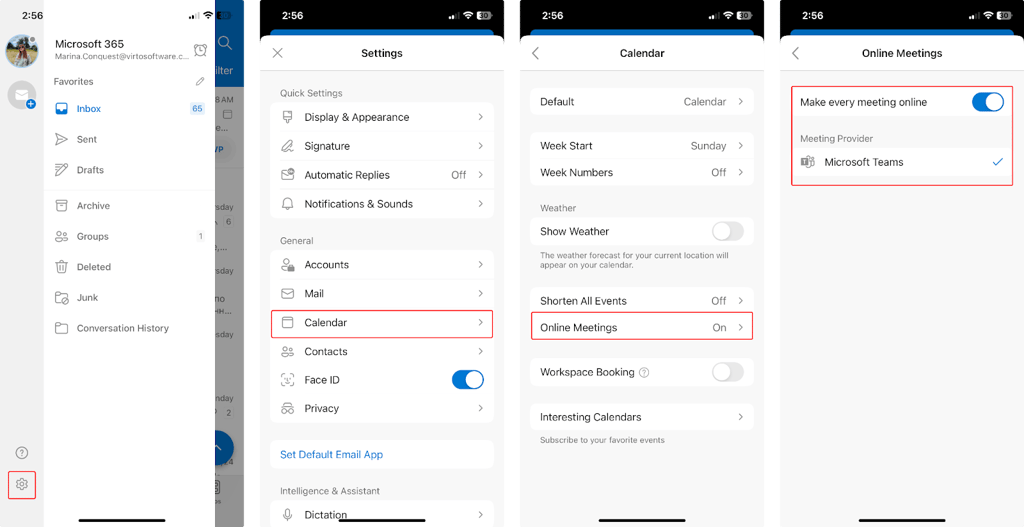
Pic. 1. Checking sync issues in the Outlook mobile app.
- Open the Outlook app on your mobile device.
- Tap your account icon or initials in the top left corner.
- Tap the gear icon (⚙️) to open Settings.
- Scroll down and tap on “Calendar”.
- Look for “Online Meetings” and then for “Default online meeting provider” and ensure it’s set to “Teams”.
Note that the exact steps and options may vary slightly depending on your device (iOS or Android) and the version of the Outlook app. If you don’t see these exact options, look for similar settings related to online meetings or Microsoft Teams integration within the Calendar or Events settings.
Regularly reviewing these settings, especially after updates or changes to your account, can prevent sync issues from occurring.
Technical reasons (version conflicts and software updates) for Teams and Outlook calendar not syncing
Several technical factors can disrupt calendar synchronization:
- Network connection issues: Intermittent or poor internet connectivity can interrupt sync processes.
- Outdated software: Using older versions of Microsoft Teams or Outlook may lead to compatibility issues.
- Conflicts with other applications: Third-party add-ins or security software might interfere with sync functions.
To ensure you’re running compatible versions:
- For Outlook:
- Go to File > Office Account > About Outlook.
- Note the version number and build.
- For Microsoft Teams:
- Click on your profile picture or at three dots near > About > Version.
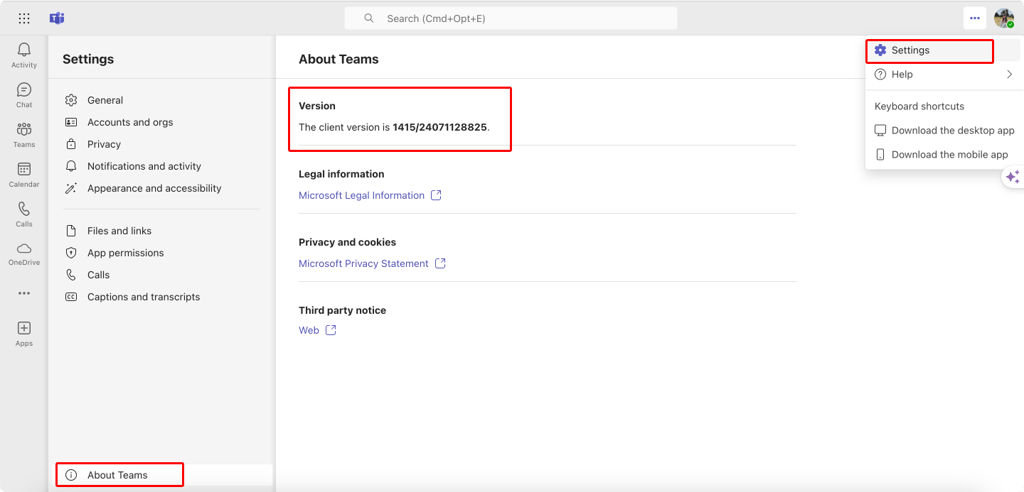
Pic. 2. Checking Microsoft Teams version.
Compare these versions with the latest releases on Microsoft’s official website. If you’re running outdated software:
- For Outlook: Use the Office 365 portal or Microsoft Store to update.
- For Microsoft Teams: The app usually updates automatically, but you can check for updates in the Microsoft Store or download the latest version from the Microsoft Teams website.
Keeping both applications up-to-date and ensuring a stable network connection can significantly reduce sync issues. If problems persist after addressing these common causes, it may be time to explore alternative solutions or seek support from your IT department.
Problems with Showing Teams Meetings in Outlook Calendar
In this section, we’ll dive deep into the common issues that prevent Microsoft Teams meetings from appearing in Outlook calendars and provide you with a comprehensive troubleshooting toolkit.
Why is my Teams meeting not showing in Outlook?
As discussed above, there are several key reasons why your Microsoft Teams meetings might not appear in your Outlook calendar:
- Calendar settings: Incorrect configuration in either Microsoft Teams or Outlook.
- Syncing issues: Problems with the synchronization process between the two platforms.
- Permissions: Lack of necessary access rights to view or edit calendar events.
- Account discrepancies: Using different accounts in Microsoft Teams and Outlook.
- Software glitches: Temporary bugs or conflicts in either application.
👉 Why is Teams meeting not showing in Outlook calendar? Often, it’s due to a combination of the above factors. The most common culprits are syncing delays, incorrect permissions, or mismatched account settings between Teams and Outlook.
Troubleshooting Outlook and Teams calendar not syncing issues
To ensure your Microsoft Teams meetings appear in your Outlook calendar, follow these steps across different platforms:
- Verify account consistency: Ensure you’re using the same Microsoft 365 account in both Microsoft Teams and Outlook.
- Check calendar permissions in Outlook:
For Outlook on Windows:
- Go to Calendar view.
- Click “Home” tab > “Calendar Permissions”.
- Ensure your account has “Owner” or at least “Editor” permissions.
For Outlook on the Web:
- Go to Calendar.
- Click the gear icon > Select “Calendar” > “Shared calendars”.
Now, depending on your organization’s setup, you might see different options:
- If you see your calendar listed under “Share your calendar,” you can click on it to view or modify sharing permissions.
- If you don’t see options to change permissions, it likely means that calendar sharing is managed by your organization’s IT department.
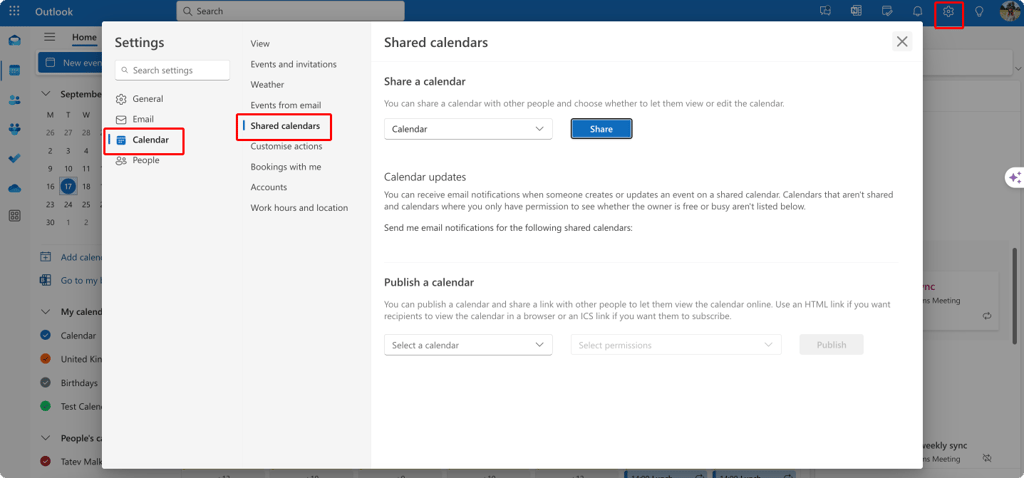
Pic. 3. Navigating to “Shared calendar” settings in Outlook on the web.
For Outlook on Mac:
- Go to Calendar view.
- Click “Tools” > “Accounts”.
- Select your account > “Advanced”.
- Ensure “Folder Permissions” are set correctly.
If you don’t have such settings, follow these steps:
- Right-click on your calendar and select “Sharing Permissions” where you can manage broader sharing settings for your calendar. You might see options to share your calendar with specific people or make it available to everyone in your organization.
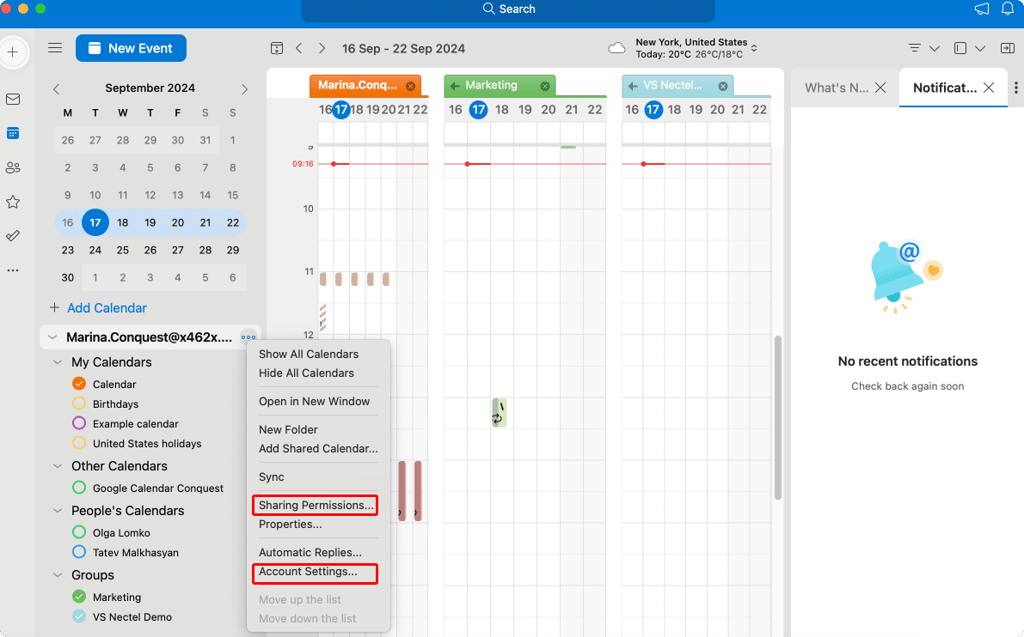
Pic. 4. Navigating to “Sharing Permissions” & “Account Settings” in Outlook for Mac.
- Right-click on your calendar and select “Accont Settings”. Here, in the “Delegation and Sharing” section, make sure your own account has full access (if listed) and verify that your calendar’s sharing settings align with your organization’s policies.
If you don’t see options to modify these settings, or if the changes don’t seem to take effect:
- Check with your IT department, as they may be managing these permissions at an organizational level.
- Ask them to confirm that your account has the necessary permissions to sync with Microsoft Teams.
For Outlook Mobile (iOS/Android):
- Tap your account icon > “Settings”.
- Select “Calendar” > “Default Calendar”.
- Ensure you have full access to this calendar.
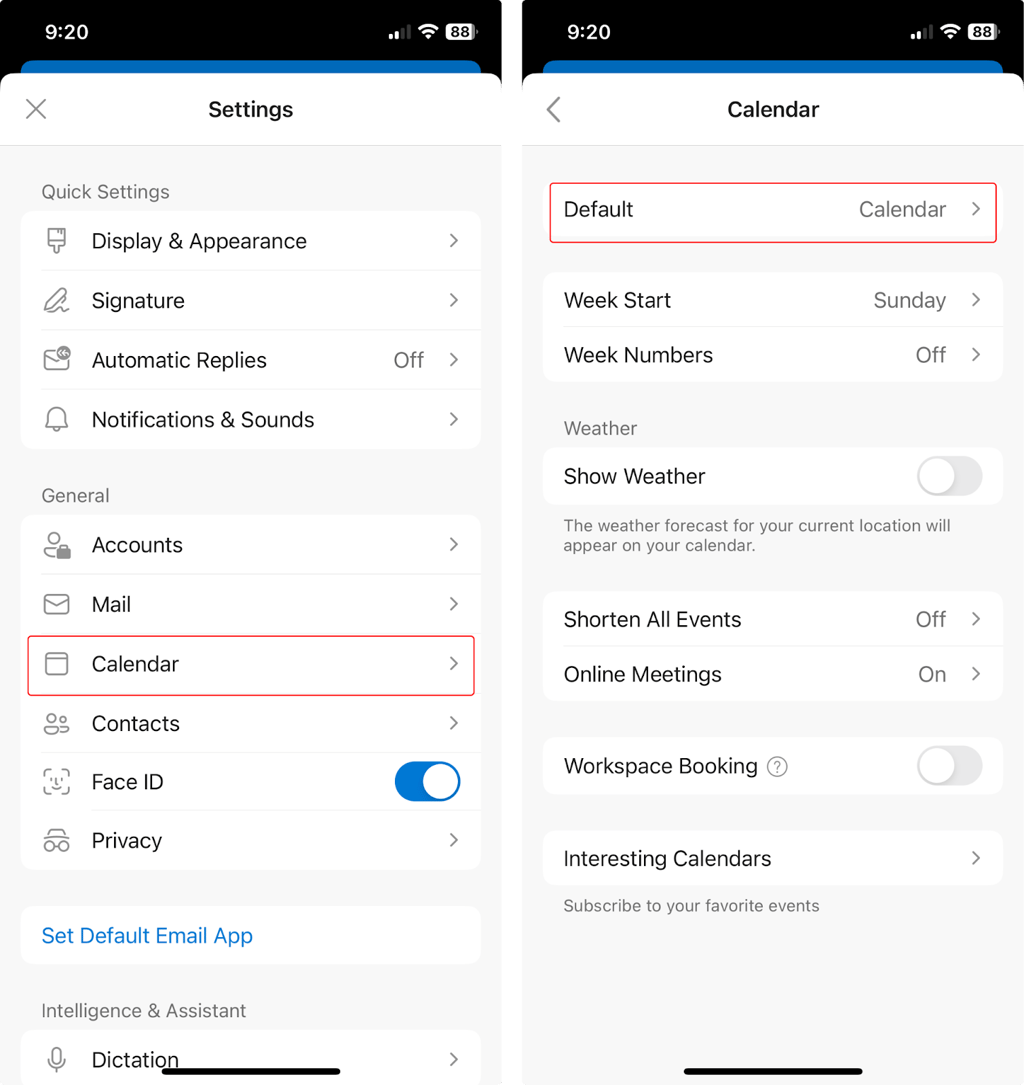
Pic. 5. Verifying the default calendar in Outlook for mobile.
- Verify Microsoft Teams calendar settings:
For Microsoft Teams Desktop and Web:
- Click on your profile picture > “Settings” > “Calendar”.
- Ensure “Sync Outlook calendar” is toggled on (if available).
For Microsoft Teams Mobile:
- Tap your profile picture > “Settings”.
- Look for “Calendar” or “Meetings” settings.
- Enable calendar sync if the option is available.
In most cases, Microsoft Teams and Outlook calendars sync automatically when both are part of the same Microsoft 365 account. Don’t worry if you can’t find these specific settings in Microsoft Teams; their absence doesn’t automatically mean syncing isn’t happening. To confirm that sync’s working, create a test meeting in Microsoft Teams and check if it appears in your Outlook calendar after a few minutes. If the event has not materialized, contact your IT support to confirm if calendar sync is enabled for your organization and troubleshoot any account-specific issues.
- Restart and sync:
- Close both Microsoft Teams and Outlook completely.
- Reopen both applications.
- In Outlook, go to “Send/Receive” tab > “Update Folder” (Windows) or “Sync” button (Mac).
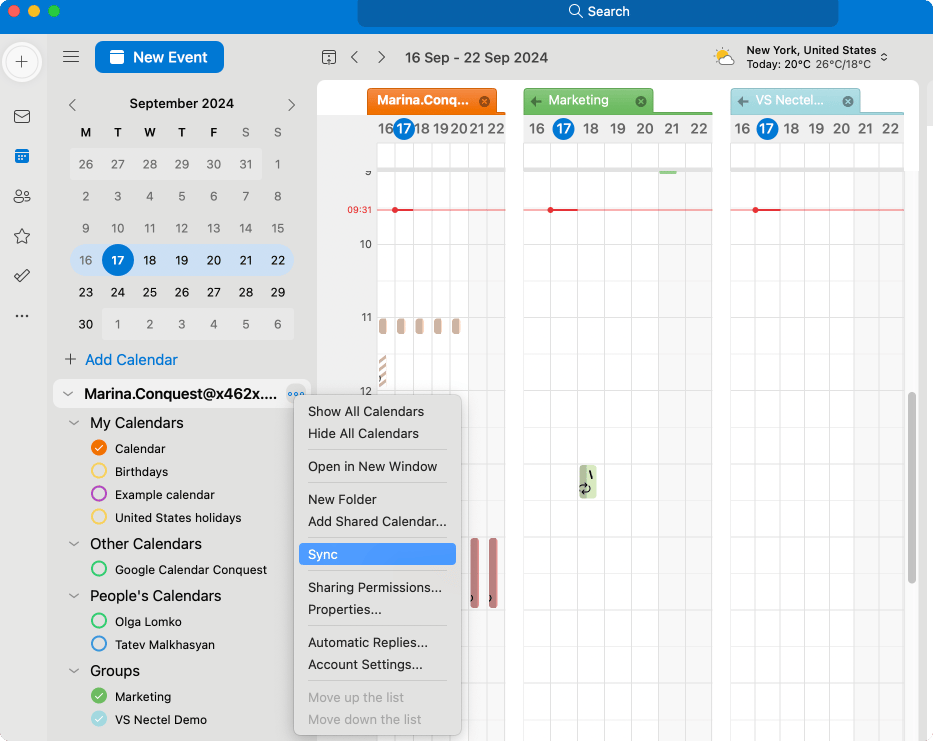
Pic. 6. Syncing calendars in Outlook for Mac.
- In Microsoft Teams, go to Calendar > “…” > “Sync now” (if available).
- Allow several minutes for syncing to complete.
- Use alternative methods:
- In Microsoft Teams, when scheduling a meeting, you can manually select “Add to Outlook calendar” if available.
- In Outlook, you can add the Teams meeting option when creating calendar events.
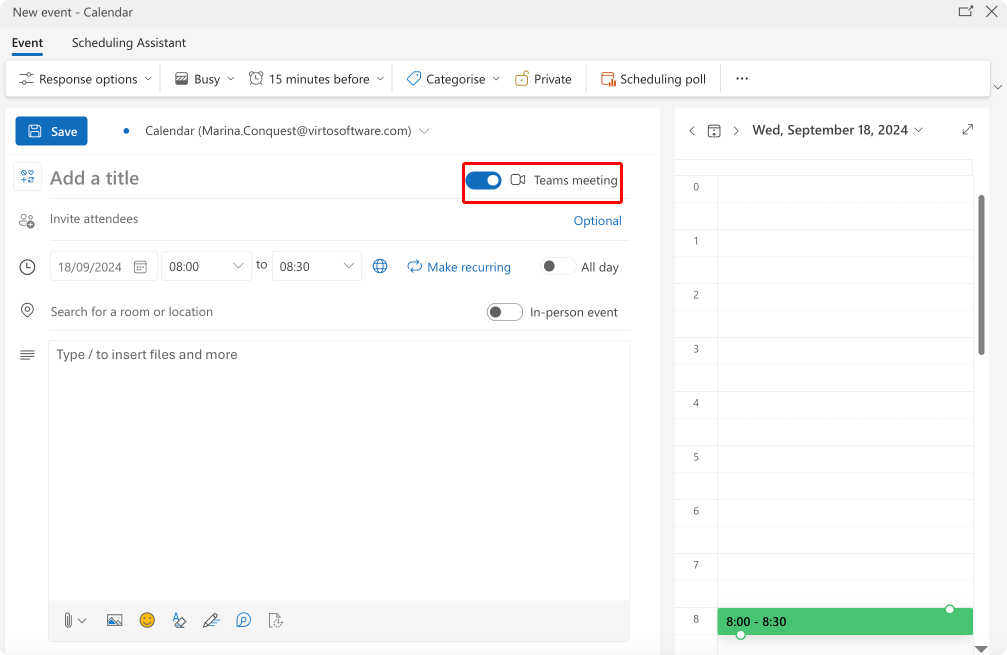
Pic. 7. Scheduling a Microsoft Teams meeting from Outlook on the web.
- Additional steps for persistent issues:
For Outlook on Windows:
- File > Account Settings > Account Settings.
- Select your account > “Repair”.
For Outlook on Mac:
- Tools > Accounts.
- Select your account > “Advanced” > “Reset Account”.
If you don’t see these exact options, or if you’re still experiencing issues, you can try these alternative steps:
- Quit Outlook completely.
- Right-click on Finder and select “Go to Folder”.
- In the dialog box that appears, copy and paste this path:
~/Library/Containers/com.microsoft.Outlook/Data/Library/Preferences
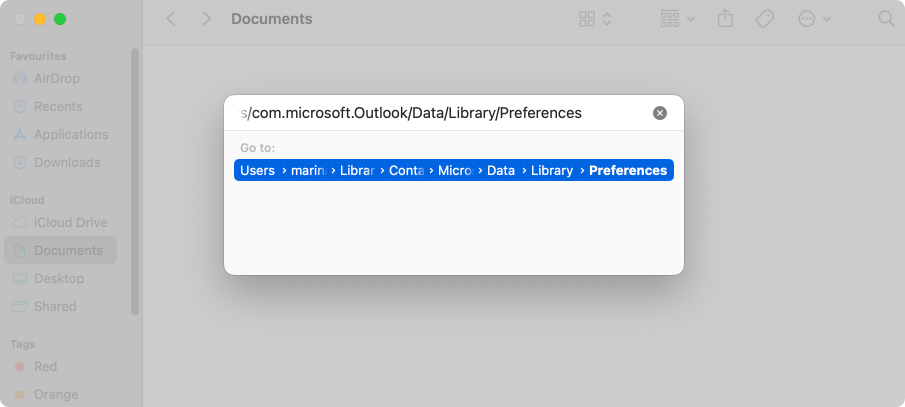
Pic. 8. Resetting Outlook through Finder on Mac.
- Click “Go” or press Enter.
- In the folder that opens, find the file named “com.microsoft.Outlook.plist”.
- Move this file to the Trash (or to your desktop if you want to keep a backup).
- Restart Outlook.
If you encounter any issues after this process, you can restore the .plist file you moved to the desktop (if you chose to keep a backup).
For Microsoft Teams (all platforms):
- Sign out completely.
- Clear the Microsoft Teams cache (refer to your OS-specific instructions or a guide provided in the next section).
- Sign back in.
👉 How do I sync my Teams meeting with Outlook calendar? Follow the steps outlined above, paying special attention to account consistency and permissions. Remember that the sync between Teams and Outlook is typically automatic once set up correctly. If you’ve created a meeting in Teams, it should appear in your Outlook calendar within a few minutes.
If issues persist after trying these steps, consider:
- Checking your network connection.
- Verifying that your organization allows calendar sync between Teams and Outlook.
- Consulting your IT department, as there might be organization-specific settings or policies affecting the sync.
In the next section, we’ll dive into more advanced troubleshooting techniques for resolving persistent sync issues.
Step-by-Step Guide to Troubleshooting Outlook Calendar Not Syncing with Teams Issues
This comprehensive troubleshooting section will walk you through a series of steps to get your digital calendars back in harmony. In addition to the above syncing suggestions, we’ll explore many other possible methods, from built-in diagnostics to the nuclear options of clearing cache and reinstalling your apps. And if all else fails, we’ll guide you on how to effectively engage your IT support team.
Checking settings and connectivity. Reconnecting accounts
- Verify account settings:
Outlook for Windows:
- Click File > Account Settings > Account Settings.
- Ensure the correct account is listed and connected.
Outlook for Mac:
- Click Outlook > Preferences > Accounts.
- Verify the correct account is present and enabled.
Outlook Web:
- Click on your profile picture in the top-right corner.
- Select “My account” to view account details.
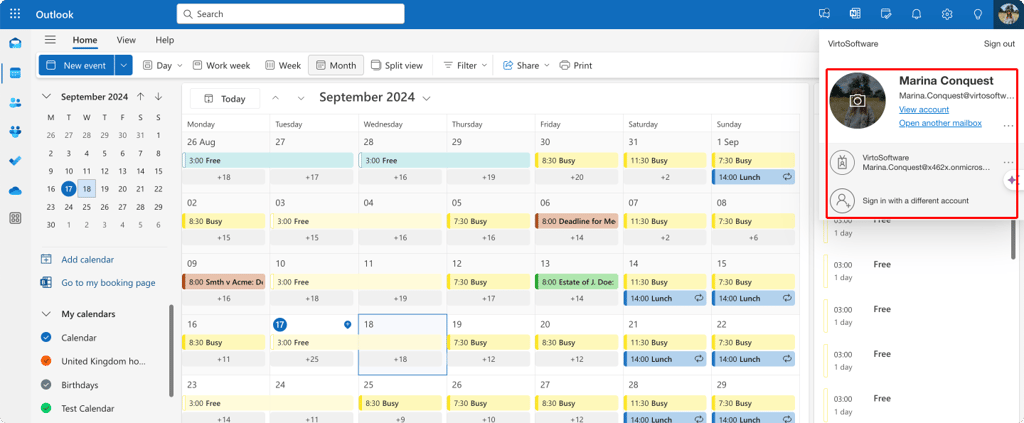
Pic. 9. Checking your account on Outlook for the web.
Microsoft Teams (Desktop and Web):
- Click on your profile picture > Settings > Accounts.
- Confirm the correct account is being used.
Ensure the same account is used across all platforms.
- Test network connection:
Open a web browser and visit office.com.
If the site doesn’t load, try these steps:
Restart your router.
Check other devices on the network.
Run Windows Network Diagnostics (on Windows) or Network Diagnostics (on Mac).
Contact your internet service provider if issues persist.
- Reconnect accounts:
Outlook for Windows:
- File > Account Settings > Account Settings.
- Select the account > Remove.
- Restart Outlook.
- File > Add Account > follow prompts to add the account back.
Outlook for Mac:
- Outlook > Preferences > Accounts.
- Select the account > click “-” to remove.
- Restart Outlook.
- Outlook > Preferences > Accounts > “+” to add account back.
If you don’t see the above options:
- Quit Outlook completely.
- Right-click on Finder and select “Go to Folder”.
- Copy and paste this path into the dialog box:
~/Library/Group Containers/UBF8T346G9.Office/Outlook/Outlook 15 Profiles/Main Profile
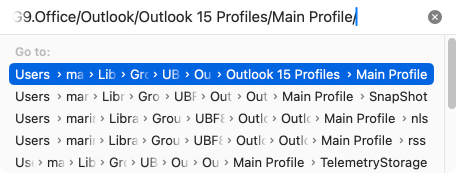
Pic. 10. Removing your Outlook account through Finder on Mac.
- Click “Go” or press Enter.
- In the folder that opens, look for a file or folder with your account name or email address.
- Drag this item to your desktop as a backup.
- Move the original item from the Main Profile folder to the Trash.
- Restart Outlook.
- When Outlook opens, it should prompt you to add an account.
Outlook Web:
- Sign out completely.
- Clear browser cache and cookies.
- Sign back in at outlook.office.com.
Microsoft Teams for Desktop:
- Click profile picture > Sign out.
- Close Teams completely.
- Reopen and sign in.
Microsoft Teams Web:
- Sign out
- Clear browser cache and cookies.
- Sign back in at teams.microsoft.com.
Updating apps
Outlook for Windows:
- File > Office Account > Update Options > Update Now.
Outlook for Mac:
- Help > Check for Updates.
If unavailable, try the following:
- Use Microsoft AutoUpdate:
- Click on the Finder in your Dock.
- Go to Applications.
- Look for “Microsoft AutoUpdate” and open it.
- Click “Check for Updates”.
If you don’t find it, try downloading the tool from here: Update Office for Mac automatically.
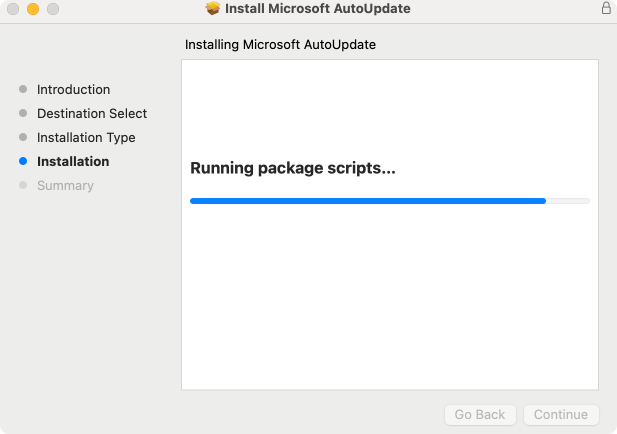
Pic. 11. Installing Microsoft AutoUpdate on Mac.
- Through the Mac App Store:
- Open the App Store on your Mac.
- Click on “Updates” in the sidebar.
- Look for Microsoft Outlook or Microsoft Office in the list of available updates.
- Via Office.com:
- Open a web browser and go to office.com.
- Sign in with your Microsoft account.
- Look for an option to download or update Office applications.
- Terminal command (for advanced users):
- Open Terminal.
- Type:
/Library/Application\ Support/Microsoft/MAU2.0/Microsoft\ AutoUpdate.app/Contents/MacOS/msupdate --list
- Press Enter to run the command and check for updates.
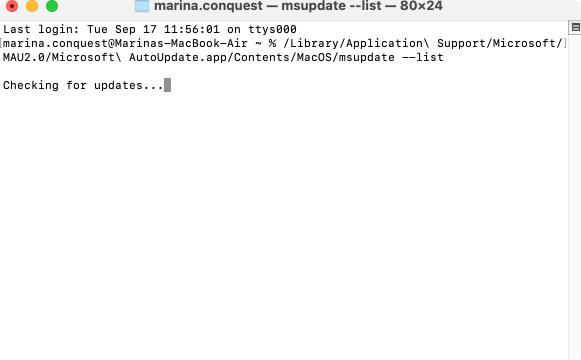
Pic. 12. Checking for updates through Terminal on Mac.
- If you want to actually install the updates, you can use this command instead:
/Library/Application\ Support/Microsoft/MAU2.0/Microsoft\ AutoUpdate.app/Contents/MacOS/msupdate --install
If you receive a “command not found” error, it might mean that Microsoft AutoUpdate is not installed in the default location. In this case, you might need to locate it manually or reinstall Office to ensure AutoUpdate is properly set up.
Outlook Web:
- Automatically updates; no action required.
Microsoft Teams Desktop:
- Click … next to your profile picture.
- Check for updates.
- If available, install updates and restart Teams.
Microsoft Teams Web:
- Automatically updates; refresh the page if needed.
Reinstalling applications (if Outlook not syncing with Teams problems persist):
Outlook for Windows:
- Control Panel > Programs > Uninstall a program.
- Select Microsoft Office > Uninstall.
- Download and reinstall from office.com.
Outlook for Mac:
- Drag Outlook to the Trash.
- Empty Trash.
- Redownload and install from office.com.
Microsoft Teams for Windows:
- Settings > Apps > Microsoft Teams > Uninstall.
- Download and reinstall from teams.microsoft.com.
Microsoft Teams for Mac:
- Drag Teams to the Trash.
- Empty Trash.
- Redownload and install from teams.microsoft.com.
Remember, for Outlook Web and Microsoft Teams Web, clearing your browser cache and cookies can often resolve issues without needing to reinstall.
Always ensure you have your account credentials handy before removing accounts or uninstalling applications. If you’re in a corporate environment, check with your IT department before making significant changes to your setup.
Manually syncing calendars
Outlook for Windows:
- Go to the “Send/Receive” tab.
- Click “Update Folder”
Outlook for Mac:
- Go to the “Tools” menu.
- Select “Sync” > “Sync Now”.
Otherwise, right-click on your calendar and select “Sync” as in Pic. 6.
Outlook Web:
- Automatically syncs; refresh the page if needed.
Microsoft Teams (Desktop and Web):
- Go to Calendar
- Click “…” in the top right.
- Select “Sync now” (if available).
👉 How do I sync my teamwork calendar with Outlook? For instructions to create, share, sync, and troubleshoot your teamwork calendar in both Microsoft Teams and Outlook, consider reading the following articles on the blog: How to Seamlessly Sync MS Teams and Outlook Calendars & How to Create a Shared Calendar in Microsoft Teams: Guide, Tips, Security Issues.
Clearing the cache and restarting the apps
- Clear Microsoft Teams cache:
Windows:
- Close Teams.
- Press Win+R.
- Type %appdata%\Microsoft\Teams.
- Delete all files in this folder.
- Restart Teams.
👉 Check out Microsoft’s community post on clearing cache for New Teams: Clearing Cache in “New” Teams
Mac:
- Quit Teams.
- Open Finder.
- Press Cmd+Shift+G.
- Type ~/Library/Application Support/Microsoft/Teams.
- Delete contents of the following folders: Cache, Application Cache, Blob Storage, databases, GPUCache, IndexedDB, Local Storage, tmp.
- Restart Teams.
👉 Check out Microsoft’s community post on clearing cache for New Teams: Clearing Cache in “New” Teams for Mac
Web:
- Clear your browser cache and cookies.
- Clear Outlook cache:
Windows:
- Close Outlook.
- Press Win+R.
- Type outlook.exe /cleanviews.
- Press Enter.
- Restart Outlook.
👉 Check out Microsoft’s community post on clearing cache for New Teams: Clearing Outlook cache.
Mac:
1. Clearing the main Outlook cache:
- Close Outlook completely.
- Open Finder and click on “Go” in the top menu bar.
- Select “Go to Folder…”
- Enter the following path: ~/Library/Caches/com.microsoft.Outlook and press Return.
- Locate the folder named “com.microsoft.Outlook”.
- Delete this folder by dragging it to the Trash.
- Empty your Trash.
2. Clearing the Outlook RGES add-in cache (if applicable):
- Quit Outlook.
- Open Finder and click on “Go” in the top menu bar.
- Select “Go to Folder…”
- Enter the following path: ~/Library/Containers/com.microsoft.Outlook/Data/Library/Application Support/Microsoft/Office/16.0/Wef/ and press Return.
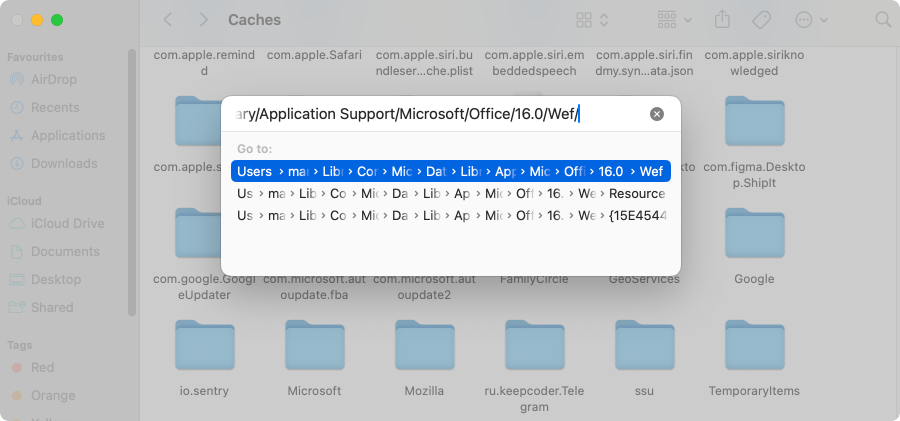
Pic. 13. Clearing Outlook cache on Mac through Finder.
- Select all items within the “Wef” folder.
- Move these items to the Trash.
- Empty your Trash.
3*. Restart Outlook:* Once you’ve cleared the cache(s), restart Microsoft Outlook. This will allow Outlook to create fresh, clean cache files, hopefully resolving any synchronization problems.
👉 Check out more suggestions on clearing Outlook cache for Mac: Clear the cache in Outlook for Mac & Clear the cache in the new Outlook for Mac.
Web:
- Clear your browser cache and cookies.
After clearing caches, restart your computer before relaunching the apps to ensure all changes take effect. If you’re using organization-managed devices, some of these actions might require administrator privileges. Always consult with your IT department before making significant changes to your work applications.
Using built-in diagnostics for Outlook and Teams not syncing
For Outlook Windows:
- Open Outlook.
- Click on “File” in the top-left corner.
- Select “Options” at the bottom of the left sidebar.
- In the Outlook Options window, click on “Advanced” in the left sidebar.
- Scroll down to the “Troubleshooting” section.
- Click on “Run Diagnostics”.
- A new window will open with a list of diagnostic tests.
- Select the tests you want to run (or “Run All Tests”).
- Click “Run Selected Tests”.
- Review the results:
- Green checkmarks indicate passed tests.
- Red X marks indicate failed tests.
- For failed tests, click on them to see more details and suggested actions.
- Follow the suggested actions to resolve issues.
For Outlook Mac: Outlook for Mac doesn’t have a built-in diagnostic tool. Instead, check for updates as suggested earlier and install a new version if available. If issues persist, contact Microsoft Support.
For Outlook Web: Outlook Web doesn’t have a built-in diagnostic tool. Instead:
- Clear your browser cache and cookies.
- Try accessing Outlook in a different browser or incognito/private mode.
For Microsoft Teams Desktop (Windows and Mac):
- Open Microsoft Teams.
- Click on your profile picture in the top-right corner.
- Select “About”.
- Click on “Run health check”.
- The diagnostic tool will run several tests, including:
- Network connectivity.
- Sign-in status.
- App version.
- Cache status.
- Review the results:
- Green checkmarks indicate passed tests.
- Red X marks indicate failed tests.
- For failed tests, click on “Learn more” or “Troubleshoot” links provided.
- Follow the suggested actions to resolve issues.
- Common fixes might include:
- Clearing cache.
- Checking network settings.
- Updating the app.
- Restarting the app or your computer.
For Microsoft Teams Web: Teams Web doesn’t have a built-in health check. Instead:
- Clear your browser cache and cookies.
- Try accessing Teams in a different browser or incognito/private mode.
- Check your network connection.
- Ensure you’re using a supported browser and it’s up-to-date.
Additional Tips:
- For both Outlook and Teams, make sure you’re running the latest version of the application.
- If you’re using a work or school account, some diagnostic options might be limited by your organization’s policies.
- Always back up important data before making any significant changes suggested by diagnostic tools.
- If issues persist after following the suggested actions, contact your IT support team or Microsoft Support for further assistance.
Remember, these diagnostic tools are designed to identify common issues. For more complex problems, especially in enterprise environments, your IT department may have additional tools and procedures to diagnose and resolve issues.
Working with the system administrator
Contact IT support if:
- Issues persist after trying all troubleshooting steps.
- You encounter error messages about server or policy restrictions.
- You suspect organization-wide sync problems.
Tips for effective communication with IT:
- Provide a clear, concise description of the issue.
- List all troubleshooting steps you’ve already taken.
- Share any error messages or diagnostic results.
- Be prepared to grant temporary access to your account for investigation.
3.7 Start Outlook in safe mode:
- Close Outlook completely.
- Windows: Press Win+R, type outlook.exe /safe, press Enter.
- Mac: Hold Option key while launching Outlook.
- Check if sync issues persist in safe mode.
- If issues resolve, problem may be related to add-ins or customizations.
Open communication and a good rapport with your IT support team can help them understand your needs better, leading to faster issue resolution and a more positive tech environment.
Checking add-ins
For Outlook Windows:
- Open Outlook.
- Click “File” in the top-left corner.
- Select “Options” at the bottom of the left sidebar.
- In the Outlook Options window, click “Add-Ins” in the left sidebar.
- At the bottom of the window, find the “Manage” dropdown.
- Select “COM Add-ins” from the dropdown and click “Go”.
- In the COM Add-Ins window:
- Review the list of active add-ins.
- Uncheck any suspicious or unnecessary add-ins.
- Click “OK” to apply changes.
- Repeat steps 5-7 for other add-in types (e.g., “Exchange Add-ins”, “Outlook Add-ins”).
- Restart Outlook and test if sync issues are resolved.
For Outlook Mac:
- Open Outlook.
- Click “Tools” in the top menu.
- Select “Add-ins”.
- Review the list of installed add-ins.
- Uncheck any suspicious or unnecessary add-ins.
- Click “OK” to apply changes.
- Restart Outlook and test sync.
Your version of Outlook might not support add-ins. If you’re using a work account, contact your IT department for assistance with add-in management.
For Microsoft Teams Desktop & Web:
- Open Microsoft Teams.
- Click on the three dots (…) next to your profile picture and then “Settings”.
- Select “App permissions” and adjust settings as required.
- Click on “Apps” on the left-hand side of the screen and then “Manage your apps”.
- Click on apps you want to delete and delete them.
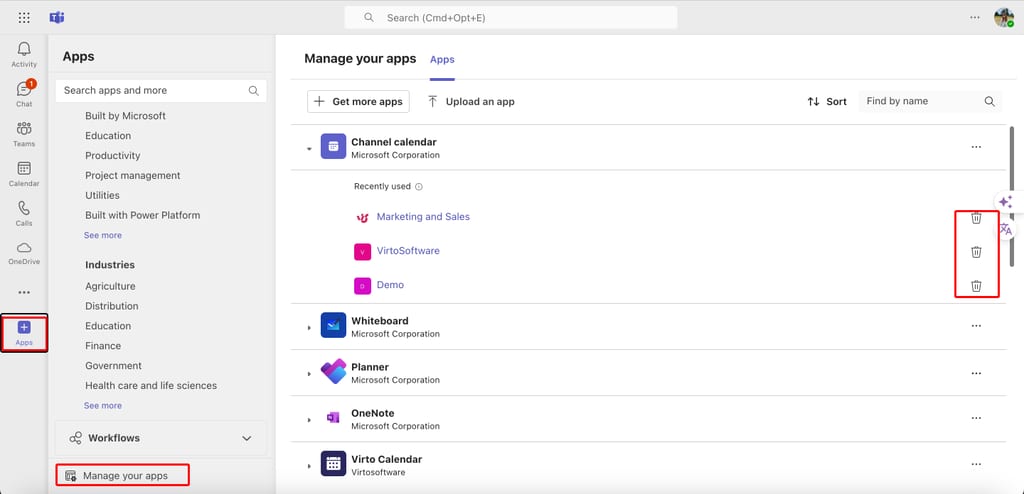
Pic. 14. Checking apps and add-ins in Microsoft Teams.
- Restart Teams and check if sync issues are resolved.
Additional tips:
- Identify problematic add-ins: Disable add-ins one by one and test sync after each to identify which might be causing issues.
- Keep essential add-ins: Don’t remove add-ins that are crucial for your work without consulting IT.
- Update add-ins: Check if there are updates available for your add-ins, as outdated versions can cause conflicts.
- Third-party add-ins: Be cautious with third-party add-ins and ensure they’re from trusted sources.
- Organization policies: In corporate environments, some add-ins might be mandated by your organization. Consult IT before removing these.
- Performance impact: Too many add-ins can slow down Outlook or Teams. Consider keeping only essential ones.
- Compatibility: Ensure add-ins are compatible with your version of Outlook or Teams
- Logging: Some add-ins have logging features. Enable these for troubleshooting if available.
If managing add-ins doesn’t solve the problem, or if you’re unsure about removing specific add-ins, reach out to your IT support team for assistance.
Preventing Future Sync Issues
Keeping your software up-to-date is crucial for maintaining smooth synchronization between Teams and Outlook. Here are some recommendations:
- Enable automatic updates:
- For Windows: Go to Settings > Update & Security > Windows Update.
- For Mac: Apple menu > System Settings > General > Software Update.
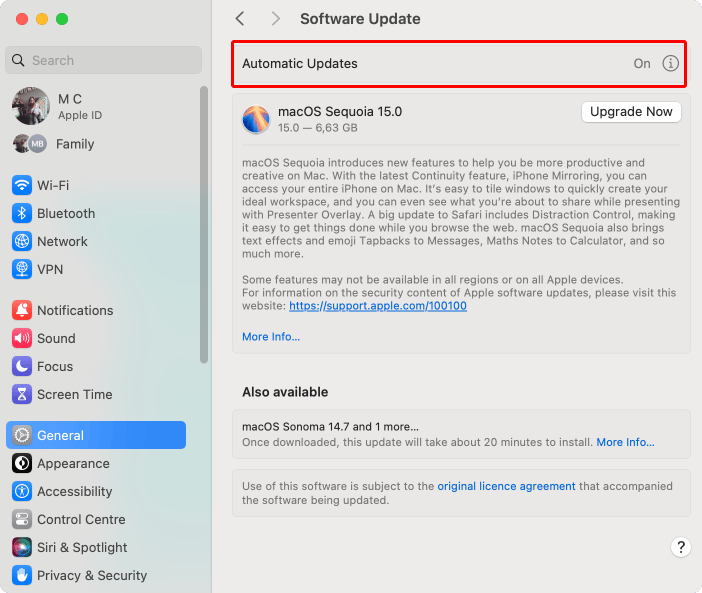
Pic. 15. Checking for system updates on Mac.
- For Office apps: File > Account > Update Options > Enable automatic updates.
- Check for updates manually:
For Outlook Windows:
- Click File > Office Account > Update Options > Update Now.
- Alternatively: File > Account > Office Updates > Update Now.
For Outlook Mac:
- Click on App Store > Updates.
- If updates are available, follow the prompts to install.
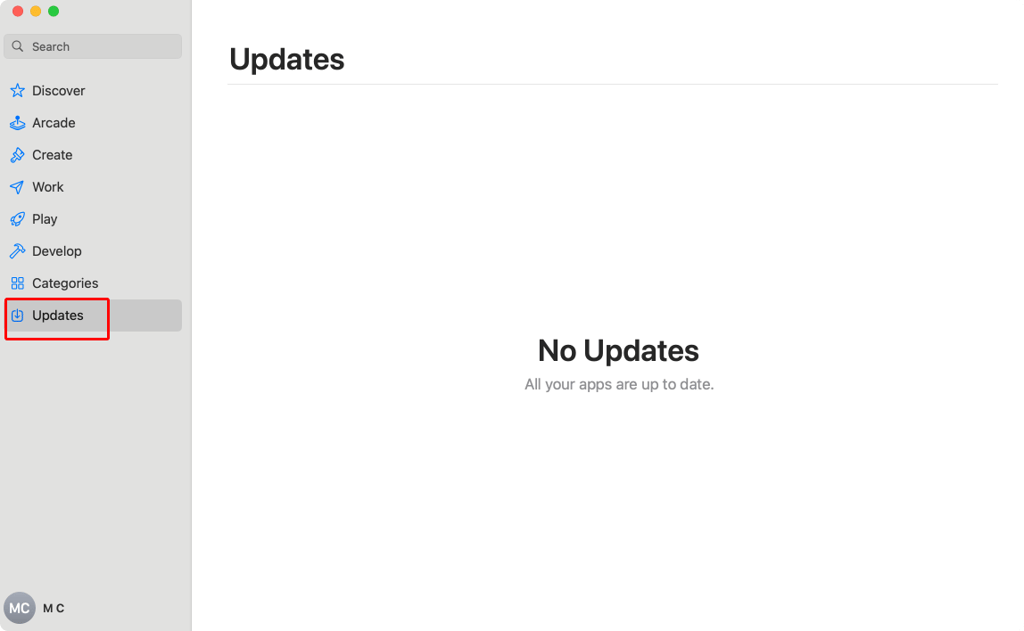
Pic. 16. Checking for app updates on Mac.
For Outlook Web: Outlook Web automatically updates, no manual action required.
For Microsoft Teams Windows and Mac:
- Click on your profile picture in the top-right corner.
- Select Check for updates.
- If an update is available, restart Teams to apply it.
For Microsoft Teams Web: Teams Web automatically updates, no manual action required.
- Regularly check sync settings:
- In Outlook: File > Account Settings > Account Settings.
- In Teams: Profile picture > Settings > Accounts.
Importance of regular checks:
- Updates often include bug fixes and improvements to sync functionality.
- Regular checks ensure your settings haven’t been inadvertently changed.
- It helps in early detection of potential sync issues.
Additional tips:
- For organization-managed accounts, some settings may be controlled by IT policies. If you can’t modify certain settings, contact your IT support.
- On Mac, you might need to use the Microsoft AutoUpdate application to check for updates across all Office apps:
- Open Finder > Applications.
- Look for Microsoft AutoUpdate.
- Run it to check for updates across all Microsoft apps.
- For Web versions, while they update automatically, clearing your browser cache periodically can help ensure you’re using the latest version:
- In your browser settings, find the option to clear browsing data.
- Select cached images and files, then clear them.
- If you’re using Outlook or Microsoft Teams mobile apps:
- iOS: Go to the App Store, tap your profile, and scroll to see available updates.
- Android: Open the Google Play Store, tap the menu icon, select My apps & games to see available updates.
User training
Proper training on Microsoft Teams and Outlook usage is crucial for minimizing sync issues and maximizing productivity. Here’s why it’s important and how to implement effective training:
- Importance of training:
- Reduces user-induced errors.
- Increases productivity and efficiency.
- Ensures consistent use of features across the organization.
- Training ideas:
- Conduct regular workshops on Teams and Outlook features.
- Create step-by-step guides for common tasks.
- Develop a quick-reference troubleshooting guide.
- Implement a buddy system for peer-to-peer learning.
- Creating instructions:
- Use screenshots and screen recordings for visual learners.
- Develop interactive e-learning modules.
- Create a knowledge base or wiki for easy reference.
- Regularly update training materials as software evolves.
Additional considerations:
- Tailor training to different user levels (beginner, intermediate, advanced)
- Offer training in multiple formats to cater to different learning styles (written, visual, hands-on).
- Consider creating role-specific training paths (e.g., for managers, administrative assistants, remote workers).
- Implement a system to track training completion and identify areas where users might need additional support.
- Encourage continuous learning by highlighting new features or updates in company newsletters or intranet posts.
Keep in mind that effective training is continuous. Regularly gather feedback from users to identify their challenges and refine your training program as needed. By investing in thorough user training, organizations can greatly reduce sync issues, enhance the adoption of Teams and Outlook features, and increase overall productivity.
Monitoring and early detection of issues
Proactive monitoring is crucial in catching sync issues before they escalate into major problems. Here’s a detailed look at the methods, tips, and strategies for effective monitoring and early detection:
- Methods for monitoring sync status:
- Regularly check calendar events in both Microsoft Teams and Outlook.
- Implement a daily check routine for IT staff or designated users.
- Use sample accounts to test sync across different user roles.
- Create a script to automatically compare events between platforms.
- Use the built-in sync status indicators in Outlook.
- Train users to understand and interpret sync status icons.
- Set up alerts for persistent sync errors.
- Use PowerShell scripts to query sync status across multiple accounts.
- Implement third-party monitoring tools if available for your organization.
- Research and evaluate tools like SysKit Insights or ENow.
- Configure automated alerts for sync discrepancies.
- Use dashboard visualizations to track sync health across the organization.
- Regularly check calendar events in both Microsoft Teams and Outlook.
- Tips for early detection:
- Encourage users to report any discrepancies immediately.
- Create a simple reporting process (e.g., dedicated email or Teams channel).
- Offer incentives for prompt reporting of issues.
- Provide clear guidelines on what information to include in reports.
- Set up a system for users to log sync issues.
- Implement a ticketing system (e.g., ServiceNow, Jira Service Desk).
- Create a user-friendly form to capture relevant details.
- Automate initial triage based on reported symptoms.
- Regularly review sync logs (if available in your organization).
- Set up automated log analysis tools.
- Schedule weekly reviews of sync-related logs.
- Look for patterns or recurring issues across users or departments.
- Encourage users to report any discrepancies immediately.
- Early resolution strategies:
- Develop a quick-response team for addressing sync issues.
- Assign roles and responsibilities within the IT team.
- Establish an escalation process for complex issues.
- Implement an on-call rotation for after-hours support.
- Create a flowchart for common sync problems and their solutions.
- Develop decision trees for troubleshooting.
- Create step-by-step resolution guides for each common issue.
- Update the flowchart regularly based on new issues and solutions.
- Implement a system for sharing solutions across the organization.
- Use a knowledge base to document all resolved issues.
- Set up a Teams channel for IT staff to share tips and solutions.
- Conduct regular “lessons learned” sessions to discuss recent issues.
- Develop a quick-response team for addressing sync issues.
- Preventive measures:
- Regularly review and optimize network infrastructure.
- Conduct monthly network performance assessments.
- Monitor bandwidth usage and optimize for Teams and Outlook traffic.
- Implement QoS (Quality of Service) policies for critical sync traffic.
- Conduct periodic audits of user permissions and access rights.
- Schedule quarterly reviews of user roles and permissions.
- Use automated tools to detect anomalies in access patterns.
- Implement least privilege principles to minimize sync conflicts.
- Stay informed about known issues and updates from Microsoft.
- Subscribe to Microsoft 365 update channels and blogs.
- Participate in Microsoft Tech Community forums.
- Consider joining the Microsoft 365 Insider program for early access to updates.
- Regularly review and optimize network infrastructure.
Proactively monitoring your Microsoft Teams and Outlook integration for potential sync issues is crucial for maintaining a productive work environment. By implementing the strategies outlined in this guide, you can minimize disruptions, build user trust in your collaboration tools, and keep your team working efficiently.
Improve Your Calendar Experience with the Virto Calendar App for Microsoft Teams
Despite your best efforts to troubleshoot and resolve synchronization issues between Microsoft Teams and Outlook calendars, sometimes problems can persist. If you find yourself constantly battling with sync errors, missing appointments, or inconsistent calendar views, there’s a powerful alternative solution at your fingertips. Enter Virto Calendar – a Microsoft-vetted and approved native app that adheres to all prescribed Microsoft security standards.
What is the Virto Calendar App, and why is it useful?
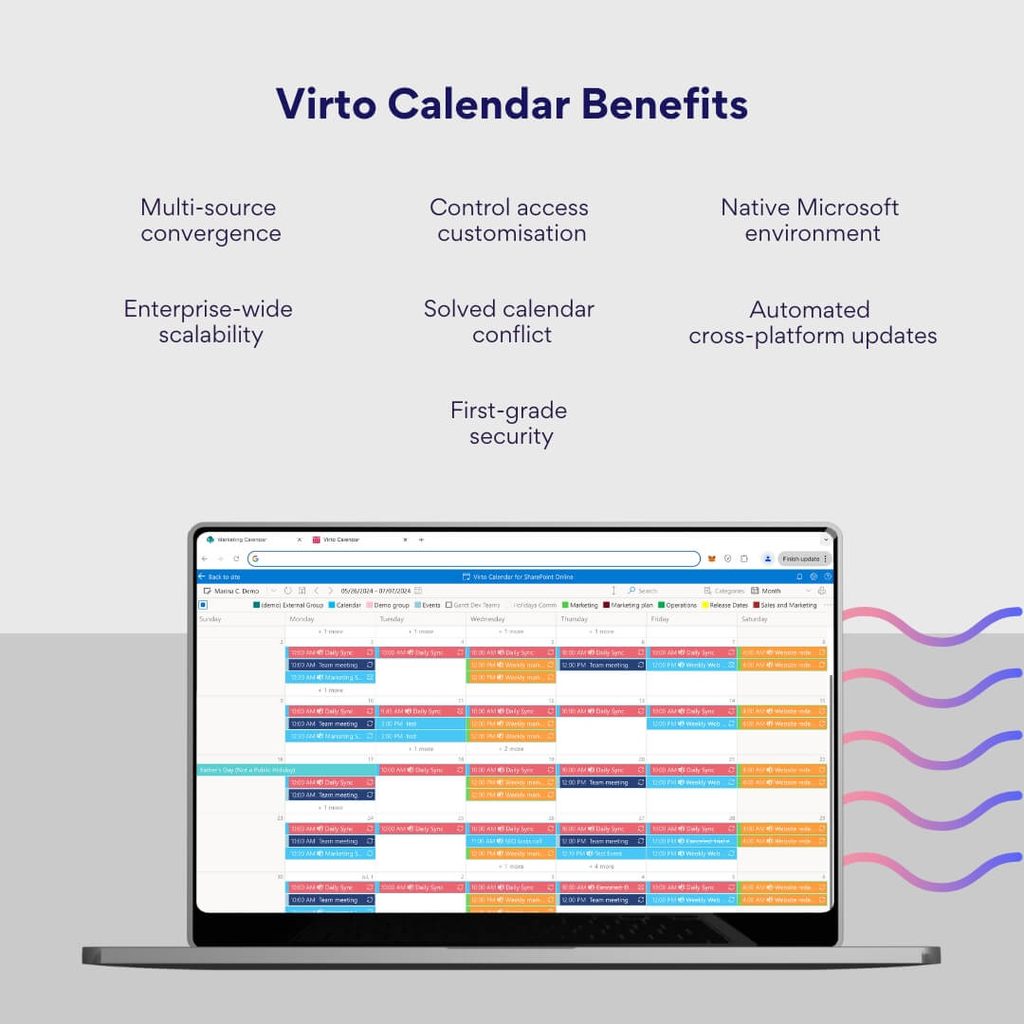
Virto Calendar App for Microsoft Teams is a powerful tool designed to enhance your calendar management experience within the Microsoft 365 ecosystem. This versatile application allows you to effectively manage your calendars by providing a comprehensive overlay of multiple calendar sources, including Exchange Online calendars, SharePoint lists, meeting rooms, and even external calendars.
Key features of Virto Calendar App include:
- Seamless integration with Microsoft Teams and Outlook
- Ability to combine events from various sources in a single view
- Flexible timescale options (day, week, month, year, and tasks)
- Color-coding for events and categories
- Mini Calendar for a compact event overview
This app is particularly beneficial for users who frequently encounter synchronization issues with standard calendars. By providing a centralized view of multiple calendar sources, Virto Calendar App eliminates many common sync problems and ensures that all your appointments and events are visible and up-to-date.
Benefits of using the Virto Calendar App
Now, let’s explore the key benefits of integrating Virto Calendar into your workflow.
Cross-platform synchronization:
- Overlay Exchange Online calendars with other Microsoft 365 calendars
- Incorporate external calendars using iCal links from services like Google Calendar
- Ensure consistent calendar views across different platforms and devices
Advanced access rights management:
- Easily manage permissions for shared calendars
- Maintain control over who can view and edit calendar events
- Respect existing access rights settings in SharePoint and Exchange
Compatibility with Microsoft Teams and Outlook:
- Seamless integration with the Microsoft 365 ecosystem
- Create Microsoft Teams meetings directly from Virto Calendar events
- Synchronize events with Outlook calendars
Solving common calendar problems:
- Calendars not syncing: By providing a unified view of multiple calendars, sync issues become less problematic
- Appointments not showing up: All events from various sources are displayed in one place, reducing the chance of missing appointments
Ideal for large teams and companies:
- Combine events from multiple SharePoint lists, Outlook calendars, and meeting rooms
- Efficiently manage and view team schedules and resources
- Color-code events and categories for better organization
Compliance and security:
- Fully compliant with Microsoft security policies
- Respects existing access rights settings in SharePoint and Exchange
- Ensures data privacy and protection within the Microsoft 365 environment
Getting Started with Virto Calendar App for Microsoft Teams:
- Navigate to the desired Teams channel.
- Click the “+” button to add a new tab.
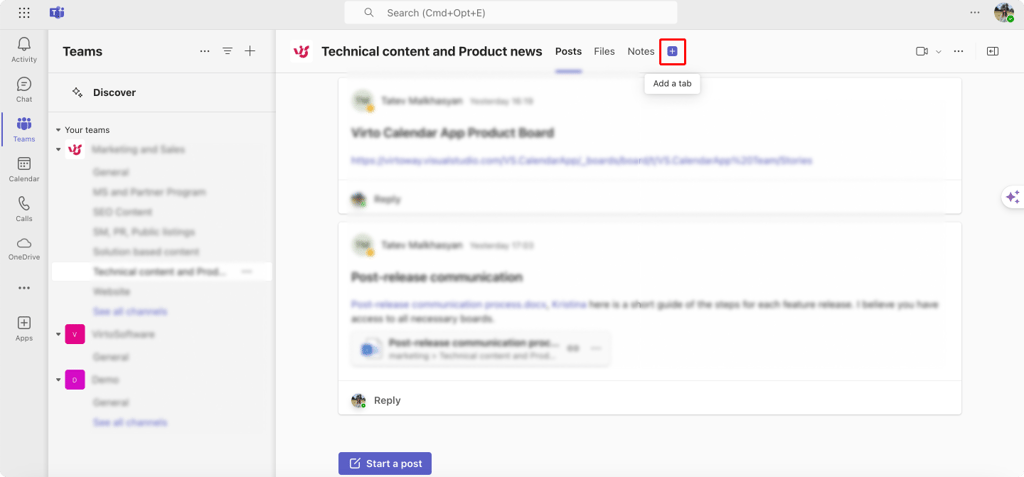
Pic. 17. Adding a tab to the channel in Microsoft Teams.
- Select Virto Calendar from the list of available apps.
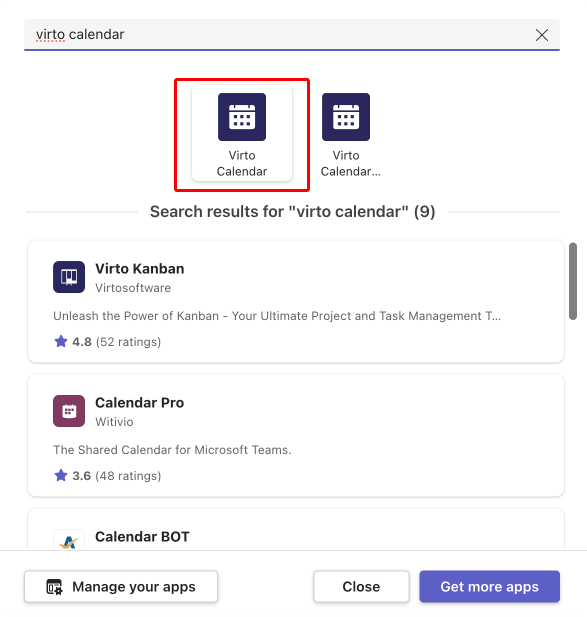
Pic. 18. Searching for the Virto Calendar app in Teams store.
- Follow the prompts to select an appropriate calendar for display and grant necessary permissions.
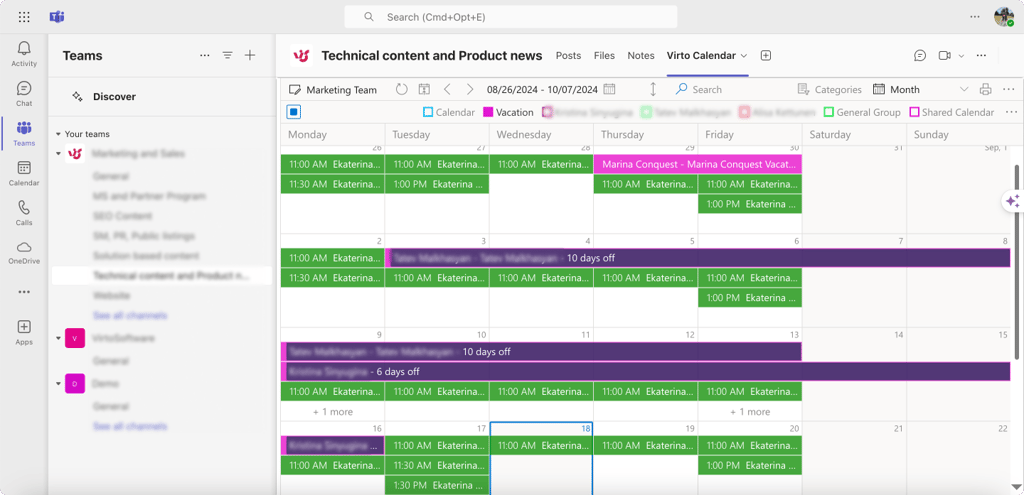
Pic. 19. Viewing Virto Calendar in Microsoft Teams.
By adopting Virto Calendar App, organizations can significantly improve their calendar management experience, reduce sync-related issues, and enhance overall productivity within the Microsoft Teams environment. Whether you’re managing personal schedules or coordinating across a large corporation, Virto Calendar App offers the flexibility and reliability needed for efficient calendar management in the modern workplace.
Conclusion on “Why Is My Teams Calendar Not Syncing with Outlook”
Throughout this article, we’ve explored the common challenges users face with Teams-Outlook calendar synchronization and provided comprehensive solutions to address these issues.
We’ve covered a range of troubleshooting techniques, from basic checks like verifying account settings and network connectivity to more advanced steps such as clearing caches and managing add-ins. We’ve also emphasized the importance of regular software updates, user training, and proactive monitoring to prevent sync issues before they occur.
For those facing persistent sync problems, we introduced the Virto Calendar App for Microsoft Teams as a powerful alternative. This Microsoft-vetted solution offers advanced features like cross-platform synchronization, multi-calendar overlay, and seamless integration with the Microsoft 365 ecosystem, all while adhering to strict security standards.
If standard solutions don’t resolve your sync problems, we highly recommend giving Virto Calendar App a try:
For further information and support, we invite you to explore these helpful resources:
Official Microsoft Resources:
- Outlook and Teams Calendars Not Syncing
- Microsoft Teams Outlook Calendar Not Syncing
- Outlook Calendar Not Syncing with Team Calendar
- Microsoft Teams Calendar is Not the Same as Outlook
- Unable to Sync Outlook and Teams Calendars
VirtoSoftware blog articles: