Microsoft 365 Calendar: Essential Guide, Tips, and Integrations
Explore the Office 365 calendar from Microsoft 365: a tool for seamless scheduling across devices. Discover its impact on business efficiency and delve into the world of shared calendars.
Introduction
Welcome to our guide on Microsoft’s powerful productivity tool—the Office 365 calendar a.k.a. Outlook calendar, a component of the now rebranded Microsoft 365 suite.
If you’re keen to simplify your scheduling, you’ve come to the right place. The Office 365 calendar, with its multiple views, was designed to facilitate your day-to-day planning. It not only helps keep track of appointments and tasks but also integrates effortlessly with other applications in the Office 365 suite. The best part? It’s accessible anytime, anywhere, across all the devices.
This guide will unpack the potential of the Office 365 calendar and demonstrate how much of a game-changer it can be for managing your time and tasks, both work and private. From small businesses to large corporations, anyone can benefit from the streamlined scheduling and integrations it offers.
If you’re particularly interested in shared calendars, a feature that’s crucial for team collaboration, we have a dedicated article that provides a step-by-step guide on how to create a shared Office 365 calendar. We’d also like to highlight the Virto Calendar App for SharePoint 365, a perfect high-level addition to your productivity toolkit.
Keep reading as we delve into the world of the Office 365 calendar and help you discover its full potential for your business.
Office 365 Calendar Features
The Office 365 calendar is not just a scheduling tool; it’s a productivity powerhouse packed with features to help with so many aspects of planning and the execution of those plans. Let’s look at some of the key attributes that set it apart from other calendar solutions.
Event creation: At its core, the Office 365 calendar allows you to quickly create events. You can set the date and duration and invite attendees all within a few clicks. Whether it’s a work meeting in an Office 365 meeting room, a family gathering, or a personal reminder, adding it to your calendar is as easy as pie.
Reminders and notifications: Do you ever worry about missing important appointments? The Office 365 calendar has you covered with timely reminders and notifications, so you won’t ever miss a call with a client.
Recurring events: Got a weekly team sync or a monthly check-in? The Office 365 calendar’s recurring events feature is handy for these kinds of events. You can set an event to repeat daily, weekly, or monthly or set up custom repetitions, automating your scheduling and freeing up valuable time.
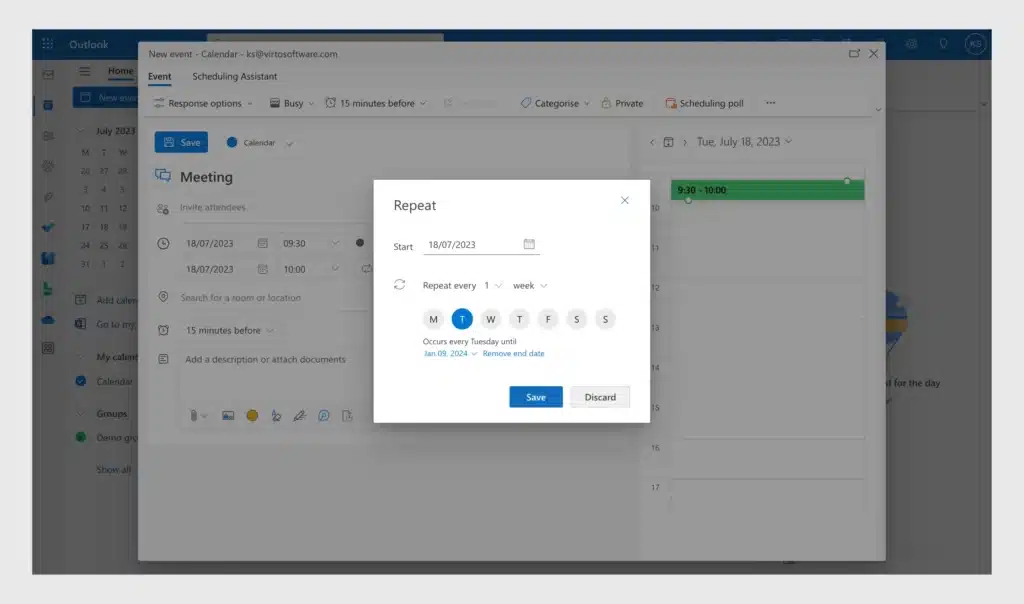
Integrated scheduling: One unique aspect of the Office 365 calendar is its seamless integration with the entire Microsoft 365 suite. For instance, you can schedule a Microsoft Teams meeting directly from your SharePoint calendar, attach files stored in OneDrive to your event details, or link your calendar with Outlook to have your schedule at your fingertips.
Shared calendars: The Office 365 calendar transforms team collaboration from a tedious chore into a pleasant experience. With the shared calendars feature, your team can be in sync every minute of a work week. You can share your calendar with colleagues, see when they’re free or busy, and schedule meetings accordingly.
Time zone support: Do you work with people in different time zones? The Office 365 calendar helps you keep track of this by allowing you to view multiple time zones in your calendar. You can schedule meetings that work for everyone, no matter where they are in the world.
Mobile access: A standout feature of the Office 365 calendar is its accessibility across devices. Whether you’re on your laptop, tablet, or smartphone, you can access your schedule on several Microsoft 365 apps, making sure you’re always up to date.
As you can see, the Office 365 calendar app is much more than just a place to jot down your appointments. It’s a powerful app that not only enhances your scheduling but also adapts to the needs of your online and offline teams on the go. And if you need to make your calendar public, the Office 365 publish calendar feature allows you to do this in under five minutes.
Office 365 Shared Calendar
Within the Office 365 universe, a shared calendar is an instrument for fostering collaboration. Essentially, an Office 365 shared calendar is your usual calendar, but colleagues or teams can also access it to view or modify meetings and events.
The benefits of Office 365 shared calendars are substantial. They foster an environment of transparency, helping everyone to stay updated on team events, deadlines, and availabilities. This visibility enhances collaboration by ensuring all team members are on the same page.
Moreover, shared calendars streamline coordination. By viewing the availability of team members in real time, you can easily schedule meetings, avoiding the back-and-forth usually involved in finding a time that suits everyone. Office 365 shared calendars allow team members to work together on tasks and projects by keeping everyone abreast of progress.
Setting up and sharing calendars in Office 365 takes no more than five minutes:
- Create an Office 365 calendar.
- Choose whom you want to share it with.
- Decide the level of permission they should have—from being able to view your availability to being able to manage all aspects of the calendar.
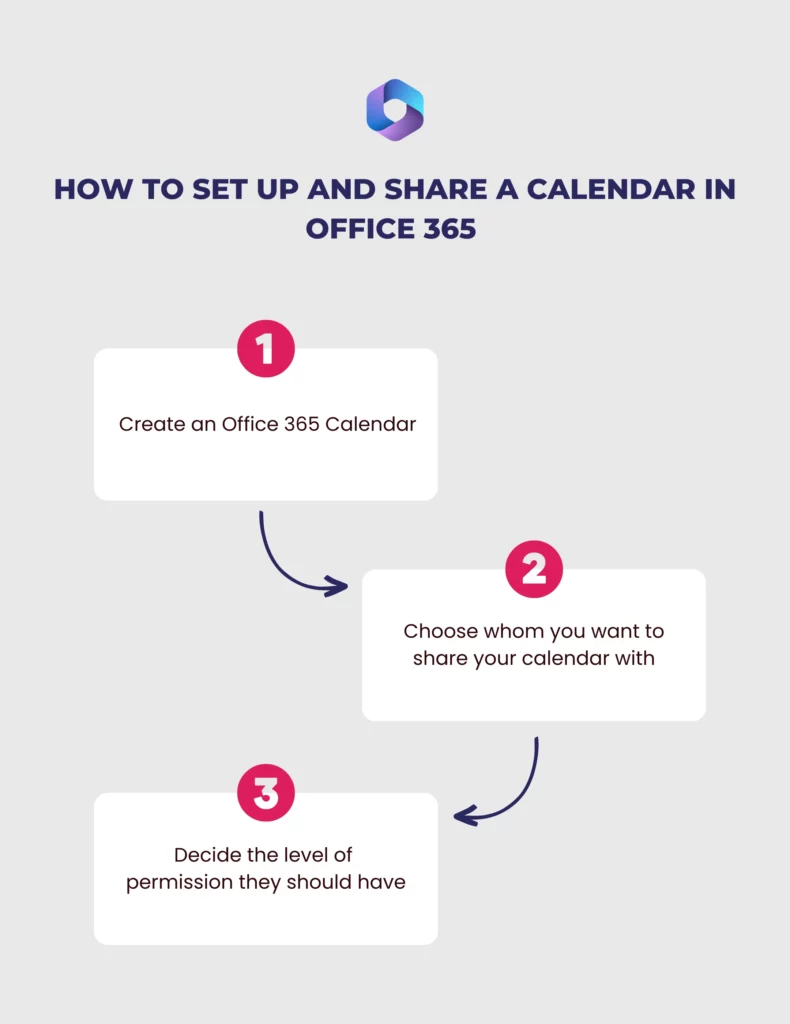
The last action can be done with just a few clicks:
- Open the calendar app.
- Click the three dots next to the calendar you’d like to share.
- Go to “Sharing and permissions.”
- Add the people or the email addresses of the teams you want to share it with and select the level of their permissions.
And voila! You’ve successfully created an Office 365 shared calendar.
If you want to share your Office 365 calendar with external users, follow the steps described in our dedicated blog post.
Office 365 Group Calendar
In the collaborative ecosystem of Office 365, a group calendar serves as a shared hub for teams to manage events and schedules. Instead of being tied to an individual user, an Office 365 group calendar is linked to a group, giving all members of the group access to scheduling management.
An Office 365 group calendar offers a unified view of the group’s schedule, simplifying meeting scheduling and enabling effective resource allocation. Group members can propose meeting times and find time slots that accommodate everyone, reducing conflicts and enhancing participation. In addition, the handy reminders and notifications ensure no meeting or task is overlooked.
Aside from meeting scheduling, group calendars also significantly benefit resource allocation. Teams can effectively schedule and manage shared resources, such as conference rooms or equipment. This not only prevents double-bookings but also ensures that resources are used optimally.
Managing a group calendar in Office 365 is straightforward. You start by creating an Office 365 group. Here’s how it’s done:
- Open Outlook and navigate to the “Groups” section on the left-hand side of your screen.
- Click “Create group” and fill in the necessary details such as the group’s name, description, privacy settings, and members.
- Once you hit “Create,” your new Office 365 group is born!
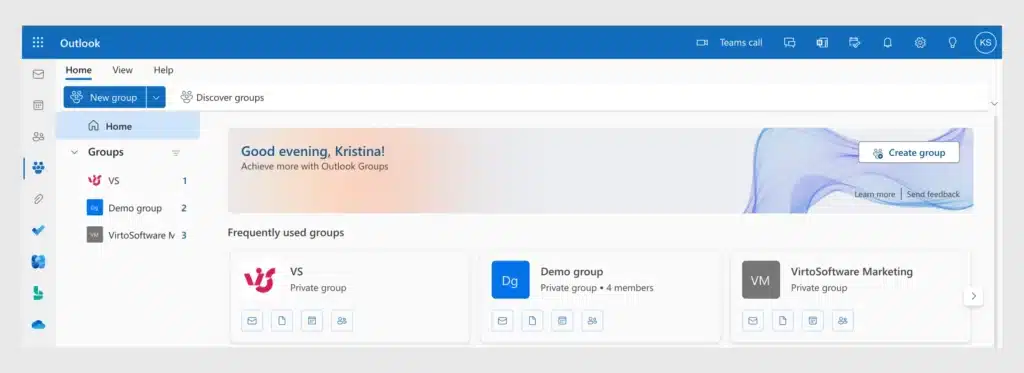
A great advantage of creating an Office 365 group is that a group calendar is automatically generated as part of the process. The Office 365 group calendar can be conveniently accessed and managed by all group members via the Outlook application on desktop, web, or mobile.
An Office 365 group calendar is a must-have tool that makes scheduling meetings and resource control a breeze. With a group calendar in place, teams thrive in a more united and fruitful work environment.
Office 365 Calendar Integrations
Office 365 calendars boast powerful integration capabilities with various applications, granting smoother workflows. Whether it’s connecting with your favorite Microsoft apps or syncing with outside platforms such as Zoom or Google Calendar, Office 365 can do it all, though sometimes with a bit of third-party help.
One of the most fundamental integrations is with Outlook. SharePoint Office 365 calendar can be synchronized with Outlook for easy access to your schedule right from your email client. You can follow our step-by-step guide to learn how to sync SharePoint Office 365 calendar with Outlook. Integration with Microsoft Teams lets you schedule and join meetings directly from your calendar. You can also link your Outlook calendar with SharePoint to make organization-wide events easily visible to all team members.
Zoom calendar integration Office 365 feature lets you schedule Zoom meetings directly from your Office 365 calendar. The same is true for Skype, where you can plan and start Skype calls or meetings directly from your calendar events. Additionally, integrating Microsoft Office 365 and Google Calendar can be easy with third-party apps. This way, whether you use Google or Office 365, you can keep all your appointments in one place.
The Office 365 calendar also works with iPhone. You can quickly add an Office 365 calendar to your iPhone so all your meetings and appointments are at your fingertips.
Add-ins and sync settings are crucial to achieving some of the mentioned integrations:
Skype integration:
Skype for Business is integrated into Office 365 by default. If your organization uses it (although most prefer using Microsoft Teams nowadays) you will see a “Skype Meeting” button when creating a new event. Simply click “Skype Meeting” to include Skype meeting details automatically.
Zoom integration:
- Install the Zoom for Outlook add-in from the Microsoft App Store.
- Once installed, you’ll find a new option in your Office 365 calendar to schedule a Zoom meeting.
- When you create a new event, you can select the “Add a Zoom Meeting” option, and Zoom will automatically generate meeting details.
Google Calendar integration:
Integrating your Office 365 calendar with Google Calendar is made simple with the help of Virto Calendar Overlay. Virto Calendar Overlay is a flexible tool that allows you to overlay multiple calendars and view all events in a single place. Follow the video instructions to sync a Microsoft Teams or Outlook calendar with Google Calendar.
Office 365 calendar on iPhone:
- Go to your iPhone settings.
- Scroll down and select “Accounts.”
- Tap “Add Account” and select “Microsoft Exchange.”
- Enter your Office 365 email address and tap “Next.”
- Sign in with your Office 365 credentials, and you’ll be able to access your calendar directly from the iPhone Calendar app.
Another exciting feature is the integration of the Office 365 calendar with iCal sources. This is made possible with the help of Virto Calendar Overlay, which allows you to overlay multiple calendars (Exchange, SharePoint, Google Calendar, SalesForce Calendar, SharePoint Lists, SQL Tables, or XML) and view them all in one place.
These diverse integrations mean that your Office 365 calendar can act as the ultimate hub for your schedule, enabling collaboration across platforms. So, no matter where your meetings or events are hosted, you can manage them all from one central location with Office 365 and Virto Calendar Overlay.
Customization
When it comes to personalizing your Microsoft Office 365 calendar, you have a range of options to make it truly yours.
With the Office 365 calendar, you can inject a dose of personality by customizing the color schemes and themes. You can choose from a variety of vibrant color options or even create your own color scheme. This allows you to visually differentiate between different types of events, making it easier to organize your schedule.
Follow these steps to customize your calendar color schemes and themes:
- Open your Office 365 calendar in the Outlook web app.
- Navigate to the settings menu by clicking the gear icon in the upper right corner.
- Look for the “Theme” section, where you will see the option to customize color schemes or themes, including dark mode, bold event colors, etc.
- Apply the changes, and your calendar will now reflect the new color scheme or theme.
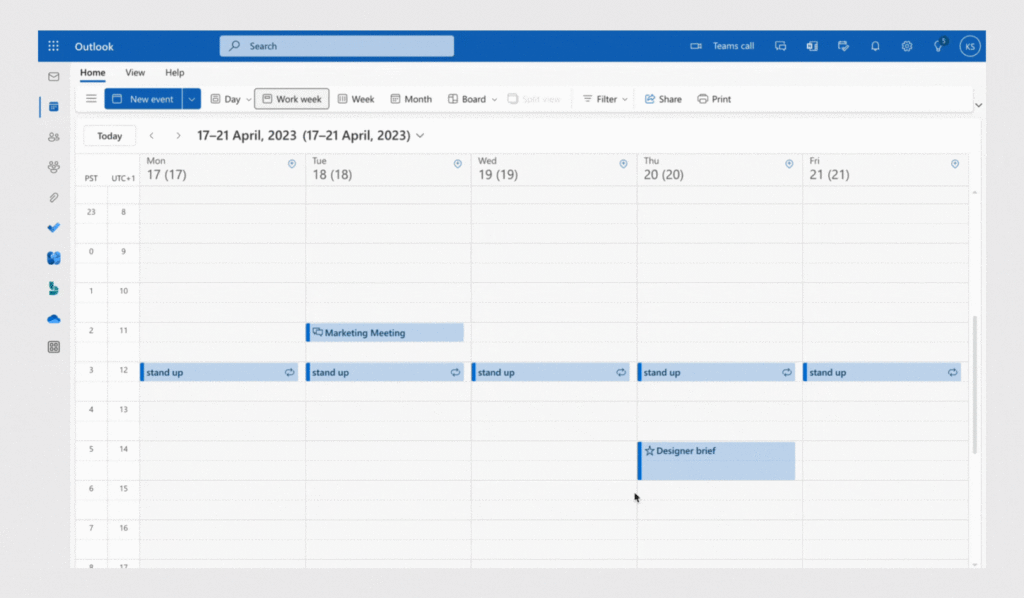
Additionally, the Office 365 calendar provides different layouts and view modes to cater to your needs. The default view mode is typically set to “Day,” “Week,” or “Month,” but you can switch to “Work Week” to focus on business hours and even choose how many days to display. Here’s how to change the calendar view mode:
- Open your Office 365 calendar in any Outlook application or browser.
- Look for the toolbar at the top of the calendar view.
- Click on the desired view mode to switch the calendar display to that mode.
- Explore each view mode to understand how they present the calendar information differently.
There’s also a “Split view” option on the ribbon. This allows you to divide your calendar into multiple panes to view different time ranges or calendars side by side. This feature is useful when comparing schedules or managing multiple calendars simultaneously.
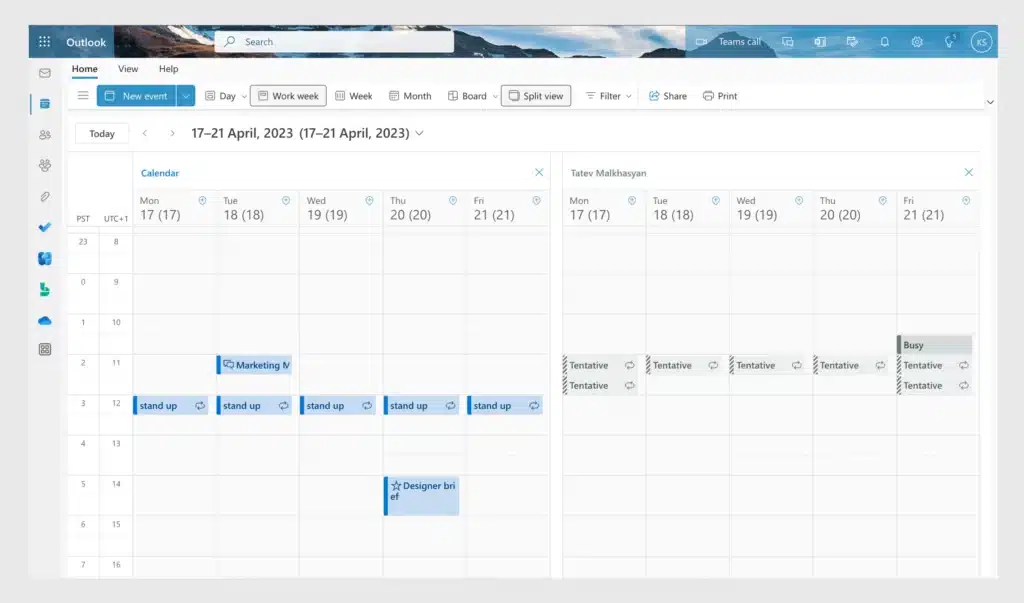
Please note that the board view, a visual representation of your calendar using sticky-note-like cards, was retired in June 2023.
With these customization options, the Office 365 calendar empowers you to tailor your calendar to match your workflow and preferences. By adapting the color schemes, layout, and view modes, you can create a calendar that is both visually appealing and optimized for your requirements.
Sharing and Permissions
Office 365 Calendar Sharing and Permissions are quite versatile. With the flexibility Office 365 offers, you’ll find it remarkably easy to align your schedules with others, all while maintaining control over your information. Let’s quickly break down the sharing options and permission customization in Office 365 calendars:
- Publicly publishing a calendar: Office 365 lets you publish your calendar on the web. This means anyone with the URL can view your calendar, which can be great for public events. You can choose to show your full details, just the times you’re busy, or somewhere in between. For a more in-depth look, explore our guide on how to publish a calendar in Office 365 and how to share an Office 365 calendar with external users.
- Shared calendars for teams: Office 365 allows you to create a shared calendar with a chosen group of people within your organization. This is especially useful for teams, as it can help with coordination and scheduling. If you’re curious about setting up a shared calendar, follow our step-by-step tutorial on how to create a shared Office 365 calendar.
- Private calendar sharing with specific individuals: This feature allows you to share your private calendar with certain people and determine how much they can see. You can grant varying levels of access, from simply seeing when you’re busy, to allowing someone to add and edit events.
- Delegating a calendar: This is a more specific form of sharing where you can allow another person to manage your calendar on your behalf. This is often used by executives who need assistants to manage their schedules.
You might be wondering about privacy and security when sharing your calendars. Thankfully, Microsoft has ensured that your information remains secure with Office 365. You have full control over what others can view, and Office 365 abides by all major data protection regulations, such as GDPR. Nonetheless, it’s crucial to only share information with trusted individuals or groups and to review permissions and sharing settings once in a while.
How to Use Office 365 Calendar
Here are some practical tips for getting the most out of your Office 365 calendar:
- Streamline event organization: Start by setting clear titles for your events and including as much detail as possible in the description. Use color-coding to differentiate between types of events. Always remember to set reminders, especially for important meetings or deadlines.
- Manage multiple calendars: If you’re juggling different projects or working with several teams, having separate calendars for each can be helpful. You can view one at a time or overlay multiple calendars to see everything at a glance. The Virto Calendar Overlay app is a tool that enhances your overlaying and personalization experience.
- Integrate with other Office 365 apps: One of the strengths of the Office 365 calendar is its ability to integrate seamlessly with other Microsoft apps. For instance, you can sync your SharePoint calendar with Outlook schedule Microsoft Teams meetings directly from the calendar, or attach OneDrive files to event details.
- Use meeting rooms in Outlook 365: When planning an in-person meeting, Office 365 makes it easy to find and book a meeting room. Check out this guide on how to display meeting rooms in Office 365.
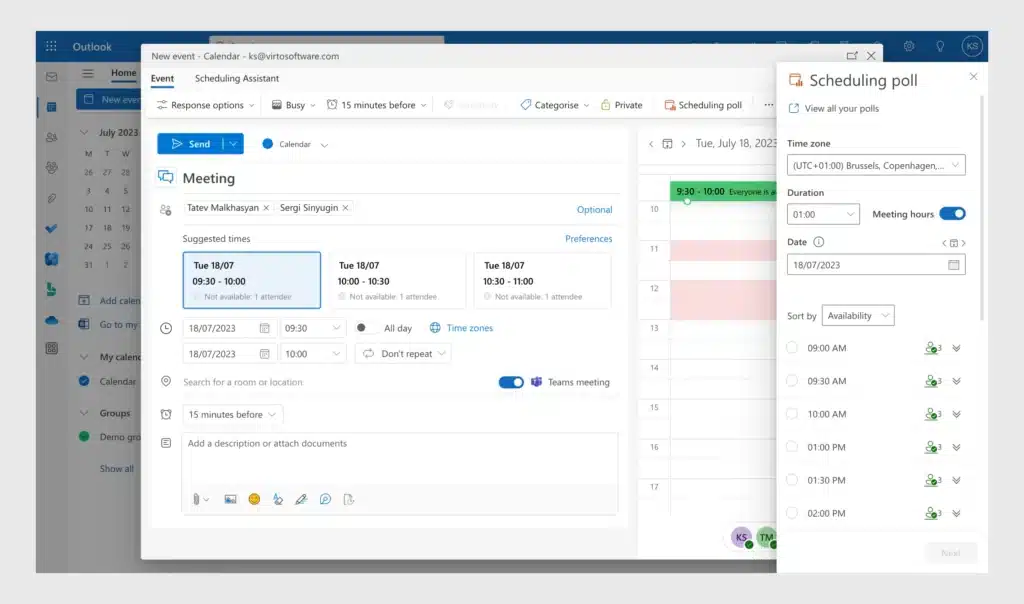
- Use the Scheduling Poll: The Scheduling Poll in Office 365 helps you find suitable meeting times for all attendees. It displays everyone’s availability based on their own Office 365 calendars. This feature eliminates the need for time-consuming email exchanges and simplifies the process of finding a convenient meeting slot for everyone.
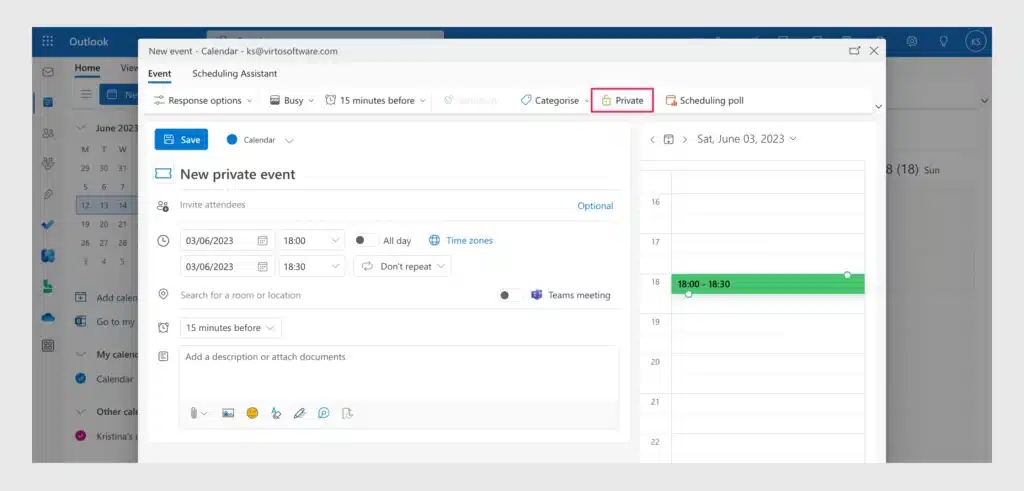
- Keep events private: You can mark events as private, which is especially useful if you share your calendar with others but want to keep certain events confidential.
- Use keyboard shortcuts: Learn and use keyboard shortcuts. For instance, you can press Ctrl+Shift+A to create a new appointment or Ctrl+G to go to a specific date.
All in all, the key to effective calendar management is consistent usage and exploring all the Office 365 calendar tips available.
Wrapping It Up
The Office 365 calendar, with its robust set of features, is an invaluable tool for organizing your team’s daily plans. Its rich customization options, including its versatile themes and view modes, cater to your unique scheduling needs and visual tastes.
Learning how to use the Office 365 calendar effectively will elevate your productivity. Streamlining event organization, managing many calendars, and using meeting rooms in Outlook 365 are among the many beneficial practices to adopt. Keyboard shortcuts can also expedite navigation, increasing your efficiency.
One of the standout Office 365 calendar features is its seamless integration with other Microsoft apps. For instance, syncing your Office 365 calendar with Outlook, scheduling Microsoft Teams meetings directly from the calendar, or attaching OneDrive files while setting up events will provide you with a unified workflow.
Furthermore, Office 365 calendar sharing options facilitate smooth collaboration within your organization. With features allowing public calendar publishing, calendar sharing, individual calendar sharing, and delegation, you can efficiently coordinate team efforts while maintaining the security of your data.
Mastering Office 365 calendar management not only simplifies your scheduling but also helps to secure your information. Regular review of permissions and sharing settings is crucial, as is learning how to use private events for setting personal boundaries in the workplace.
If you’re looking to leverage more Office 365 calendar tips and get the most out of your time management, consider using Virto Calendar Overlay. This dynamic tool enhances the Office 365 calendar, offering an improved overlaying and personalization experience.
In summary, Office 365 calendars empower you to take control of your personal and team-wide scheduling. Make the most of your Office 365 calendar and explore the extended capabilities offered by the Virto Calendar Overlay app!
FAQ about Office 365 Calendar
1. How do I access my calendar in Office 365?
Open a web browser and go to the Office 365 calendar page Log in, if it asks you to do so, by providing your Microsoft account’s email and password. Alternatively, you can go to the office.com website, log in with your Microsoft account, click the dots in the upper left corner to open the app menu, and search for calendar.
2. Is there a calendar in Office 365?
Yes, Office 365 includes a calendar that seamlessly integrates with other Office 365 applications, such as Outlook, Microsoft Teams, and SharePoint. Users can access their Office 365 calendar through various platforms, including the web-based Outlook interface, desktop applications like Outlook, mobile apps for iOS and Android devices, and through the aforementioned Office 365 apps.
3. Is Office 365 calendar free?
The Office 365 calendar is included in Microsoft subscription plans. They vary from $6 per user per month to $22 per user per month, depending on the set of tools you purchase; you can find all the current information on the official Microsoft website.
4. How do I create a calendar in Microsoft 365?
- Open a web browser and go to the Microsoft 365 calendar page. Log in with your Microsoft 365 credentials.
- In the panel on the left-hand side, click “Add calendar.”
- In the pop-up, click “Create blank calendar.”
- Provide a name for your new calendar in the designated field.
- Select the desired options for the new calendar, such as its color, icon, and location.
- Click the “Save” button to create your new calendar.
- The newly created calendar will now appear in the calendar list on the left-hand side of the screen, and you can start adding events, appointments, and reminders to it.
Please note that the exact steps may vary slightly depending on the version of Microsoft 365 you are using and the app that you use (web, desktop, mobile, etc.).
5. How do I manage calendars in Office 365?
Follow these steps to create and manage events:
- Open a web browser and go to the Office 365 calendar page. Sign in with your Office 365 credentials.
- You can create new events by clicking the blue “New event” button on the ribbon or by clicking the desired date and time and entering the event details.
- To manage existing events, click the event to open its details. From there, you can edit the event information, change the date or time, invite attendees, set reminders, and more.
You can also create additional calendars within Office 365 to organize different types of events or projects:
- To create a new calendar, click “Add calendar” on the left-hand side of the page.
- Give the new calendar a name and customize its settings as needed.
To share your calendar with others, click the three dots next to your calendar name (in the calendar list on the left) and click “Sharing and permissions.” From there, you can choose the individuals or groups you want to share your calendar with and set their permissions levels (view, edit, etc.).
You can also subscribe to external calendars, such as public calendars or team calendars:
- Go to the calendar view and click “Add calendar.”
- Click “Subscribe from web.”
- Follow the prompts to enter the calendar URL or search for available calendars.
You can also enable Office 365 calendar sharing with external users in the admin center. Read our instructions on how to do it in the linked blog post.
Additionally, you can manage calendar settings, such as default reminders, working hours, time zones, and more, by accessing the calendar settings or options within Outlook—click the gear icon in the top-right corner to go to the settings.
Please note that the specific steps may vary slightly depending on the version of Office 365 and the client application you are using.
6. What is Office 365 calendar app?
The Office 365 calendar app is a feature within Microsoft Office 365 that allows users to manage their schedules and arrange meetings with teammates and people outside the organization. You can access the Office 365 calendar through various platforms, including web browsers, desktop applications such as Outlook, mobile apps for iOS and Android devices, and through other Office 365 applications such as Microsoft Teams and SharePoint. It integrates seamlessly with other apps within the Microsoft ecosystem.
7. How do I give calendar permissions in Office 365 admin
- Sign in to the Office 365 admin center.
- Navigate to the “Admin Centers” section and click “Exchange.”
- In the exchange admin center, go to the “Recipients” tab and select “Mailboxes” or “Groups” depending on who you want to grant calendar permissions to.
- Find and select the mailbox or group for which you want to configure calendar permissions.
- Click the three dots or “More options” and choose “Manage calendar sharing.”
- Now you can configure permissions for the selected mailbox or group. You can specify permissions for individuals or groups by adding them as delegates.
- To add a delegate, click on the plus icon and search for the user or group in the address book. Select the desired user or group and choose the appropriate permission level (e.g., “Editor,” “Reviewer,” “Availability Only,” etc.).
- Save the changes.
Please note that the interface may vary depending on your version and configuration. We recommend you refer to Microsoft’s official documentation for more detailed instructions.
8. How do I sync my Office 365 calendar with my iPhone?
- On your iPhone, go to “Settings” > “Mail” > “Accounts.” Tap “Add Account” and select “Microsoft Exchange” as the account type.
- Enter your Office 365 email address and a description (name) for the account. Tap “Next.”
- Click “Sign In” to set up syncing automatically.
- On the next screen, enter your Office 365 account password (if it asks for it) and tap “Next.”
- Choose the data you want to sync with your iPhone, such as Mail, Contacts, Calendars, Reminders, and Notes. Make sure the toggle for “Calendars” is enabled.
- Tap “Save” to complete the setup process.
In a matter of minutes your calendars will be synced, and you will see all the Office 365 calendar appointments in your iPhone calendar.


