Guide to Setting Up a Shared Calendar in Microsoft Office 365
This guide explores step-by-step configuration and sharing best practices for Microsoft 365's built-in calendaring to advance enterprise-wide visibility and transparency.
As one of the most widely adopted productivity suites, Microsoft 365 and its predecessor Office 365 empowers over a million organizations worldwide (1). Core to its appeal lies seamless calendar and email integration advancing employee coordination.
In this practical guide, we will explore step-by-step how teams can use Microsoft 365’s built-in calendaring functionality to align scheduling across the organization. From creating new calendars to establishing permissions and sharing settings, we cover the key features and best practices for configuration.
While the native Microsoft 365 calendar provides a solid foundation, we also showcase Virto Calendar—a powerful alternative solution that enriches capabilities. By complementing Microsoft 365’s offering with Virto Calendar’s customizable views, calendar aggregation, and other advanced features, teams can realize the full potential of streamlined calendaring.
Between leveraging Microsoft 365’s native strengths and unlocking Virto Calendar’s enhancements, this guide provides the blueprint for shared scheduling success and superior time management.
For supplementary information on optimized Microsoft 365 calendar management or Outlook calendar integration, see our related articles on those topics:
- Microsoft 365 Calendars: A Practical Guide to Managing Multiple M365 Calendars
- Your Ultimate Guide to Sharing Outlook Calendars.
What Is Office 365 Shared Calendar?
Microsoft 365, formerly known as Office 365, offers a comprehensive and versatile calendar system that serves as a powerful tool for managing time and scheduling. O365 shared calendars are deeply integrated with various Microsoft applications, providing seamless functionality across different platforms and devices. Here’s a brief overview of how calendars work in Microsoft 365:
- Different data sources: Calendars in Microsoft 365 can be created from multiple sources, including Exchange Online, Outlook, Microsoft Teams, and SharePoint. Each source offers unique features and benefits, allowing users to choose the most suitable platform for their scheduling needs.
- Functionality: The calendars support a wide range of functionalities, such as scheduling meetings, setting reminders, booking resources, and creating recurring events. They also allow for color-coding, categorizing events, and setting privacy levels to manage visibility.
- Integrations: Microsoft 365 calendars integrate seamlessly with other Microsoft applications. For example, a meeting scheduled in Outlook will automatically appear in Microsoft Teams, and events can be embedded into SharePoint sites. This integration ensures that all your scheduling information is synchronized across the ecosystem.
- Availability on different devices: Microsoft 365 calendars are accessible on various devices, including desktops, laptops, tablets, and smartphones. This cross-device availability ensures that users can manage their schedules anytime, anywhere, enhancing productivity and flexibility.
Overview of M365 shared calendar types
Microsoft 365 offers several types of calendars to cater to different needs:
- Personal calendars: These are individual calendars used for personal scheduling and are typically only visible to the calendar owner. They are ideal for managing personal appointments and tasks.
- Shared calendars: Shared calendars allow multiple users to view and manage the same calendar. They are perfect for teams and departments that need to coordinate schedules and plan collaborative activities.
- Group calendars: Group calendars are associated with Microsoft 365 Groups. They enable members of a group to view and schedule events that are relevant to the entire group. These calendars are useful for larger teams and projects.
Understanding shared calendar Office 365
Shared calendars in Microsoft 365 are designed to facilitate collaboration and coordination among team members, departments, and even external stakeholders. They offer a range of features that make it easy to manage and share scheduling information. Here’s a more detailed look at shared calendars:
Key features of shared calendars:
- Accessibility:
- Multiple users: Shared calendars can be accessed and managed by multiple users. This means that everyone on the team can view, add, and modify events, ensuring transparency and coordination.
- Permission levels: Admins can set different permission levels (e.g., view-only, edit, full control) to control who can make changes to the calendar. This helps maintain order and prevent unauthorized modifications.
- Integration with Microsoft applications:
- Outlook: Shared calendars integrate seamlessly with Outlook, allowing users to schedule meetings, send invites, and view availability directly within the email client.
- Microsoft Teams: Integration with Teams enables users to schedule meetings and events that automatically appear in their Teams calendar, making it easier to coordinate with remote teams.
- SharePoint: Shared calendars can be embedded in SharePoint sites, providing a centralized location for team schedules and event planning.
- Real-time updates: Any changes made to shared calendars are updated in real-time across all users’ devices. This ensures that everyone has the most current information, reducing the risk of scheduling conflicts.
- Cross-device availability: Shared calendars are accessible on desktops, laptops, tablets, and smartphones. This cross-device compatibility ensures that users can manage their schedules from anywhere, at any time.
- Event customization: Users can create events with detailed descriptions, set reminders, and categorize events using color-coding. This helps in organizing the calendar and making it easy to identify different types of events at a glance.
Internal use of shared calendars: Within an organization, shared calendars are invaluable for:
- Team coordination: They help teams stay aligned by providing a single, shared view of all scheduled activities, meetings, and deadlines.
- Resource management: Shared calendars can be used to book and manage shared resources such as meeting rooms, equipment, or company vehicles.
- Project tracking: Teams can use shared calendars to track project milestones, deadlines, and deliverables, ensuring that everyone is aware of their responsibilities and timelines.
- Leave management: Shared calendars can also be used to manage and track employee leave, ensuring that team leads are informed about availability and absences.
External use of shared calendars: Shared calendars are not only useful for internal coordination but also for managing relationships and schedules with external parties:
- Client meetings: Organizations can share calendars with clients to schedule and manage appointments, ensuring that both parties are informed and prepared.
- Event planning: Shared calendars can be used to coordinate events with external partners, such as workshops, conferences, or training sessions.
- Vendor coordination: Companies can use shared calendars to manage and schedule interactions with vendors, ensuring that deliveries and services are timely and well-coordinated.
As can be seen from above, Microsoft 365 shared calendars are an invaluable asset for productive teamwork. Here’s a summary of their benefits:
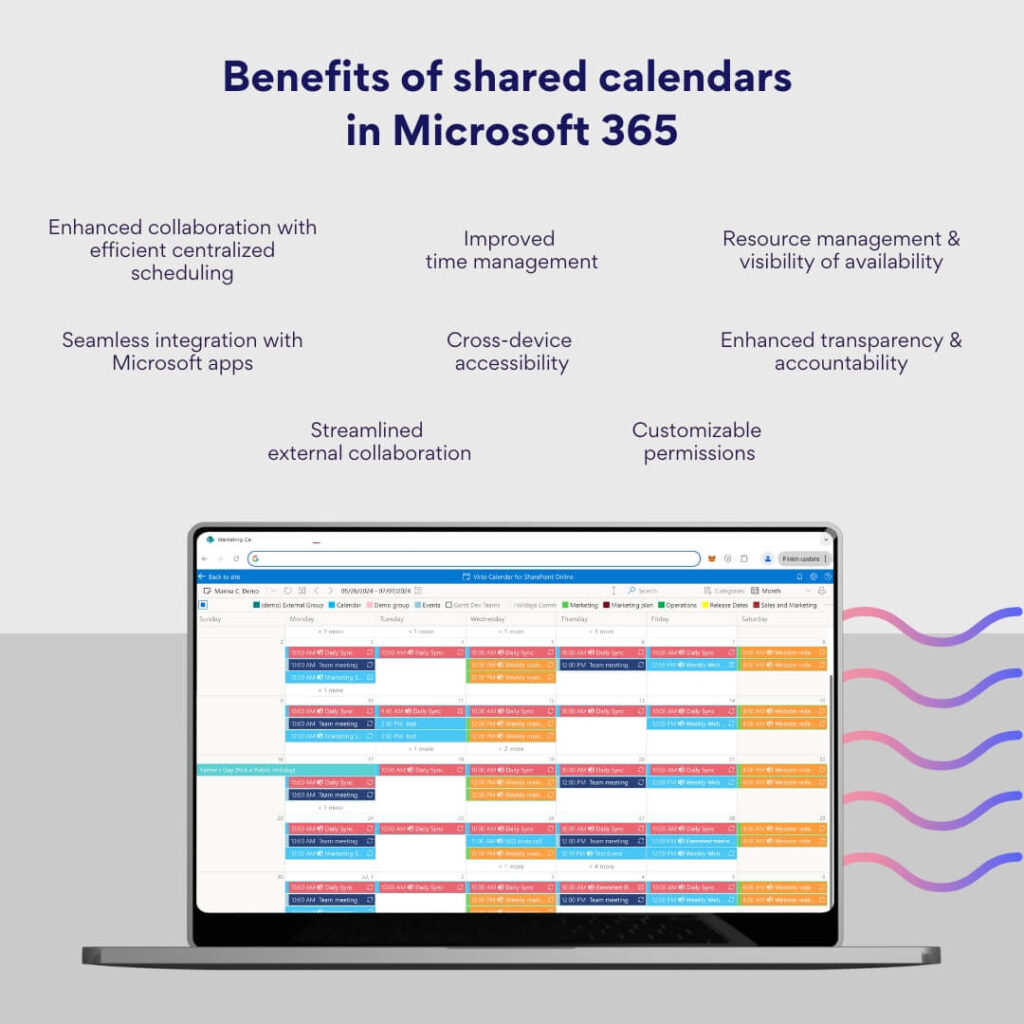
👉 Does Office 365 have a shareable calendar? Yes, Microsoft 365 includes shareable calendar features. Users can create and share calendars using Outlook, SharePoint, and within Microsoft (Office) 365 Groups. These calendars can be shared with specific individuals, groups, or even company-wide, depending on the permissions set by the calendar owner.
How to Create a Shared Calendar in Office 365
Creating a shared calendar in Microsoft 365 can be accomplished through various methods depending on your organization’s needs. Here, we’ll explore three approaches: setting up a group calendar in SharePoint, creating a public mailbox for enterprises, and creating a shared mailbox for small businesses.
Setting up a Office 365 group calendar in SharePoint
Here’s a step-by-step instructions on creating and setting up a SharePoint group calendar, which allows team members to collaborate and manage schedules:
- Open SharePoint: Navigate to your SharePoint site in your web browser.
- Go to site contents: From the SharePoint home page, click on the gear icon at the top right and select “Site contents”.
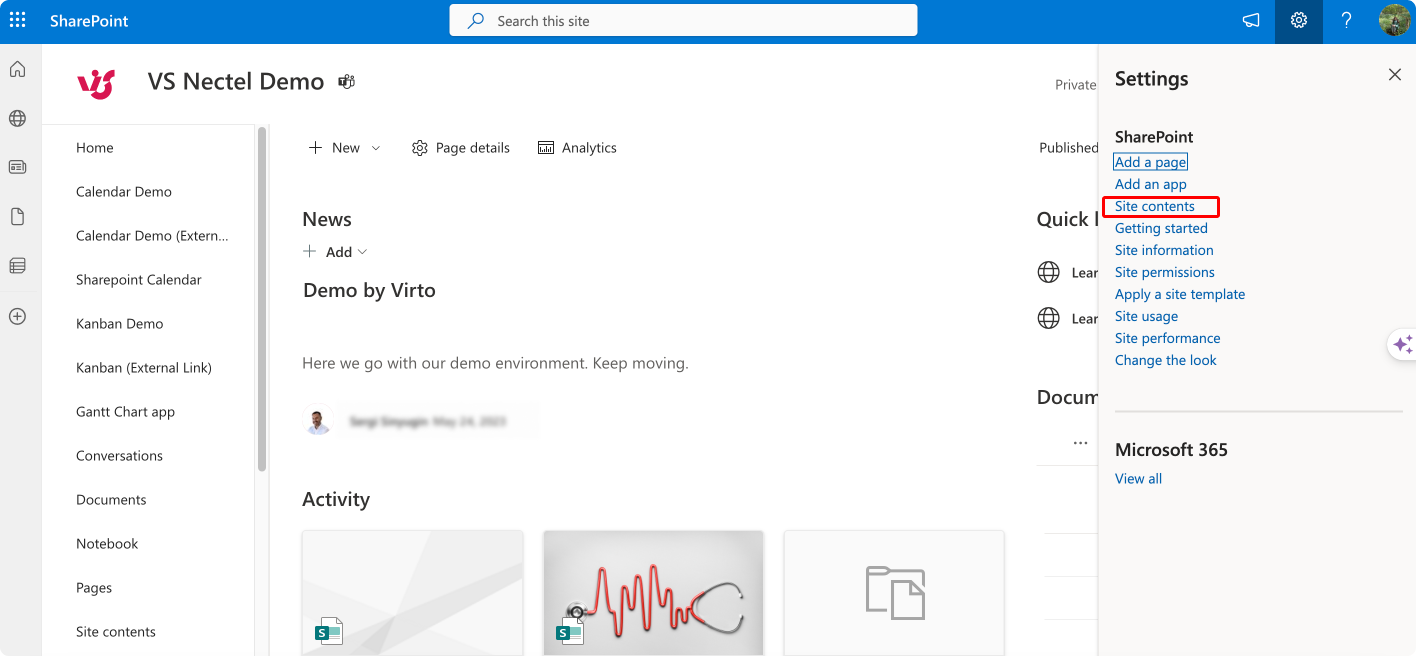
Pic. 1. Navigate to “Site contents”.
- Add an app: Click on “New” > “App” or “Add an app” to add a new application.

Pic. 2. Click on “add an app” to create new app.
- Choose calendar app: Scroll through the list of apps and select the “Calendar” app.

Pic. 3. Find the “Calendar” app.
- Name your calendar: Enter a name for your calendar (e.g., “Team Calendar”) and click “Create”.
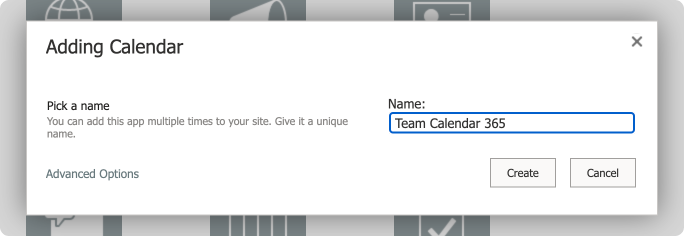
Pic. 4. Name your calendar and click “Create”.
- Access the calendar: Once created, you can find your calendar under “Site contents”. Click on it to open and start using it.
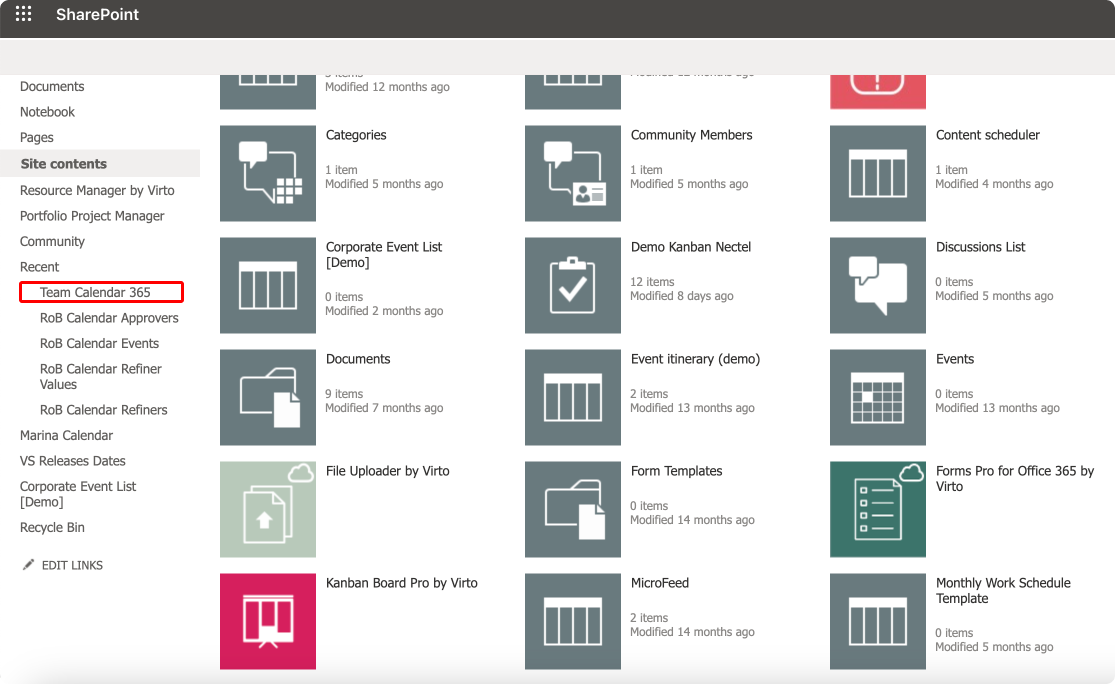
Pic. 5. Locate your newly added calendar under “Site contents”.
- Configure calendar settings:
- Click on the calendar name, then select “Calendar” in the ribbon.
- Choose “List Settings” to configure calendar settings.
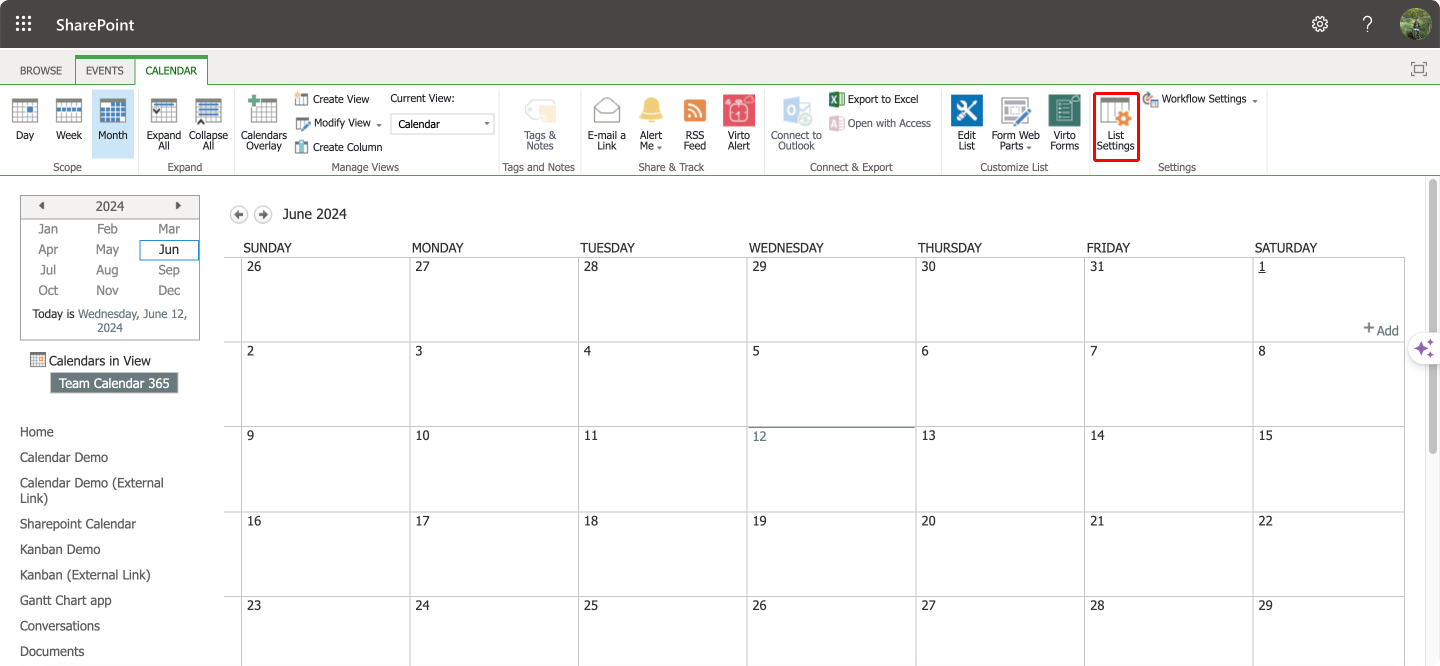
Pic. 5. Open your calendar and click on “List Settings”.
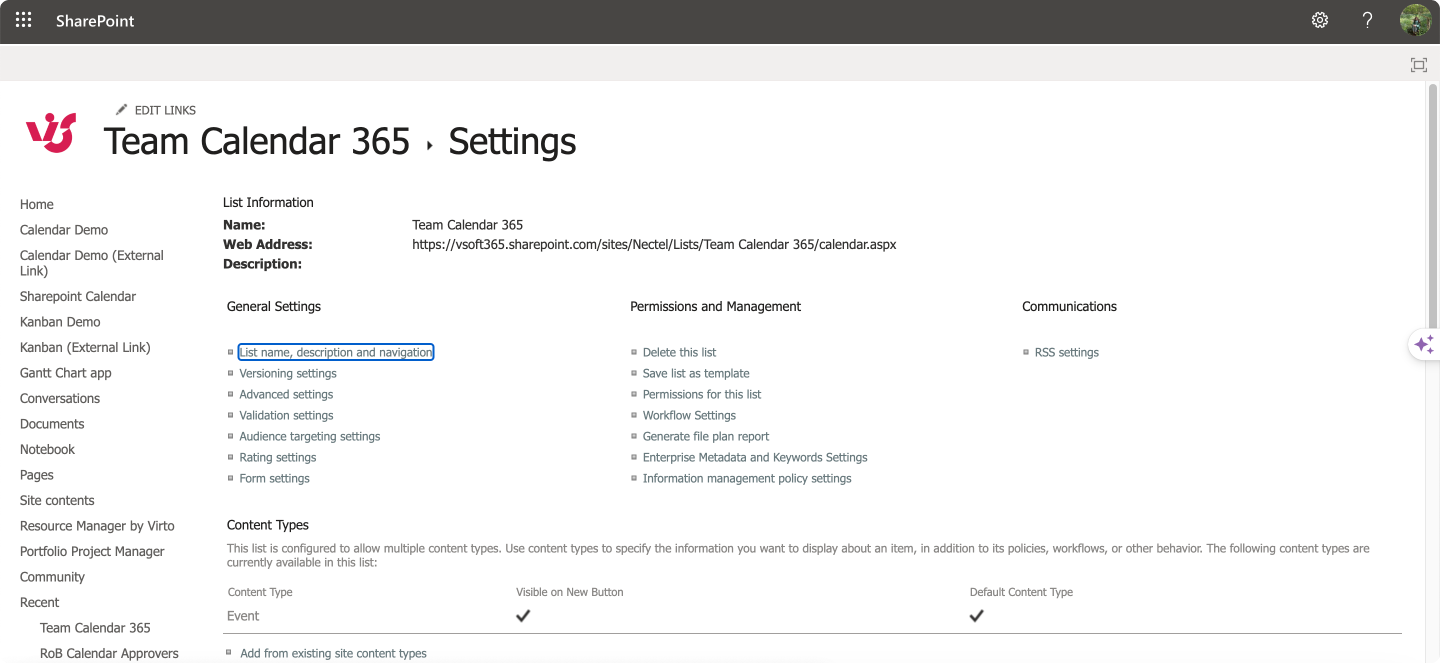
Pic. 6. Check your calendar settings.
- Under “General Settings,” select “Title, description and navigation.” To share the event calendar with colleagues in Microsoft 365, enable the “Use this calendar to share members’ schedules” option found in “Group Calendar Options.”
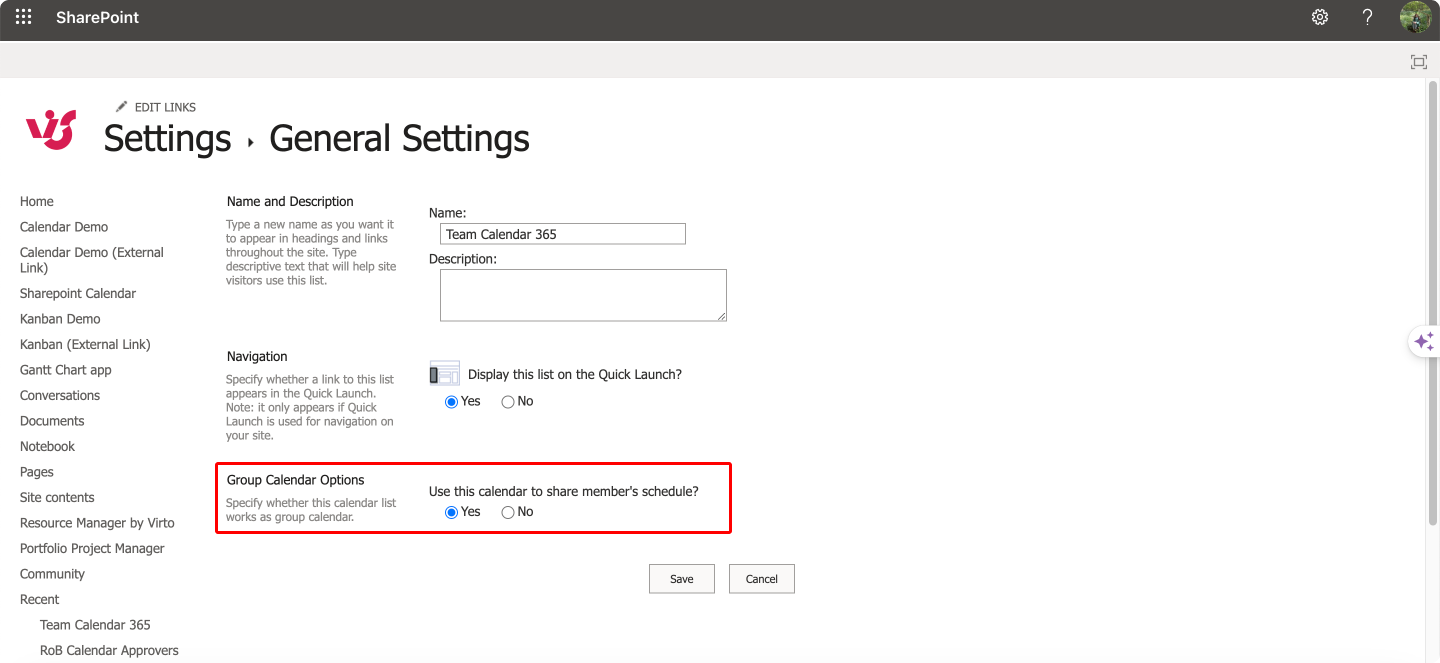
Pic. 7. Amend group calendar options in “General settings”.
- Under “Permissions for this list” manage who has access to the calendar and what level of control they have.
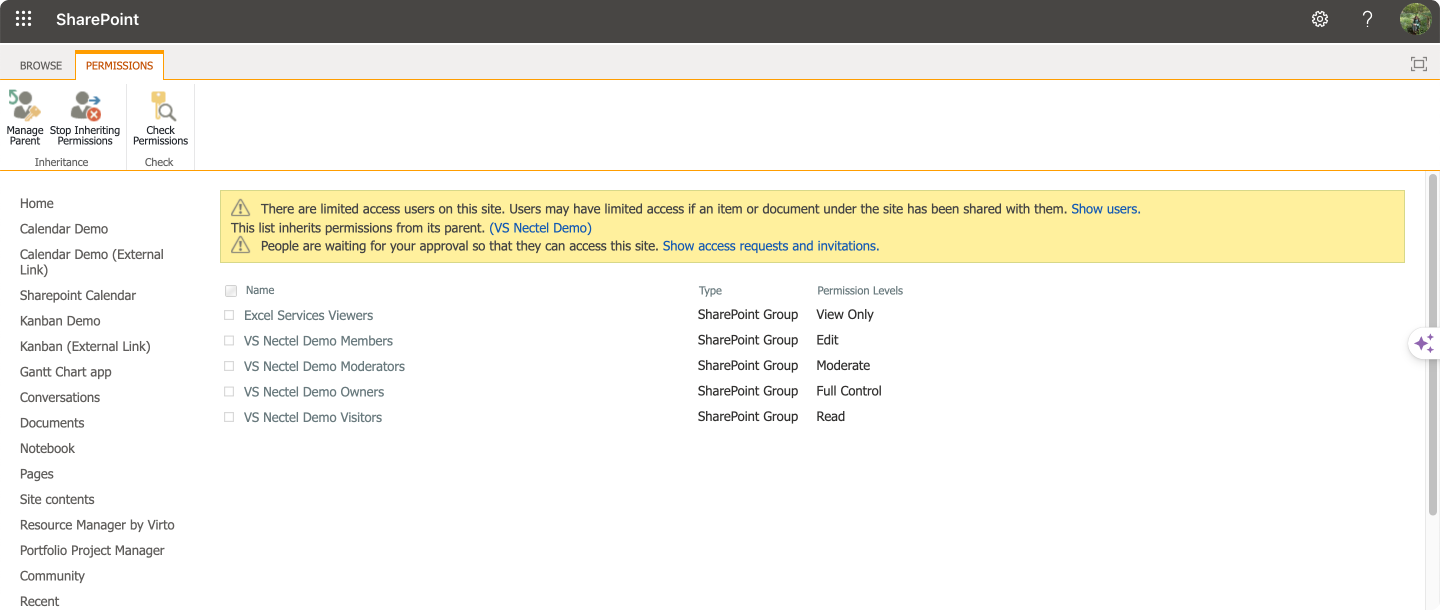
Pic. 8. Ensure appropriate permissions in the “Permissions for this list” section.
👉 For a visual guide to create shared calendar Office 365, refer to the excellent tutorial by Microsoft here.
Sharing Office 365 group calendar in SharePoint
Here are your step-by-step instructions for sharing a group calendar in SharePoint:
- Go to permissions: In the “List Settings” page, click on “Permissions for this list” to manage who can access the calendar.
- Grant access:
- Click on the “Grant Permissions” button.
- Enter the names or email addresses of the people or groups you want to share the calendar with.
- Select the appropriate permission level (e.g., “View Only,” “Edit,” “Full Control”).
- Click “Share” to send invitations.
If there are groups listed under “Permissions” (as in Pic. 8) and you want to add new members or modify existing groups, click on the desired group, such as “Members”, and make the necessary changes. To add a person, click on “New” and then select “Add users to this group”.

Pic. 9. Select a group and then “New” to add a new member.
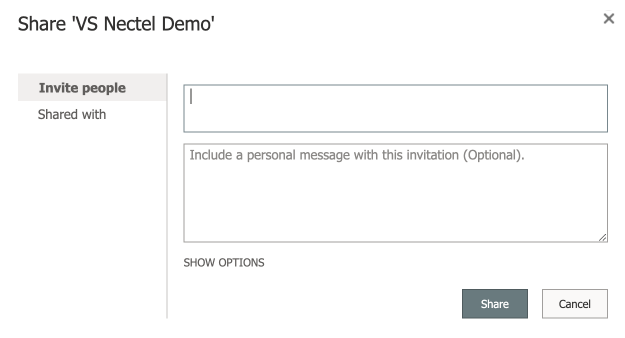
Pic. 10. Invite new people by finding them or their emails in the directory.
You can also add entire groups to the calendar for broader access. Just type the name of the group in the “Invite people” field, or use the browse icon to search for the group.
If you need to change permissions, select the user or group from the list and adjust their settings accordingly.
- Accessing other members’ calendars: The following method allows you to set a temporary view of another team member’s calendar within the group calendar, facilitating easier coordination and planning.
- To see other members’ calendars, go to the group calendar under “Site settings.”
- Use the “Add Person” feature to type in the name of the person or group, or click the browse icon to search.

Pic. 11. Add people for a temporary view of their calendar.
By following these detailed steps, you can effectively share a group calendar in SharePoint and add people or groups to it, ensuring smooth collaboration and efficient schedule management within your organization.
👉 So, how do I create a shared calendar in SharePoint 365? To create a shared calendar in SharePoint 365, go to your SharePoint site and click on “Site Contents.” Select “New” and choose “App,” then find and select “Calendar.” Name your calendar and add it to your site. Once created, you can configure permissions to allow specific users or groups to view and edit the calendar. You can also sync this calendar with Outlook by clicking on “Connect to Outlook” under the “Calendar” tab.
Creating a public mailbox for enterprises as a shared calendar 365
Public mailboxes are useful for enterprises that need a shared space accessible to multiple users. Here’s how to create and set one up:
- Open the Exchange admin center (EAC):
- Log in to your Microsoft 365 or Exchange admin account.
- Navigate to the Exchange admin center (EAC).
- Navigate to “Public Folders”:
- In the EAC, go to the left-hand navigation pane.
- Select “Public Folders”.
- Create a “Public Folder Mailbox”:
- Click on “Public Folder Mailboxes”.
- Click on the + (plus) sign to create a new public folder mailbox.
- Fill in the required details such as name and mailbox properties.
- Click “Save”.
- Create a root public folder:
- Go back to “Public Folders” in the navigation pane.
- Click on “Public Folders” again.
- Click on the + (plus) sign to create a new public folder.
- Enter the folder name (e.g., “Shared Calendars”) and ensure it’s at the root level.
- Click “Save”.
- Create a calendar public folder:
- Select the root public folder you created (e.g., “Shared Calendars”).
- Click on the + (plus) sign to create a new public folder under this root folder.
- Enter the name for your calendar (e.g., “Team Calendar”).
- In the “Folder Contains” dropdown, select “Calendar Items”.
- Click “Save”.
- Assign permissions to the calendar public folder:
- Select the newly created calendar public folder (e.g., “Team Calendar”).
- Click on “Manage” under “Folder Permissions”.
- Add users or groups and assign the appropriate permission levels (e.g., Owner, Publishing Editor, Reviewer).
- Click “Save”.
- Access the shared calendar: Users can access the shared calendar via Outlook or Outlook Web App (OWA).
In Outlook desktop:
- Go to “Folders” and select “Public Folders”.
- Browse to the calendar public folder you created (e.g., “Shared Calendars” > “Team Calendar”).
- Right-click the calendar and select “Add to Favorites” for easy access.
In Outlook OWA:
- Click on the “Calendar” icon located in the left-hand navigation pane. This will open your calendar view.
- Click on “Add Calendar” located at the top of the calendar pane.
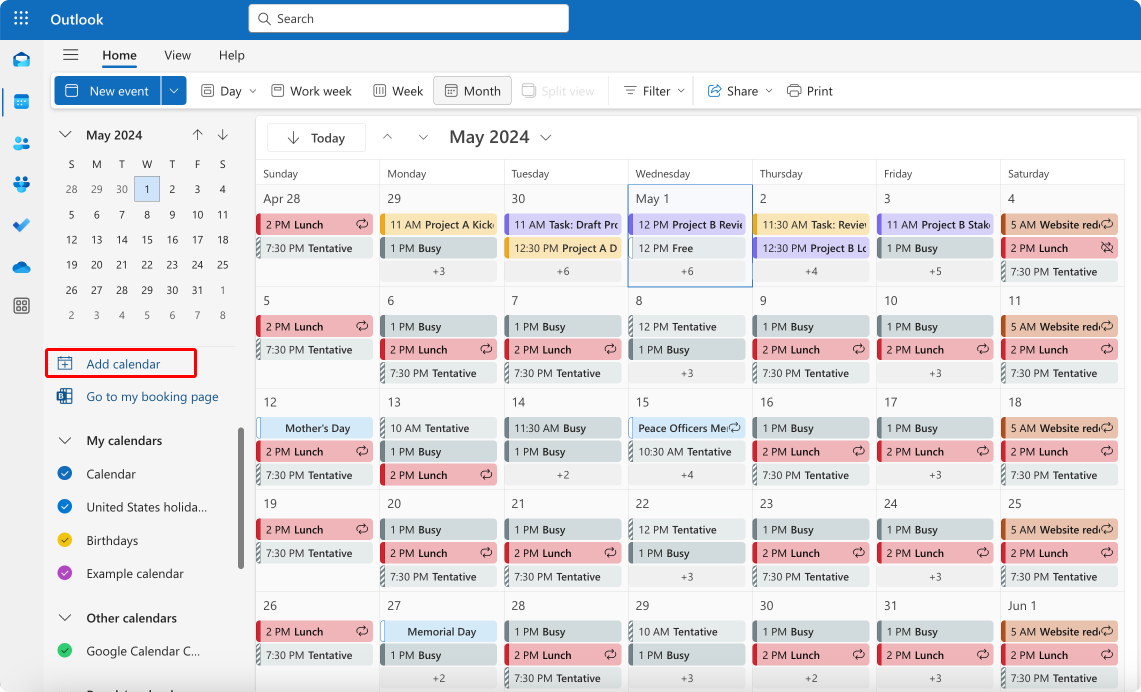
Pic. 12. Click on “Add calendar” to add shared calender.
- From the dropdown menu, select “Add from directory”.
- In the “Add from directory” dialog, enter the name or email address of the person or public folder whose calendar you want to access.
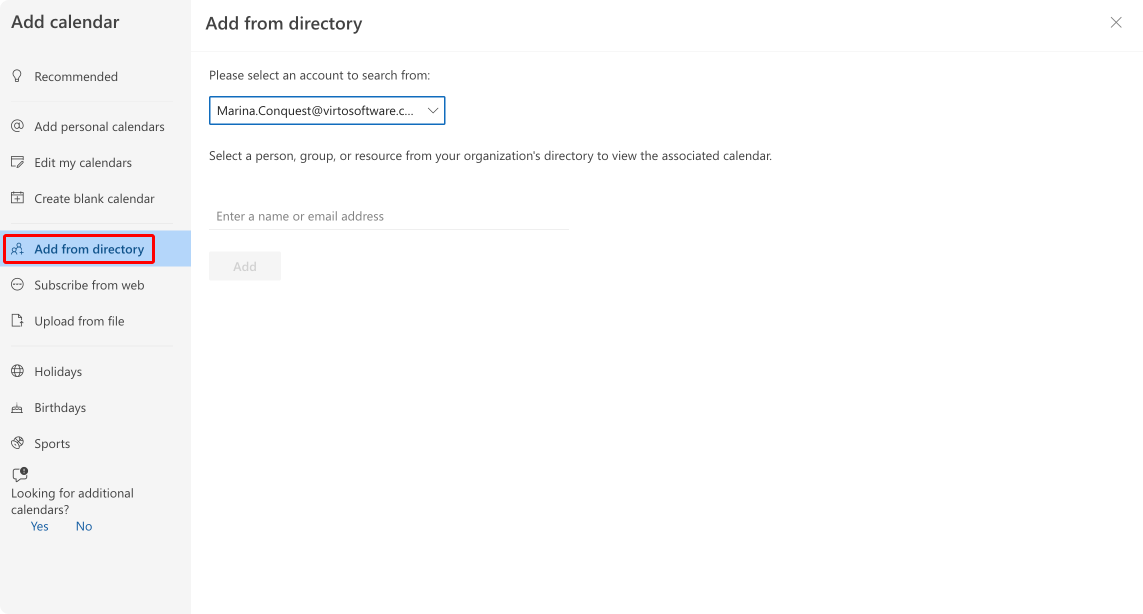
Pic. 13. Add shared calendar from directory.
- Once you have selected the correct calendar, click “Add” to add it to your list of calendars.
- The shared calendar will now appear under “Other Calendars” in your calendar pane.
- Notify Users: Optionally, notify the users that the shared calendar public folder has been created and provide instructions on how to access and use it.
👉 To learn more about Exchange admin center (EAC) & public folders in particualr, refer to the official Microsoft documentation here: Exchange admin center in Exchange Online & Public folders in Microsoft 365, Office 365, and Exchange Online.
Creating a shared mailbox for small businesses as a shared calendar O365
Shared mailboxes allow small businesses to create a common calendar for team collaboration without needing additional licenses. Here’s how you’d create one:
- Open the Microsoft 365 admin center: Log in to your Office 365 admin account and navigate to the Microsoft 365 admin center.
- Create a shared mailbox:
- In the left navigation pane, go to “Teams & groups” and then “Shared mailboxes”.
- Click on “Add a shared mailbox”.
- Set up the shared mailbox
- Enter a name and an email address for the shared mailbox.
- Click “Save changes”.
- Add members to the shared mailbox
- After creating the shared mailbox, select it from the list.
- Click “Edit” next to “Members” and add the users who need access.
- Access the shared calendar
- Users added to the shared mailbox can access the shared calendar by opening Outlook.
- In Outlook, go to the calendar view and look for the shared mailbox under “Shared Calendars”.
👉 To learn more about creating a shared mailbox, refer to official guide here: Create a shared mailbox
👉So, how to create a shared calendar in 365 admin? In the Office 365 admin center, navigate to the “Groups” section and click on “Shared Mailboxes.” Create a new shared mailbox and, within its settings, enable the calendar feature. Assign permissions to the users who need access to this calendar by adding them to the mailbox. The shared calendar will be accessible through Outlook once the shared mailbox is set up. Users can then add this shared calendar to their Outlook by opening the shared mailbox and selecting the calendar.
Common errors, difficulties, and solutions in creating and setting up Office 365 shared calendars.
Creating and setting up group calendars in SharePoint, public mailboxes, and shared mailboxes can involve various challenges and errors. Here are some common issues and their solutions:
- Challenges with creating and setting up a group calendar in SharePoint
- Permissions issues:
- Problem: Users cannot access or edit the group calendar.
- Solution: Ensure proper permissions are set. Go to the calendar settings and verify that the appropriate users or groups have the necessary permissions (View, Edit, Full Control).
- Calendar not displaying:
- Problem: The group calendar does not display correctly or is not visible in the SharePoint site.
- Solution: Check the web part settings and ensure the calendar is properly added to the page. Also, verify that the calendar view is correctly configured.
- Sync issues:
- Problem: The group calendar does not sync with Outlook or other applications.
- Solution: Ensure that the calendar is connected to Outlook by using the “Connect to Outlook” feature in SharePoint. Verify that users have the necessary permissions to sync.
- Navigation confusion:
- Problem: Users find it difficult to locate the group calendar.
- Solution: Add a link to the calendar in the site’s navigation pane or on the homepage for easier access.
- Issues with creating a public mailbox
- Mailbox creation failure:
- Problem: Errors occur during the creation of the public mailbox.
- Solution: Ensure that you have the necessary administrative privileges to create mailboxes. Check for any quota limits or policies that might be restricting mailbox creation.
- Permissions configuration:
- Problem: Users cannot access or use the public mailbox.
- Solution: Verify that the correct permissions are set for the public folder. Use the Exchange Admin Center to manage and assign permissions properly.
- Folder visibility:
- Problem: The public folder mailbox is not visible to users.
- Solution: Ensure that the public folder is added to the favorites in users’ Outlook clients. This can be done by right-clicking the folder and selecting “Add to Favorites.”
- Email delivery issues:
- Problem: Emails sent to the public mailbox are not being delivered.
- Solution: Check for any email forwarding rules or delivery restrictions that might be affecting the mailbox. Verify the email address and ensure it is correctly configured.
- Difficulties in creating a shared mailbox
- Mailbox creation failure:
- Problem: Errors occur during the creation of the shared mailbox.
- Solution: Ensure that you have the necessary administrative privileges to create shared mailboxes. Check for any quota limits or policies that might be restricting mailbox creation.
- Access issues:
- Problem: Users cannot access or send emails from the shared mailbox.
- Solution: Assign the necessary permissions (Full Access, Send As, Send on Behalf) through the Microsoft 365 Admin Center or Exchange Admin Center. Ensure users are added as members of the shared mailbox.
- Visibility in Outlook:
- Problem: The shared mailbox does not appear in users’ Outlook.
- Solution: Users may need to manually add the shared mailbox in Outlook. Go to File > Account Settings > Account Settings, then click on the Email tab, select your account, and click Change > More Settings > Advanced > Add.
- Email delivery issues:
- Problem: Emails sent to the shared mailbox are not being received.
- Solution: Check the mailbox rules and delivery restrictions. Ensure the shared mailbox is not over its storage limit and that there are no issues with the email address.
Solutions to common challenges with share Office 365 calendar
By addressing common challenges with proactive solutions, you can ensure a smoother experience when setting up and managing shared calendars in Microsoft 365. That’s why it’s worth exploring these solutions in a little more detail.
- Ensure proper permissions: Permissions dictate who can access, edit, and manage calendars, public mailboxes, and shared mailboxes. Incorrect permissions can lead to unauthorized access or prevent users from performing necessary tasks. Here’s how to manage them effectively:
- For SharePoint group calendars:
- Go to the calendar settings in SharePoint.
- Click on “Permissions for this calendar”.
- Add or remove users and set their permission levels (e.g., View, Edit, Full Control).
- Ensure that permissions are inherited correctly if the calendar is part of a larger site structure.
- For public mailboxes:
- In the Exchange Admin Center (EAC), navigate to “Public Folders”.
- Select the relevant public folder and click “Manage Permissions”.
- Assign roles such as Owner, Publishing Editor, or Reviewer based on the needs.
- Use PowerShell commands if necessary for bulk permission assignments (e.g., Add-PublicFolderClientPermission).
- For shared mailboxes:
- In the Microsoft 365 Admin Center, go to “Groups” > “Shared mailboxes”.
- Select the shared mailbox and click “Edit” to manage members.
- Assign “Full Access” and “Send As” permissions to appropriate users.
- Verify permissions periodically to ensure they align with any organizational changes.
- Provide clear instructions: Clear instructions help users understand how to access and use the new resources, reducing confusion and support requests. Here’s how best to do it:
- Step-by-step guides:
- Create detailed documentation with screenshots for common tasks, such as adding a shared mailbox in Outlook or accessing a SharePoint calendar.
- Ensure the guides are easily accessible, such as on an intranet site or shared drive.
- Video tutorials: Record short video tutorials demonstrating how to perform key tasks. These can be more engaging and easier to follow than written instructions.
- FAQs: Develop a list of frequently asked questions and their answers. Update this list based on user feedback and common issues reported.
- Regular monitoring and maintenance: Regular monitoring ensures that shared resources are functioning correctly and helps identify issues before they become major problems. Here’s how to monitor and maintain:
- Usage reports:
- Generate and review usage reports in the Microsoft 365 Admin Center to monitor how often shared resources are accessed and used.
- Identify any patterns or anomalies that might indicate issues.
- Audit logs:
- Enable and review audit logs to track changes and access to shared resources.
- Use these logs to investigate any unauthorized access or unexpected changes.
- Storage quotas:
- Set storage quotas for mailboxes to prevent them from becoming too large and affecting system performance.
- Regularly check storage usage and address any mailboxes approaching their limits.
- Training and support: Training ensures that users are comfortable with the new tools, while support channels provide a way to address issues promptly. Here’s how to provide training and support:
- Training sessions:
- Organize periodic training sessions to introduce new features or refresh users on existing tools.
- Use a mix of in-person and virtual sessions to accommodate different schedules and locations.
- Documentation:
- Maintain up-to-date documentation covering all aspects of using shared resources.
- Make this documentation easily accessible and regularly update it based on user feedback and technological changes.
- Support channels:
- Set up dedicated support channels, such as a helpdesk or support email, for users to report issues.
- Ensure that support staff are knowledgeable about the systems and can provide timely assistance.
- Feedback mechanisms:
- Implement feedback mechanisms, such as surveys or suggestion boxes, to gather user input on their experiences and any challenges they face.
- Use this feedback to continuously improve the tools and support offered.
👉 How to manage shared calendars in Office 365 admin? To manage shared calendars in Office 365 admin, log into the Office 365 admin center and navigate to the “Groups” section. From there, you can manage shared mailboxes, including their calendar settings. Adjust permissions and access levels for users within the shared mailbox settings. Additionally, you can use the Exchange admin center to further customize calendar permissions, sharing policies, and manage public folder calendars. Regularly review and update permissions to ensure appropriate access levels for all users.
Microsoft 365 Shared Calendars: Share Your Calendar in Office 365
We’ve already discussed how to create and share calendar in Office 365 using SharePoint group calendars, public and shared mailboxes. In this section, we’ll cover a few more options to share calendar Office 365, including sharing with external users and security considerations.
So, here are a few more ways to share Office 365 calendar:
- Internal team collaboration: Shared calendars are invaluable for coordinating schedules within your team. You can create a shared calendar in Outlook and add events, meetings, and deadlines that everyone on the team can see. This ensures that all team members are aware of each other’s availability and helps avoid scheduling conflicts. Here’s how to create a shared calendar for Outlook 365:
- Open Outlook and navigate to “Calendar”.
- Click on “Add Calendar” and select “Create new blank calendar”.
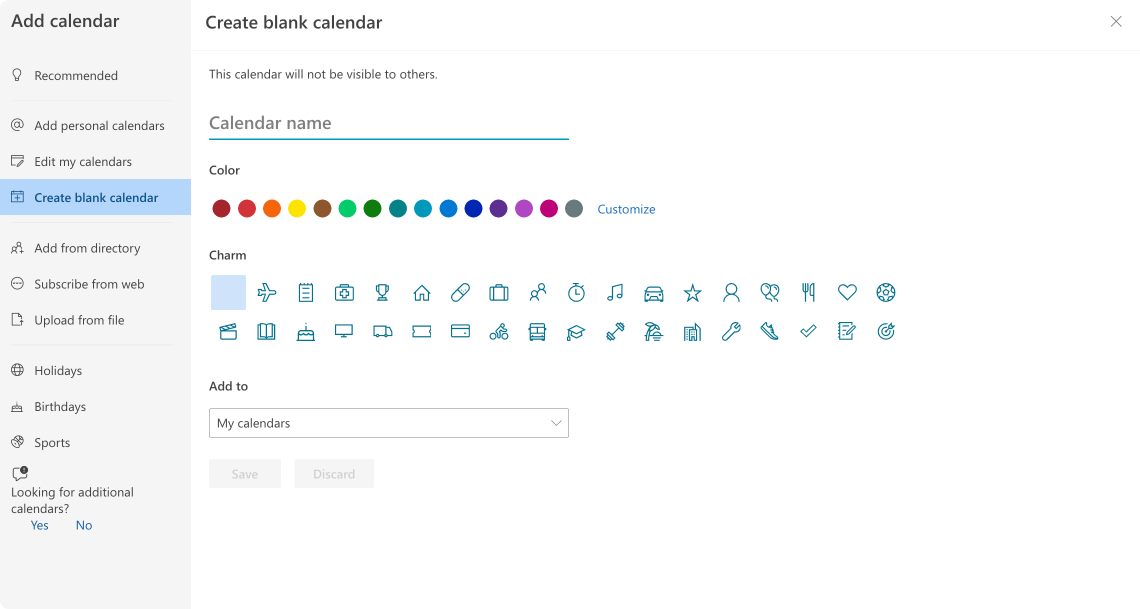
Pic. 14. Click on “Create blank calendar” to create a shared calendar from scratch.
- Name your calendar and specify its location.
- Share the calendar with your team by either right-clicking on the calendar itself (or on the three dots near it), selecting “Sharing and permissions”, and adding the people you want to share with.
👉 For more information on creating and sharing a calendar in Outlook, please refer to our comprehensive guide on the topic: Calendar Sharing in Outlook.
- Department-wide scheduling: For larger groups, such as departments or entire organizations, shared calendars can be used to schedule departmental meetings, training sessions, and other events. This centralizes scheduling and ensures that everyone is on the same page. Here’s how to share a calendar with a group:
- Open Outlook and go to “Calendar”.
- Right-click on the calendar (or on the three dots near it) and select “Sharing and permissions”
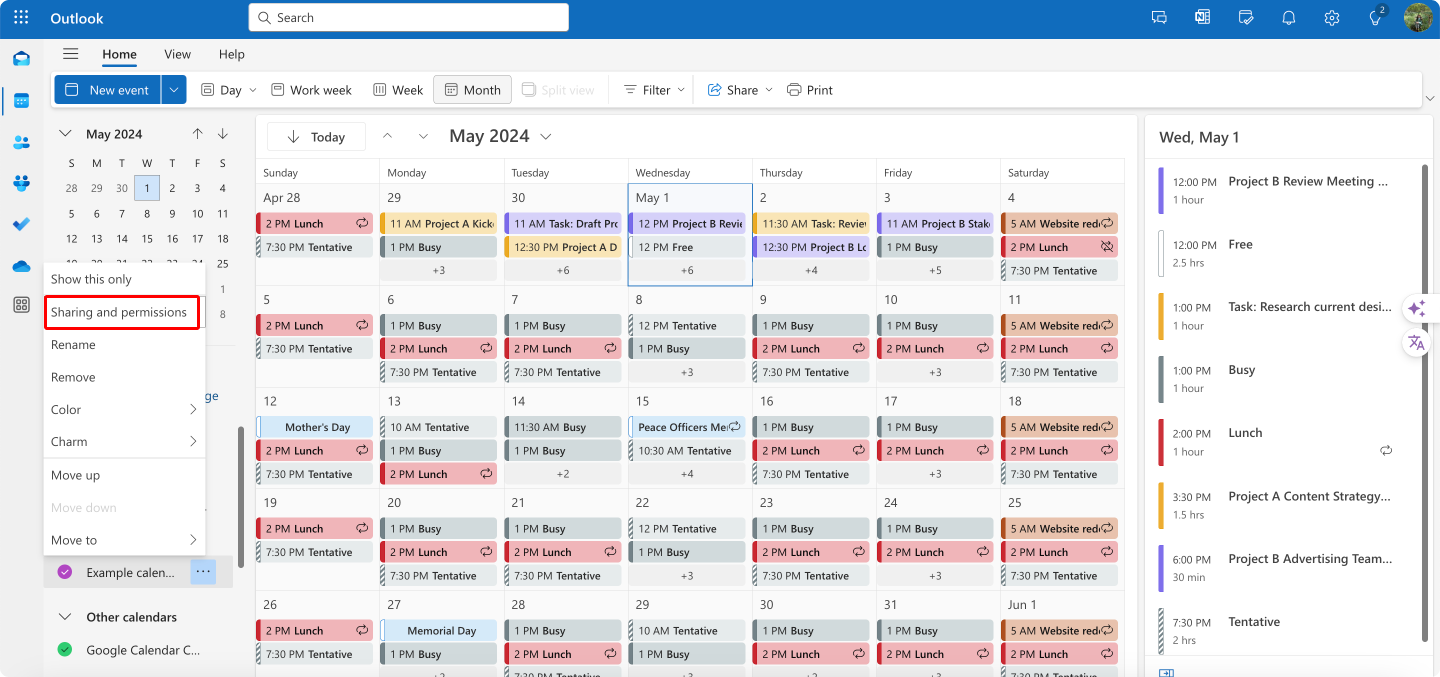
Pic. 15. Click on “Sharing and permissions” to share your calendar with an individual or a group.
- Enter the email addresses of the individuals or groups you want to share the calendar with and set the appropriate permissions.
👉 So, how do I create a shared calendar for multiple users in Outlook 365? In summary, to create a shared calendar in Outlook 365 on the web, log in to your M365 account and go to the Outlook app. Navigate to the calendar view by clicking on the calendar icon in the bottom left corner. Click on “Add Calendar,” and select “Create new calendar.” Name your calendar and click “Save.” After creating the calendar, right-click on it, select “Sharing and permissions,” and enter the email addresses of the users you want to share the calendar with. Set their permission levels (view, edit, etc.) and click “Share.”
Sharing Office shared calendar with external users
Microsoft 365 allows you to share your calendar with external users, making it easier to coordinate with partners, clients, and other stakeholders outside your organization. The sharing process is similar to the one described previously, so here’s a brief recap for reference:
- Open Outlook: Go to Calendar.
- Select the calendar to share: Right-click on the calendar (or on the three dots near it) and select “Sharing and permissions”
- Enter external email addresses: Enter the email addresses of the external users you want to share your calendar with.
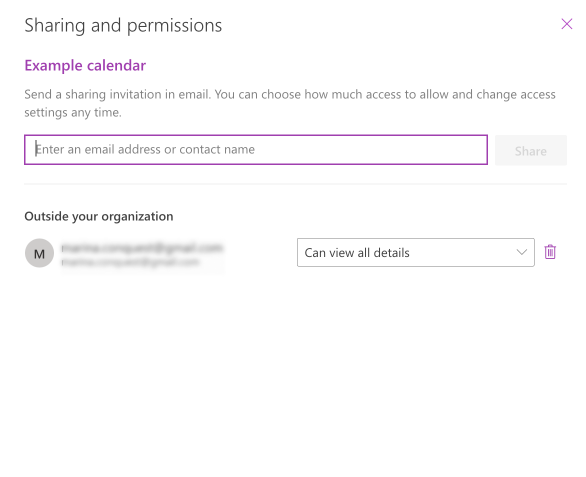
Pic. 16. Specify an addressee & permissions for your shared calendar.
- Set permissions: Choose the level of access you want to grant (e.g., view when I’m busy, view titles and locations, or edit if allowed by admin in your organization).
- Send the invitation: Click Send to share the calendar.
Considerations for external sharing of Office 365 shared calendars
When sharing your calendar with external users, it is crucial to consider privacy and permissions to maintain control over your data and prevent unauthorized access. Below’s a more detailed look at these considerations.
- Privacy: Sharing your calendar externally can expose sensitive information about your schedule, meetings, and other activities. It’s essential to protect this information to maintain confidentiality and prevent potential security risks. Some of the best practices for managing privacy include:
- Review calendar content:
- Before Sharing: Go through your calendar and ensure that no sensitive or confidential information is included in the events you plan to share. This includes meeting details, personal appointments, or any proprietary information.
- Ongoing Basis: Regularly review shared calendar content to ensure that new entries do not inadvertently expose sensitive information.
- Use descriptive titles carefully: Avoid using detailed descriptions or sensitive information in event titles or notes. Instead, use generic titles like “Meeting” or “Appointment” and provide details only in private notes or separate communications.
- Separate calendars: Consider using separate calendars for different purposes. For example, you could have one calendar for internal team activities and another for external appointments. This way, you can control what information is shared with external users more effectively.
- Mask sensitive information: When necessary, mask or generalize sensitive information in the calendar entries that will be shared. For instance, use “Client Meeting” instead of the client’s actual name or project details.
- Permissions: Permissions determine the level of access external users have to your calendar. Granting too much access can lead to unintentional data exposure or allow external users to make changes to your calendar, disrupting your schedule. Try adhering to the following best practices when setting permissions:
- Default to “View Only”: The safest option is to grant “view only” access when sharing your calendar with external users. This allows them to see your availability without accessing details or making changes to your events.
- Understand permission levels:
- Full details: Grants access to all event details, including subject, location, notes, and attachments. Use this sparingly and only for trusted collaborators who need detailed information.
- Limited details: Allows users to see the subject and location of your events but not the full details. This is a good middle-ground for sharing with external partners who need some context but not full access.
- Availability only: Shows whether you are free or busy without revealing any event details. This is the most secure option for sharing availability with external users.
- Tailor permissions to the user: Customize permissions based on the relationship and trust level with the external user. For example, a close business partner might need “Limited Details” access, while a client scheduling a meeting might only need “Availability Only.”
- Monitor and adjust permissions: Regularly review who has access to your calendar and what level of access they have. Adjust permissions as needed to ensure they align with current collaboration needs and privacy requirements.
While Microsoft 365 provides a solid calendar foundation, limitations exist in ease of use and customization. Yet by interconnecting best-of-breed apps like Virto Calendar, teams take scheduling and visibility to the next level. In the following section, we will explore how purposeful integrations on the Microsoft platform can optimize coordination beyond native tools alone.
👉 What is the best way to create a shared calendar in Office 365? The best method to create a shared calendar in Microsoft 365 depends on your specific needs and the size of your organization. For smaller teams or departments, using Outlook or shared mailboxes is recommended. For larger teams or company-wide calendars, SharePoint or public mailboxes are more suitable. For a comprehensive solution, consider using the Virto Calendar App, which enables overlaying multiple calendars into a single, unified view. For more information on Virto Calendar, refer to the next section.
Improve Your Microsoft 365 Calendar Collaboration Experience with Virto Calendar App
The Virto Calendar App is a powerful tool designed to streamline and enhance your calendar management within the Microsoft 365 ecosystem. The app allows users to overlay multiple calendars from Microsoft Exchange Online, SharePoint Online, and even external sources like Google Calendar. This aggregation capability ensures that all meetings, events, and tasks are visible in one centralized calendar view, which can be accessed directly within Microsoft Teams or SharePoint Online. The app supports various views such as day, week, month, and custom Gantt charts, enhancing its versatility for project management and daily planning. Integration with Microsoft Teams adds another layer of functionality, allowing users to create and manage Teams meetings directly from the calendar interface. This seamless integration ensures that updates are synchronized in real time across all platforms, keeping every team member on the same page without the need to switch between applications.
Here’s how Virto Calendar can help you create and share calendars within Microsoft 365:
- Centralized calendar management: Virto Calendar allows you to overlay multiple calendars from different sources (Exchange Online, SharePoint, Google, etc.) into a single, unified view. This facilitates easier management and sharing of calendars across your organization.
- Color-coding and customization: You can categorize and color-code events and calendar sources, making it easier to distinguish between different types of activities and their origins. This visual differentiation helps in quickly identifying and managing events.
- Integration with Microsoft Teams: You can add the Virto Calendar as a separate tab in Microsoft Teams, enabling real-time updates and access to calendar functionalities directly within your Teams channels. This integration enhances collaboration by providing a shared calendar view for team members.
- Mobile access: The app supports usage on most smartphones and tablets, allowing you to manage and share calendars on-the-go. This ensures that team members can stay updated and synchronized regardless of their location.
- Security: Virto Calendar guarantees complete security for both corporate and personal data, ensuring that your shared calendars are protected against unauthorized access.
- Recurring events and iCal feeds: The app supports recurring events and the addition of iCal feeds, allowing you to include external calendar data. This feature is useful for integrating various calendar sources into a single view.
A brief note on safety and security
Integrating third-party applications into the Microsoft 365 environment can present significant security challenges, particularly when it comes to data storage and protection. While Microsoft native apps store information exclusively on Microsoft servers, third-party apps often use a dual storage system, which can raise concerns for organizations with stringent security protocols. To mitigate these risks, it is crucial to use solutions from trusted Microsoft partners like VirtoSoftware. The Virto Calendar App operates entirely within the secure environment of Microsoft 365, ensuring that all data remains protected under Microsoft’s robust security protocols.
Use cases for teamwork and cross-team collaboration
Virto Calendar’s deep integration with Microsoft 365, along with features like color-coding, mobile access, and support for multiple calendar sources, makes it ideal for improving teamwork and cross-team collaboration in various use cases such as:
- Project management
- Timeline visibility: By overlaying project timelines and milestones from different sources, project managers can get a comprehensive view of the project schedule. This helps in tracking progress and identifying potential delays.
- Task deadlines: Integrate task lists from Microsoft Planner and SharePoint to ensure that all project deadlines are visible in one place. This helps in better coordination among team members.
- Meeting scheduling: Create and manage project meetings efficiently. The ability to launch Teams meetings directly from the calendar simplifies the process of organizing project discussions.
- Resource management
- Resource allocation: Use the calendar to manage the availability of resources such as meeting rooms or equipment. The color-coding feature helps in quickly identifying booked and available resources.
- Shared resource view: Overlay calendars from different departments to get a unified view of resource usage. This helps in avoiding double bookings and optimizing resource utilization.
- Location field support: The app supports adding locations to calendar entries, making it easier to manage resource locations and ensure proper allocation.
- Event planning
- Event coordination: Combine various calendars to coordinate events across different teams and departments. This ensures that there are no scheduling conflicts and all participants are available.
- Public folder calendar: Add public folder calendars to the Virto Calendar to share event information widely within the organization, ensuring everyone is informed about upcoming events.
- Customizable views: Use different views such as daily, weekly, monthly, and Gantt chart to plan and manage events effectively.
- Team planning
- Shared team calendars: Create shared calendars for teams to track meetings, deadlines, vacations, and other important events. This ensures everyone is on the same page and improves team coordination.
- Real-time updates: Provide real-time updates to team members via the Microsoft Teams integration, ensuring that any changes to the schedule are immediately communicated.
- Mini calendar feature: Use the Mini Calendar feature for a compact view of all events, making it easy for team members to get a quick overview of their schedules.
Community Tips on Creating & Sharing Office 365 Company Calendars
Although we shared several tips, tricks, best practices, and solutions to common challenges related to Office shared calendars earlier in the article, we also reached out to the community to gather additional recommendations based on their experiences within the Microsoft 365 ecosystem. Here’s what we discovered:
Unifying tasks and events for enhanced productivity: Microsoft To Do + Outlook
Pierce Hogan, owner of Varied Lands, shares how integrating Microsoft To Do with Outlook Calendar helped him optimize productivity by consolidating his schedule.
“The main challenge I encountered was ensuring all my task reminders were visible alongside scheduled meetings,” he explains. Hogan solved this by connecting the two tools to enable a unified calendar view.
As he states: “Integrating Microsoft To Do with my Outlook Calendar allowed me to see all tasks and events in one unified view.”
Commenting on best practices, Hogan advises: “For best results, regularly update your task lists in Microsoft To Do and utilize the reminder and due date features.” Doing so prevents things from falling through the cracks.
He summarizes the key benefit of consolidation, noting it “helps maintain productivity by keeping all priorities in view” no matter your device or location.
Streamlining scheduling across time zones with Microsoft Bookings
Sam Browne, Founder of Findaband, shares how he optimized Microsoft Bookings to consolidate scheduling and client management.
“It integrates seamlessly with Outlook and Teams, letting clients book appointments directly. This reduces back-and-forth emails and streamlines our processes,” Browne explains.
Commenting on a key challenge, he notes: “One challenge is handling time zone differences. When working with international clients, coordinating appointments across different time zones can be tricky.”
To address this, Browne configures Bookings settings to display localized times. As he advises: “Configuring Bookings to show clients’ local times helps mitigate this issue.”
In terms of best practices, Browne recommends: “Customize your booking page. Set clear availability times and buffer periods to avoid overlaps. Regularly update and sync calendars to maintain accuracy.” Automated reminders also prove useful for reducing no-shows.
On the security front, he adds: “To effectively share calendars, use specific permissions for internal and external users. This keeps sensitive information secure while ensuring everyone has access to what they need.”
By consolidating platforms and customizing settings, Browne has optimized his agency’s scheduling coordination across global teams, providing a great example of overcoming calendar fragmentation.
Driving user adoption for seamless Microsoft 365 calendar integration
Martin Woods, Head of SEO at Indigoextra, provides best practices for optimizing Microsoft 365 calendars across an organization.
He first notes common obstacles, stating: “Challenges may arise in seamless integration across platforms, user adoption, and effective collaboration with external parties.”
To promote adoption, Woods advises: “ensure consistent synchronization between Outlook, Teams, and SharePoint, and provide comprehensive user training to maximize adoption.”
Formalizing workflows is also key per his guidance: “Implementing clear guidelines for calendar creation, usage, and sharing within the organization…can enhance collaboration with external users.”
Commenting on security, he says: “Utilizing Microsoft’s robust security features will also safeguard sensitive information.”
Woods ties it together, concluding: “Overall, fostering a culture of efficient calendar management and communication will optimize the use of these tools within and beyond the organization.”
By emphasizing user enablement, policy clarity, platform alignment and security protocols, Woods provides a comprehensive blueprint for organizations to maximize Microsoft 365 calendars. His insights can inform change management plans to ensure solutions realize intended ROI through broad adoption.
Enhancing team collaboration with Microsoft OneNote
Roman Zrazhevskiy, CEO of MIRA Safety, leverages deep Microsoft 365 expertise to recommend OneNote for optimizing team coordination.
As he explains, “OneNote allows seamless integration with Outlook, making it easier to organize meetings and set reminders directly from your notes. You can link OneNote pages to specific calendar events, keeping all relevant information in one place.”
On driving adoption, he notes a common pitfall: “One major difficulty is ensuring all team members consistently update their schedules.”
Zrazhevskiy’s advice? “I recommend setting clear guidelines for calendar management and utilizing shared notebooks for real-time updates. Regular training sessions can also help ensure everyone is on the same page.”
In terms of implementation, he suggests: “Create centralized notebooks with section tabs for different projects or teams. This allows both internal and external stakeholders to access relevant information easily.”
Control is still important as he highlights: “Using OneNote’s sharing features, you can control access and maintain privacy where needed.”
With deep Microsoft integration and collaborative workflows, Zrazhevskiy demonstrates OneNote’s power to synchronize teams by consolidating information streams. His guidance provides a model to maximize this potential and get everyone’s schedules—and priorities—aligned.
Best practices for optimized Microsoft 365 calendar management
Gregory Shein, owner of NOMADIC SOFT, shares proven strategies for streamlining team coordination leveraging Microsoft 365’s built-in tools.
As Shein explains, “Using Outlook, Teams, and SharePoint, we have streamlined our scheduling and collaboration.” However, he notes “occasional syncing issues and managing permissions for shared calendars” as key challenges.
To address these pain points, Shein recommends “ensuring all users are trained on proper calendar settings and using integration tools like Microsoft Power Automate for seamless updates.”
Formalizing workflows is also crucial: “Establish clear guidelines on calendar naming conventions and access permissions. Utilize Teams for real-time updates and SharePoint for organization-wide visibility.”
For secure external collaboration, Shein advises leveraging “Outlook’s sharing options with appropriate security settings to maintain data integrity.”
By emphasizing adoption, integration and policy, Shein provides an actionable blueprint for organizations to align distributed teams through Microsoft 365’s versatile calendar toolset while safeguarding sensitive data.
Aligning distributed teams with Yammer-calendar integration
Managing logistics across a distributed, traveling team poses immense coordination challenges. Tim White, Founder of corporate travel specialist Milepro, relies extensively on Microsoft 365’s calendar and Yammer integrations to align scheduling across stakeholders. As he explains:
“Microsoft 365’s calendar integrates seamlessly with Yammer, enhancing team collaboration. We can schedule events directly within Yammer, ensuring all relevant members are informed and can participate. This integration simplifies coordination, especially for large teams. For frequent travelers, this is a great way to keep everyone on the same page.”
By centralizing travel planning and calendars within collaborative tools like Yammer, teams stay aligned despite regular disbursements.
However, White cautions that inconsistent manual syncs can still derail workflows, noting:
“However, syncing issues can occasionally arise, leading to missed updates. It’s crucial to regularly check and manually sync calendars if necessary to avoid such problems.”
Reinforcing consistent calendar hygiene is thus critical, as he continues:
“For optimal use, consistently communicate the importance of these tools to your team. Encourage regular updates and reviews of shared calendars. Setting a weekly review session can help everyone stay aligned.”
Finally, selective external sharing maintains oversight even when coordinating with external partners:
“For external collaboration, leverage Microsoft 365’s secure sharing options. This allows you to maintain control over who can view and edit calendar events, ensuring data security. It’s particularly useful for sharing schedules with external stakeholders.”
With deliberate adoption, Microsoft 365’s collaborative calendar features can streamline coordination for teams on the move, transforming scattered schedules into aligned action.
Conclusion on creating a shared calendar in Office 365
In this article, we’ve explained essential methods for creating and sharing Microsoft 365 calendars. We’ve explored three primary approaches: setting up a group calendar in SharePoint, which is ideal for teams needing a collaborative space to manage schedules collectively; creating a public mailbox, which serves larger enterprises requiring a centralized scheduling system accessible to a broad audience; and establishing a shared mailbox, suited for small businesses seeking an efficient way to manage shared appointments and tasks.
Additionally, we covered the process of creating and sharing Microsoft 365 calendars using Outlook, detailing the steps to set up group calendars, manage permissions, and ensure seamless integration with other Microsoft 365 tools. These methods are pivotal in maintaining organizational harmony and enhancing visibility across teams.
For those seeking an alternative solution for working with calendars, the Virto Calendar App offers a robust option. The app allows users to overlay multiple calendars into a unified view, simplifying the management of various schedules. Interested readers can try the Virto Calendar for free or request a demo to explore its features further.
To deepen your understanding of managing calendars in Microsoft 365, we encourage you to explore additional resources:
- “Create a Shared Calendar in Outlook” & “Practical Guide to Managing Multiple M365 Calendars”
- For a broader perspective on optimizing teamwork, visit our Collaboration Blog.
- For specific information on SharePoint calendars, you can refer to our detailed guide, “Everything You Should Know About SharePoint Calendar.”
- Additionally, Microsoft’s official documentation offers valuable guidance on sharing calendars and contacts, which can be found here.
- Finally, for a visual walkthrough of creating a shared calendar in Office 365, the official Microsoft support video is an excellent resource, available here.
References:
- Stats from Statista.