Keeping organized is crucial for your team to stay productive. This can be achieved by a skilled manager whose experience is backed up by a well-structured calendar. SharePoint Online delivers an adaptable calendar that is designed to blend effortlessly into your organization’s workflow. This easy-to-follow guide will show you how to add and adjust a SharePoint Online calendar and how to dramatically improve its level of customization with a third-party app.
Overview of SharePoint Online
SharePoint Online is a cloud-based platform designed for collaboration and document management. It allows organizations to create an intranet – a user-friendly portal for their company. Teams can also manage content and store and share information with their colleagues in a secure SharePoint environment.
One of the essential features of SharePoint is the calendar, which is invaluable for team collaboration. By setting up a calendar within SharePoint, team members can access events, plans and deadlines from a central location, making it easier to stay aligned with colleagues and team-wide goals. SharePoint also integrates with third-party apps that allow you to infinitely customize the calendar and other tools within the ecosystem.
In this article, we’ll guide you through the process of adding and customizing a calendar in SharePoint Online.
Adding a SharePoint Calendar
For the SharePoint modern view, follow these steps:
Navigate to the SharePoint site page and click the pencil icon in the upper right corner.
Hover over the site field and click the “+” sign that will appear.
Search for the “Events” web part and add it to your page.
Click on the newly added web part. You will see the pencil icon – click it to enter edit mode.
Adjust the web part by choosing the events list you want to display in your calendar. Exit edit mode by clicking “Х” in the upper right corner.
Click “Republish” in the upper right corner to make the changes appear on your SharePoint site page.
You can find full instructions on how to add a SharePoint calendar for both classic and modern views, including screenshots and a video, in our article here.
Want to add or remove a SharePoint calendar to or from Outlook? Check out this article that provides step-by-step instructions on how to do it in no time.
If you wish to personalize your calendar experience further, try Calendar Overlay Pro now by accessing an instant trial.
Customization
Here are some of the customization options available for your SharePoint calendar.
- Adding fields
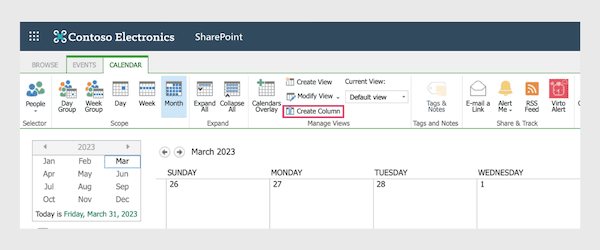
To add fields to your calendar, go to your SharePoint site and click on the calendar you’d like to customize. In the ribbon, click “Calendar,” then click “Create Column” to add a new field.
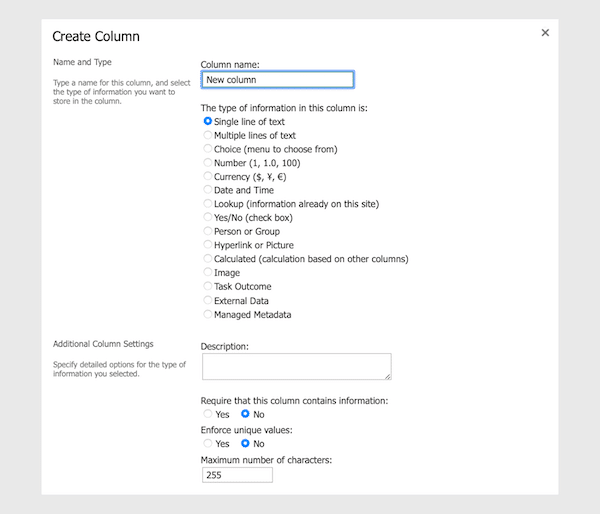
Enter a name for the column, choose the column type, and configure additional settings if necessary. Then click “OK” to finish.
- Changing views:
In the top menu, you can select the view mode of the current calendar—you can use “Day Group” or “Week Group” to see your team members’ schedules, or you can choose a regular day, week, or month view. Just click the view you want and the calendar will change to that view.
From the drop-down menu “Current View,” you can also choose the type of events to display in the calendar.

You can change the format of the data completely using “Create View” in the “Manage Views” subsection. There are several views that you can choose for the list on which your calendar is based:
- Standard view (as a list)
- Standard with expanded recurring events
- Calendar view
- Datasheet view
- Gantt view
- Map view
In the advanced settings (“Modify View”), you can edit the view by choosing a time interval to display, specifying calendar columns to be viewed, choosing a default scope for the view, filtering items to be shown in the views, and adjusting mobile settings.
Check out our detailed article on all possible SharePoint calendar views and how to create and customize them.
- Configuring alerts:
To configure alerts, go to the calendar you want to customize. In the ribbon, click “Calendar,” then click “Alert Me.” Click “Set alert on this list” to open the alert settings.

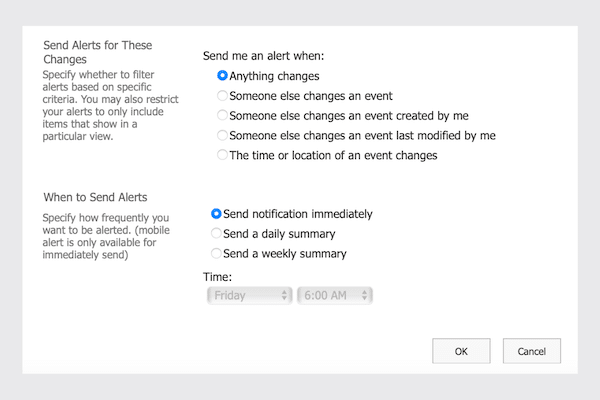
Here you can configure settings such as alert title, recipients, delivery method, and the type and frequency of notifications.
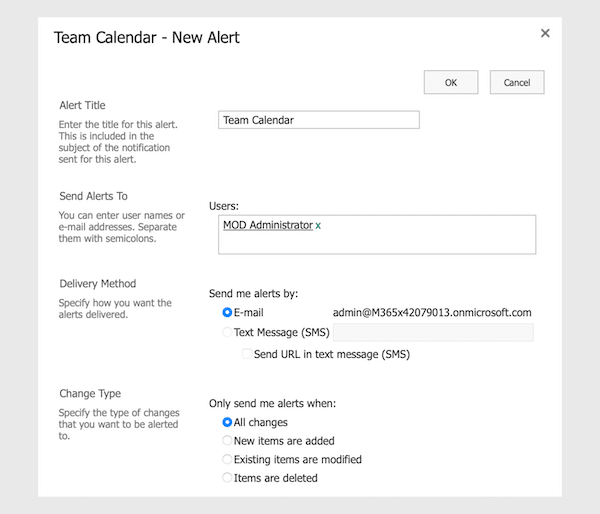
Click “OK” to save your settings.
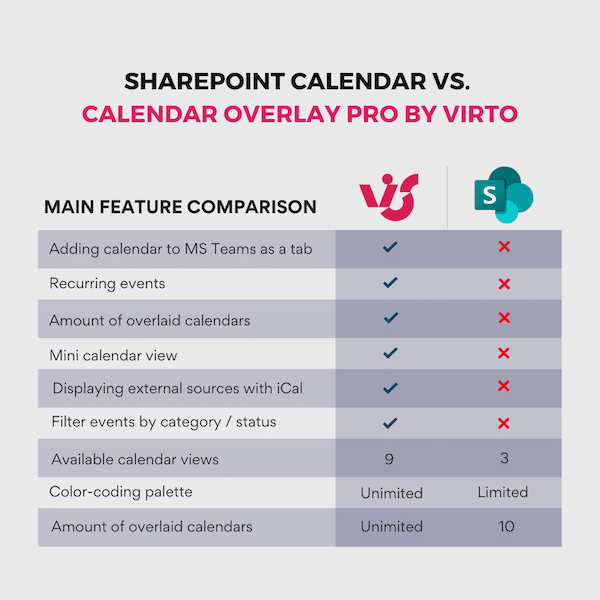
If you need more advanced customization features for your SharePoint calendar such as
- color-coding
- highly customizable alerts and notifications
- overlaying calendars
- adding calendars from other sources using iCal
- displaying Exchange calendars in SharePoint Online
- recurring events
- a mini calendar view on your SharePoint site
and generally rich customization capabilities, try Calendar Overlay Pro by Virto – find our quick start guide here.
Overlay all your calendars in one place
Try Virto Calendar to have all your Microsoft 365 calendars in a unified view.
Benefits of Using a SharePoint Calendar
The advantages of using a SharePoint calendar and the SharePoint ecosystem in general stem from its seamless integration with the Microsoft 365 suite. And that includes:
- native synchronization with other Microsoft apps such as Outlook, Microsoft Teams, and Microsoft Planner, ensuring a consistent and unified experience
- the numerous tools and components that can be synced with the calendar and used within the ecosystem
- the high level of customization, such as adding custom fields, modifying views, and setting up alerts
- permission management and the high level of security that many organizations require
- improved collaboration between teammates thanks to the variety of tools and integrations that have been created with this in mind, like Microsoft’s recent addition, Loop
Adding and Customizing Calendars in SharePoint
As a trusted provider of SharePoint apps and web parts, we offer powerful tools like Calendar Overlay Pro that will enhance your organization’s collaboration. With this app, you can effortlessly add and customize calendars in SharePoint thanks to its user-friendly interface and advanced features. Here’s what makes Calendar Overlay Pro stand out:
Seamless integration: smooth integration with Microsoft 365 allows you to add and manage calendars directly within your SharePoint environment.
Comprehensive customization options: tailor your calendars to your team’s specific needs. Set up alerts and notifications, create recurring events, and design a highly personalized color-coded calendar or group calendar (for example, an integrated marketing calendar).
Multiple calendar sources: display calendars from various sources, such as Microsoft Exchange, Google Calendar, or any other iCal source, to create a consolidated view of all events.
Improved collaboration: our solutions are designed to foster teamwork, making it easier for your colleagues to share events, stick to deadlines, and track milestones.
Begin an instant trial to explore all these features right now.
Conclusion
Judging by the short and simple instructions on how to set up a SharePoint Online calendar, we can say that this tool is a straightforward and effective way to improve collaboration and productivity within your crew. With its seamless integration and user-oriented interface, SharePoint calendars can be easily tailored to fit your business needs.
For those looking to further enhance their SharePoint calendar experience, Calendar Overlay Pro offers a powerful suite of handy features and customization opportunities. Start a free trial today, and create a highly efficient work environment that drives your business toward success.
Have a question? Talk to our sales team
We’re here to help guide your journey!